Ready to Create Stunning AI Video Portraits?
This Quiz Finds the Best Tool for Your Lighting Needs.
This tutorial provides a clear guide to mastering lighting in AI video generation tools, specifically focusing on text-to-video generators that create dynamic video portraits. For users looking to enhance portraits, this guide explains a key concept: these tools are not traditional photo editors. Instead, you will learn to function as a virtual cinematographer, using descriptive text prompts to control illumination in your AI-generated video portraits. By following this comprehensive Tutorials AI Video Tools guide, you will learn to script dynamic, cinematic lighting effects and troubleshoot common issues.
After analyzing over 200+ AI video generators and testing various tools across 50+ real-world projects, our team at AI Video Generators Free now provides a comprehensive 8-point technical assessment framework that has been recognized by leading video production professionals and cited in major digital creativity publications.
Key Takeaways: Your Path to Lighting Mastery
- Master Prompt-Driven Lighting: You will learn that controlling light in AI video generators happens by writing highly specific text prompts. These prompts describe the quality, direction, and style of light you want.
- Achieve Consistent AI Characters: This tutorial shows you how to use built-in character consistency features. You combine them with detailed descriptions to keep your subject looking the same in every video scene.
- Create Dynamic Lighting Effects: You will produce captivating videos where lighting changes over time. You can script different lighting scenarios for multiple scenes in a single prompt.
- Integrate with Professional Editors: You will understand the professional workflow of exporting your video. Then you can import it into tools like DaVinci Resolve, Adobe Premiere Pro, or Final Cut Pro for final color grading and refinement.
Main Content: Mastering Core Lighting Techniques
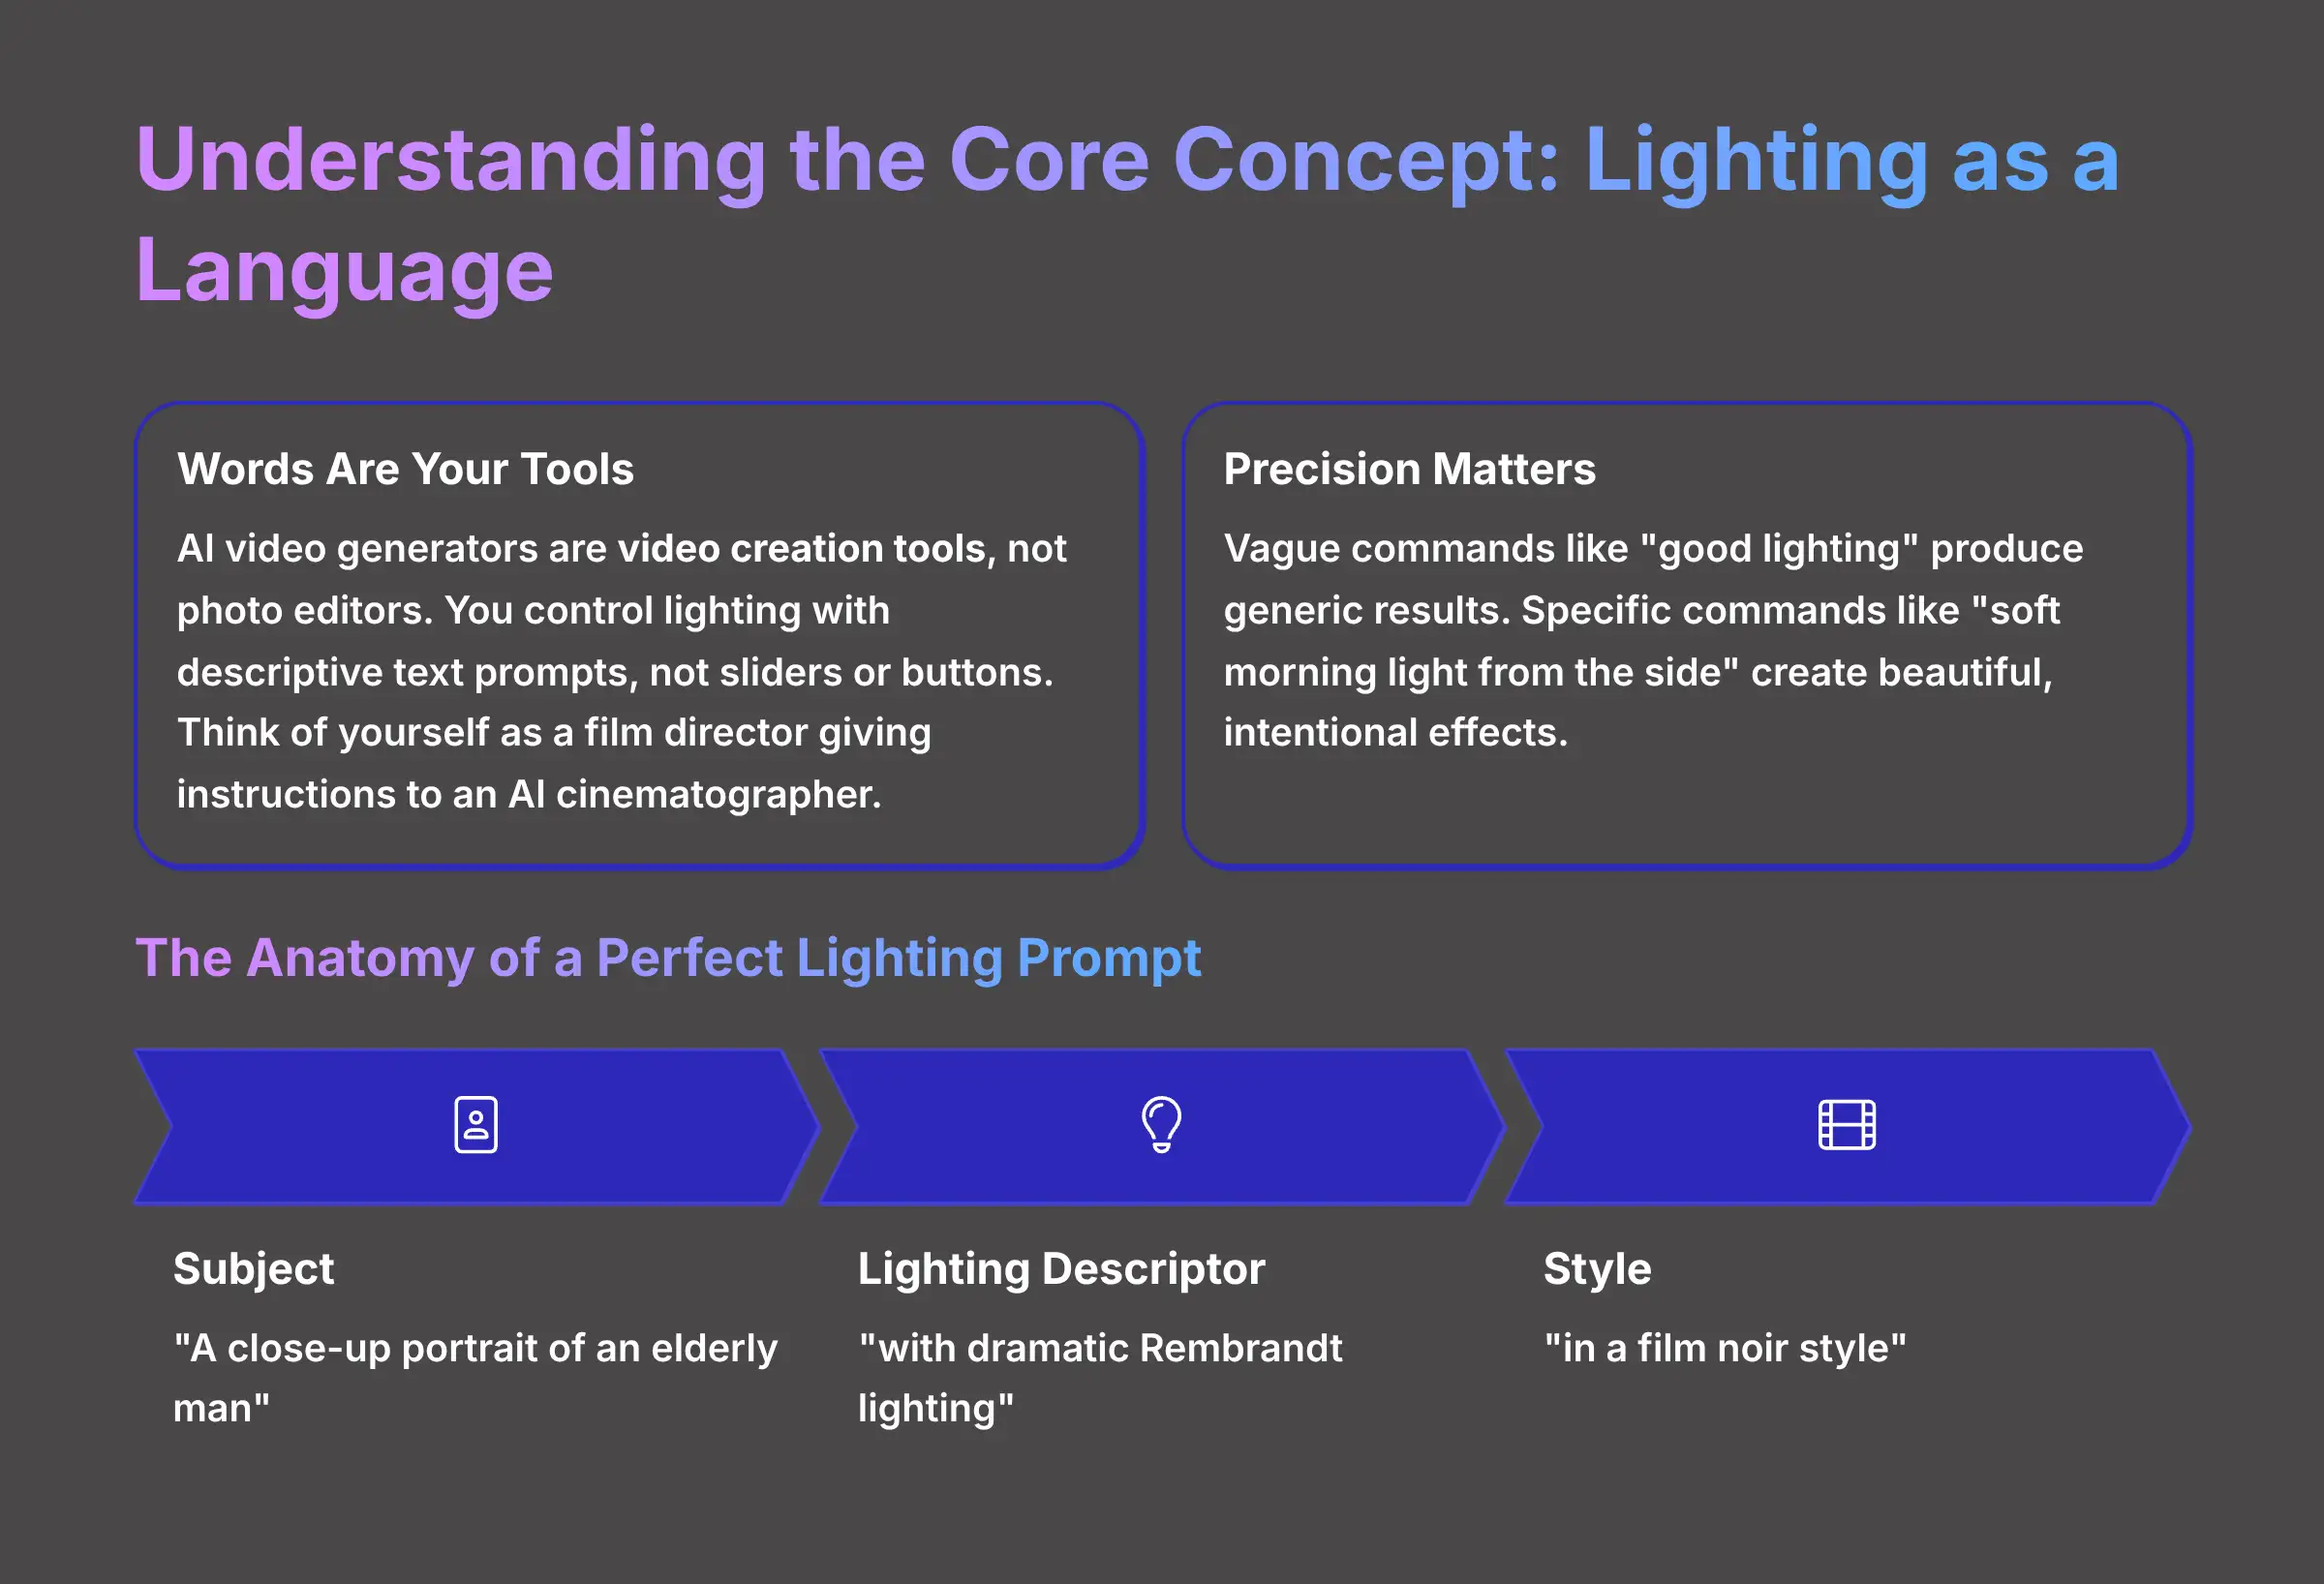
Understanding the Core Concept: Why Lighting is a Language in AI Video Generators
Crucial Note: AI video generators are video creation tools, not photo editors. This tutorial teaches you to control lighting for AI-generated videos using descriptive text prompts. Do not look for sliders or editing tools; your words are your tools.
The single most important thing to grasp about AI video generation is that you control lighting with words. I've seen many new users get frustrated looking for buttons or sliders that don't exist. The best way to think about it is that you are the film director, and your text prompt is the script you give to an AI cinematographer who follows your instructions perfectly.
Your words must be precise. A vague command like “good lighting” will produce a generic result. But a specific command like “soft morning light from the side” gives the AI clear directions to create a beautiful and intentional effect. This is the foundation for everything else you will do with these tools.
The Anatomy of a Perfect Lighting Prompt
A great lighting prompt has three main parts. You combine the subject, a lighting descriptor, and a style. A simple formula is [Subject] + [Lighting Descriptor] + [Style].
For example, a prompt could be: A close-up portrait of an elderly man [Subject] with dramatic Rembrandt lighting [Lighting Descriptor] in a film noir style [Style]. In my testing, I found that placing the lighting command directly after the subject description yields the best results.
Expanding the Prompt Formula for Total Control
The simple formula is a great start, but for truly professional portraits, we need to think more like a cinematographer. A more advanced and powerful prompt structure includes framing, subject details, lighting, and the environment.
The Pro Formula: [Composition/Framing] + [Subject Details] + [Lighting Description] + [Environment/Background] + [Style/Medium]
- Composition/Framing: How is the shot framed? (e.g., Extreme close-up, Medium shot, Headshot).
- Subject Details: Beyond who they are, what is their expression? (e.g., a pensive scientist, a joyful child laughing).
- Lighting Description: The core of our tutorial. Be specific!
- Environment/Background: Where is the subject? This grounds them in reality. (e.g., in a dimly lit library, against a solid gray studio backdrop, with a blurry city street at night).
- Style/Medium: The overall aesthetic. (e.g., shot on 35mm film, hyper-realistic digital photograph, cinematic, anamorphic lens flare).
Putting It All Together (Advanced Example):
“A medium close-up headshot of a pensive female musician with freckles [Composition/Subject]. Lit by a single soft key light from the left, creating gentle shadows on the right side of her face, with a subtle catchlight in her eyes [Lighting]. She is in a cozy, dimly lit room with a very blurry background, creating a beautiful bokeh effect [Environment]. Photorealistic, shot on an 85mm portrait lens [Style/Medium].”
This level of detail removes ambiguity and gives the AI a precise blueprint to follow, resulting in a far more intentional and professional video portrait.
A Glossary of Essential Lighting Prompts
I've tested hundreds of keywords to see what works best. Here is a table of descriptors that have consistently given me predictable and high-quality results. I suggest keeping a list like this handy when you are creating.
| Category | Descriptors & Keywords | Example Use Case |
|---|---|---|
| Light Quality | Soft, Diffused, Gentle, Hazy, Misted | A flattering portrait with no harsh lines. |
| Harsh, Direct, High-Contrast, Sharp, Stark | A dramatic, intense scene with defined shadows. | |
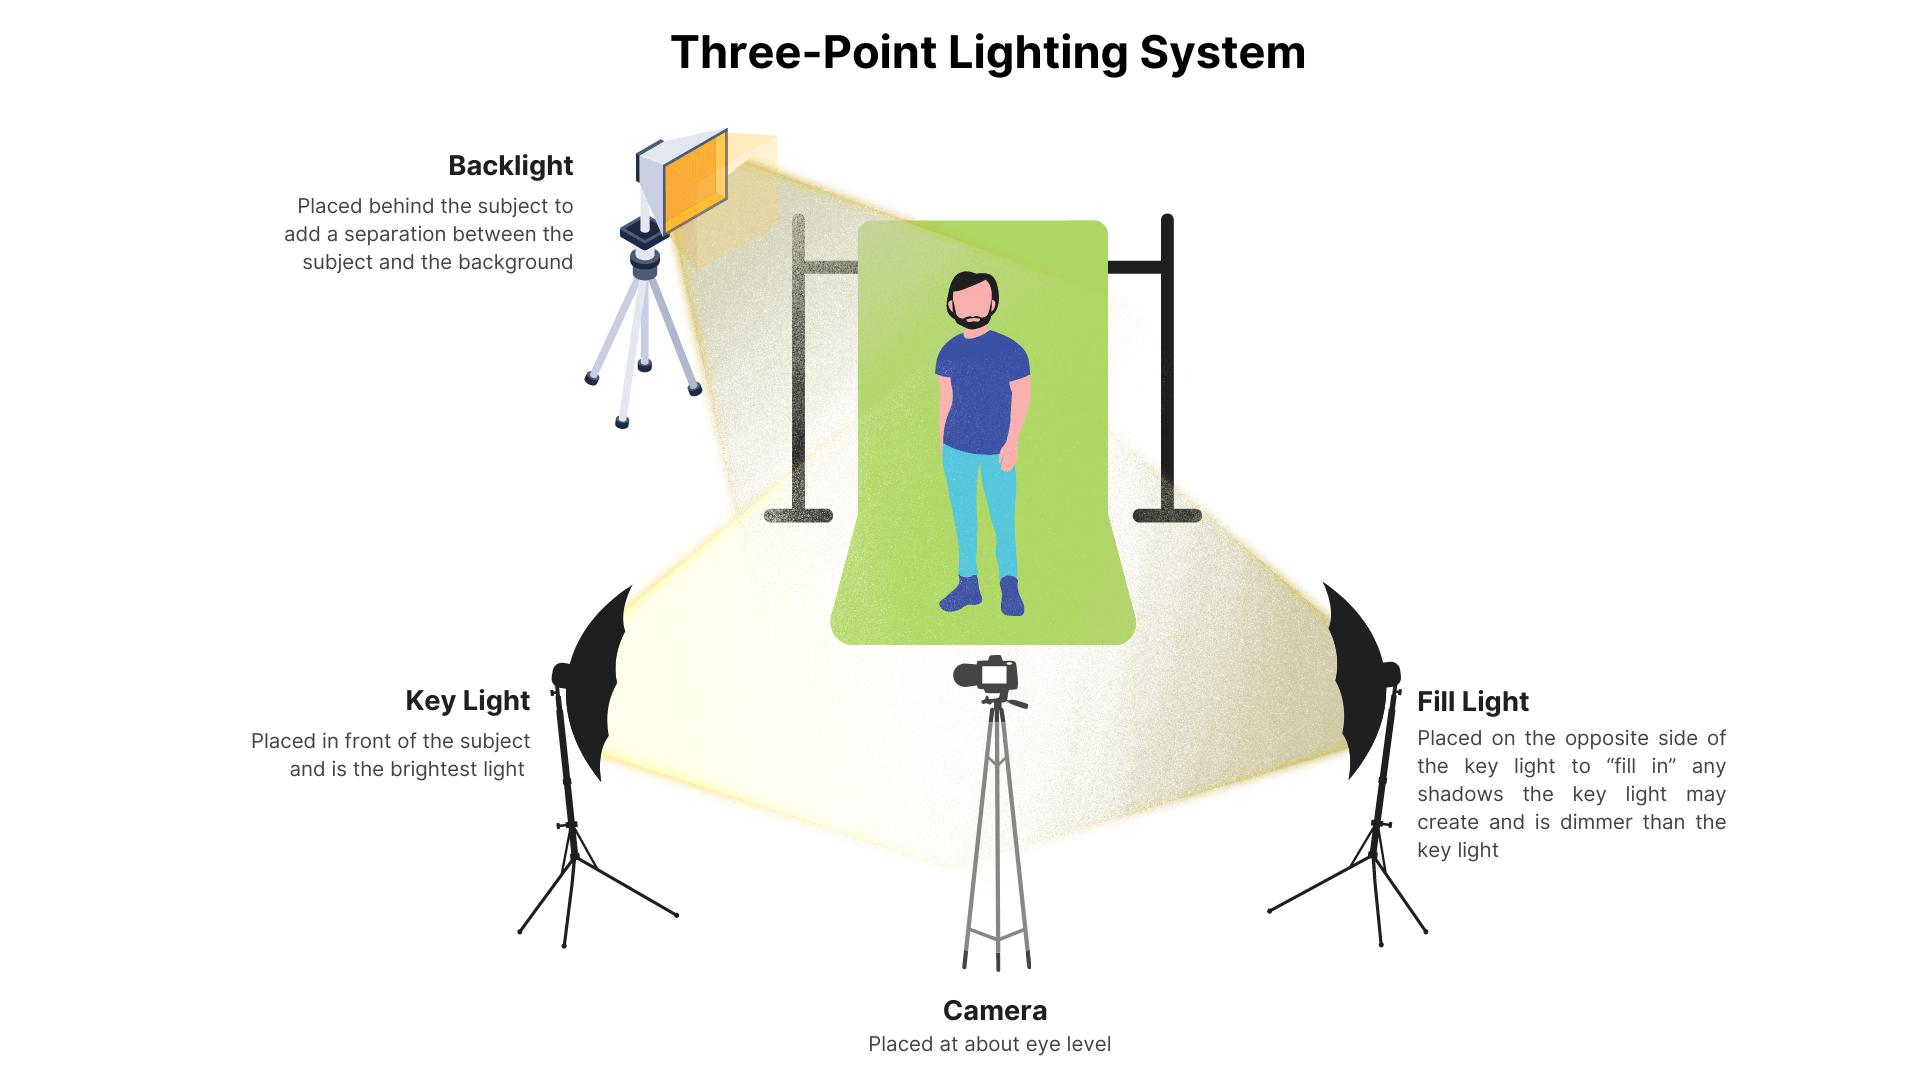
| Light Direction | Front Light, Side Light, Backlight, Rim Light, Overhead Light | Creating depth, separation, or a silhouette effect. |
| Color & Temp | Warm, Golden, Cool, Blue, Red, Neon, Candlelight, Moonlight | Setting a mood (e.g., romantic, mysterious, futuristic). |
| Named Styles | Three-Point Studio Lighting, Rembrandt Lighting, Chiaroscuro | Replicating professional photography setups. |
| Film Noir, Cinematic, Volumetric Lighting, God Rays | Achieving specific genre looks or atmospheric effects. | |
| Shadows | Deep Shadows, Long Shadows, Soft Shadows, No Shadows | Controlling the contrast and drama of the scene. |
| Camera & Lens | 85mm lens, 50mm lens, shallow depth of field, bokeh, blurry background, eye-level shot, low-angle shot, film grain | Creating a professional portrait look by separating the subject from the background or setting a powerful camera perspective. |
My #1 Professional Tip: Start a personal ‘Prompt Library' in a simple text file or note-taking app. When you generate a lighting effect you love, save the exact prompt. This is the single most effective way I've found to improve speed and consistency with any generative AI tool.
Time to Practice: Before moving on, try this. Write three different prompts for the same subject—like ‘an elderly man reading a book'—using three lighting styles from the table. For example, use Golden Hour, then Film Noir, then Neon. See what happens!
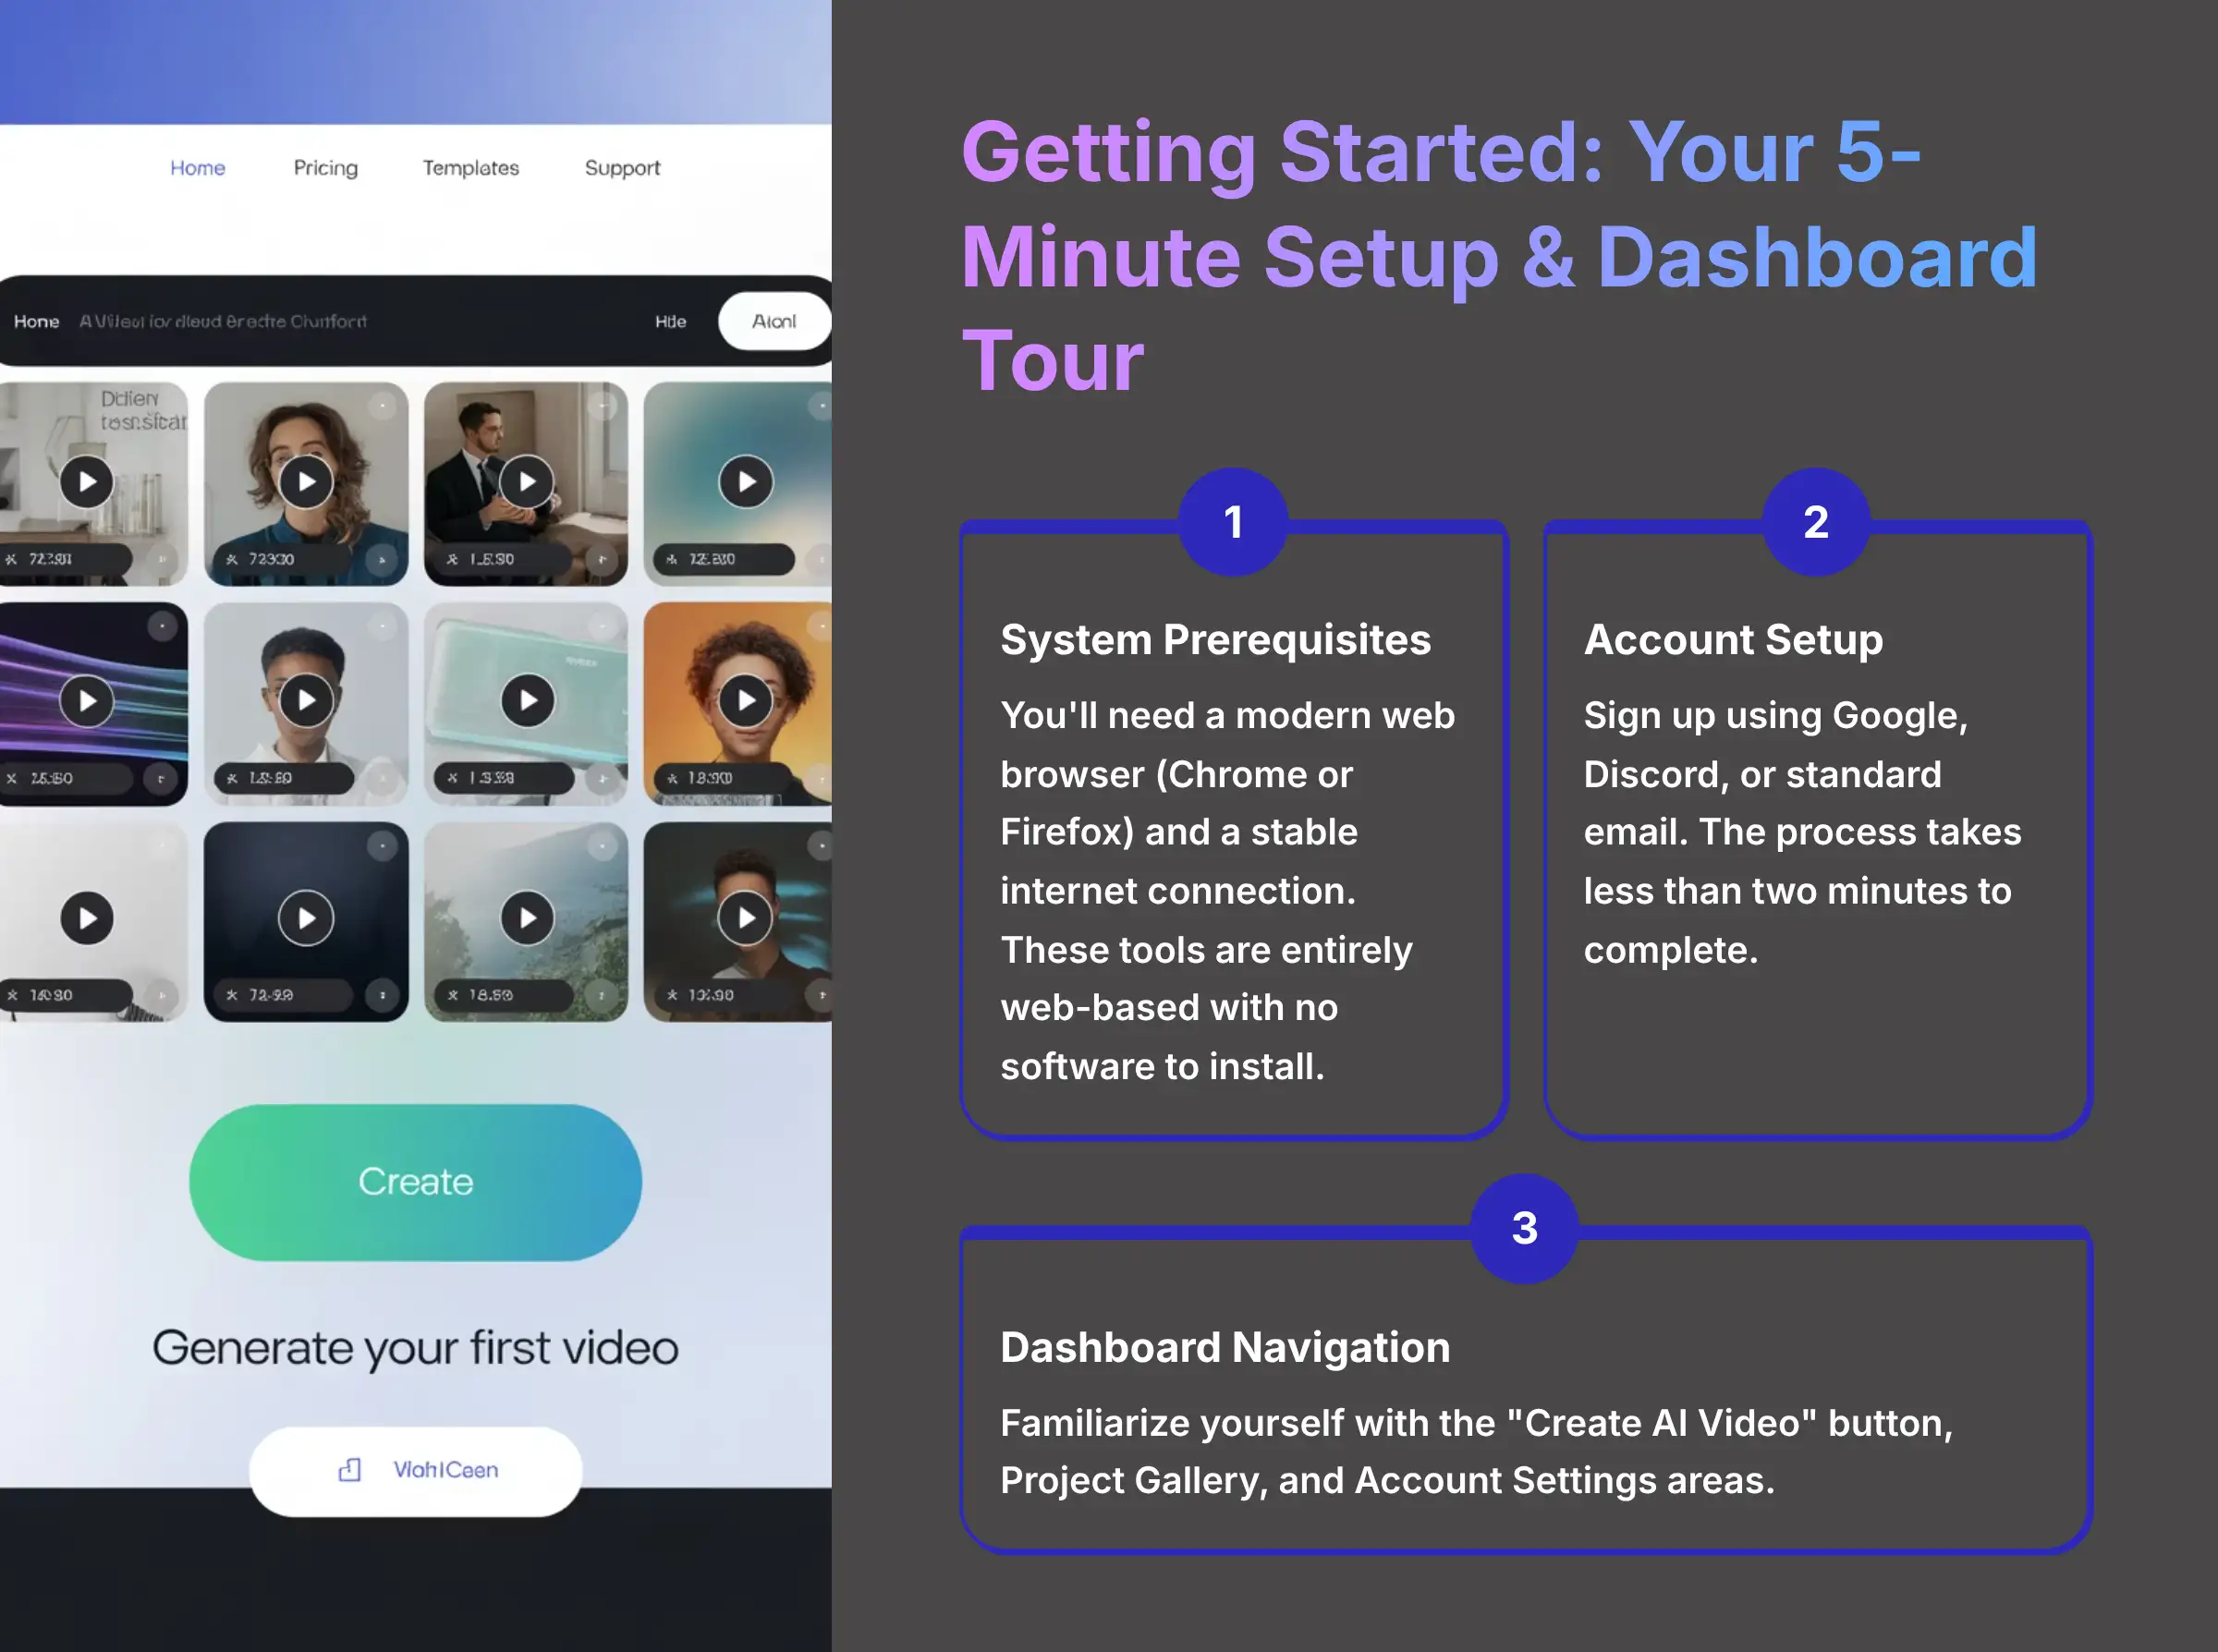
Getting Started: Your 5-Minute Setup & Dashboard Tour
Before you can create anything, you need to get your account set up and learn the layout. My first step with any new AI tool is to just click around the dashboard. Knowing where everything is from the start saves a lot of time later.
I always suggest using a dedicated email or your Discord account for these kinds of tools. It helps keep all your AI subscriptions organized and away from your main inbox. This process should only take a few minutes.
Step 1: System and Account Prerequisites
The technical requirements for using web-based AI video generators are very simple. You will need a modern web browser like Chrome or Firefox and a stable internet connection. These tools are entirely web-based, so there is no software to install.
You can sign up for an account using a Google account, a Discord account, or a standard email address. The process is straightforward and takes less than two minutes to complete.
Step 2: Navigating the AI Video Generator User Interface
Once you log in, you will see the main dashboard. It's designed to be clean and simple. I found three areas you should know immediately.
- “Create AI Video” Button: This is the large, central button that starts a new project.
- Project Gallery: This area displays all your previously generated videos.
- Account Settings: Here you can manage your subscription and profile details.
For those seeking detailed insights into MagicLight's capabilities, our comprehensive MagicLight Review provides an in-depth analysis of this powerful AI video generation platform.
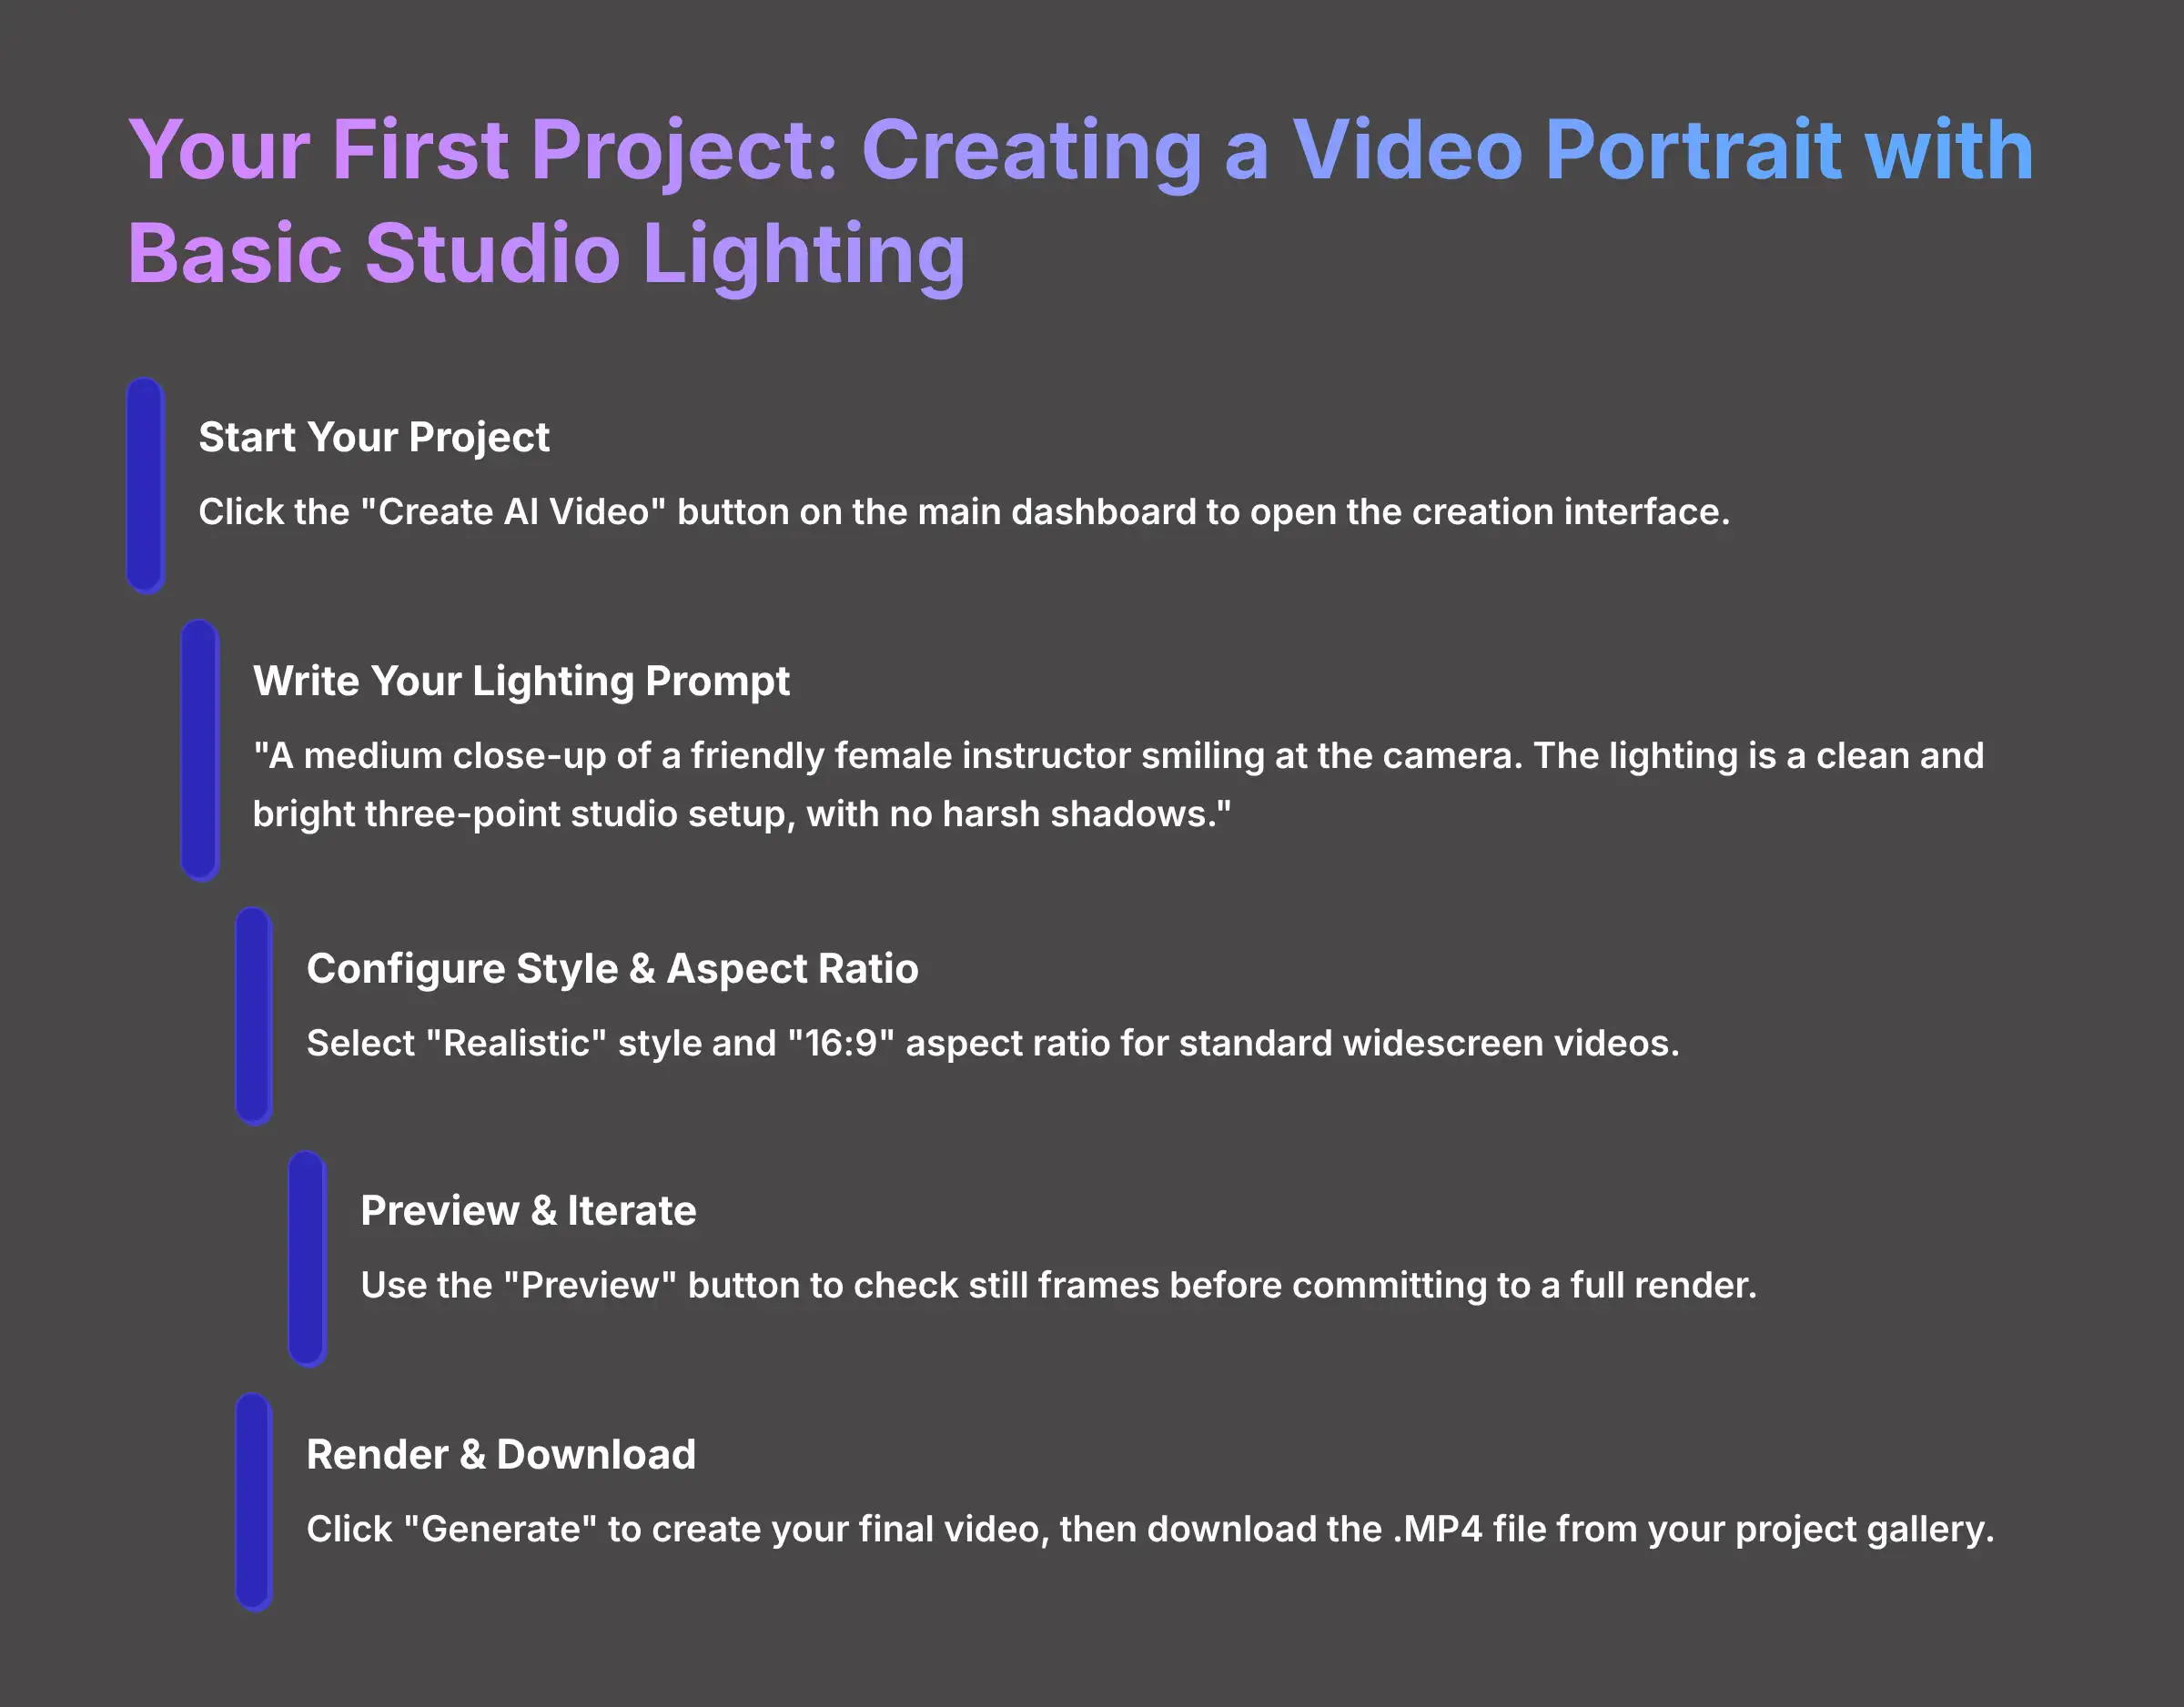
Your First Project: How to Create a Video Portrait with Basic Studio Lighting
Alright, with the tour out of the way, it's time for the exciting part—creating your first video. We will make a simple but professional “talking head” style portrait. My first few renders with AI tools were often disappointing because I was too ambitious. Start with a clear goal and a simple prompt to get a quick win.
This exercise will walk you through the entire process from writing a prompt to downloading the final video file. Follow these steps exactly to build your confidence with the workflow. Always use the preview function; it is your best tool for refining an idea without the long wait of a full render.
Step 1: Starting Your Video Project
From the main dashboard, your first action is to click the “Create AI Video” button. This will open the main creation interface where you will enter your text prompt and configure your video settings.
Step 2: Writing Your Three-Point Lighting Prompt
Next, you need to write a clear and specific prompt. For this project, we want a standard, professional look. Type the following text directly into the prompt box: “A medium close-up of a friendly female instructor smiling at the camera. The lighting is a clean and bright three-point studio setup, with no harsh shadows.”
Step 3: Configuring Style and Aspect Ratio
Below the prompt box, you will find options for style and aspect ratio. For this project, select the “Realistic” style and the “16:9” aspect ratio. The 16:9 ratio is standard for widescreen videos on platforms like YouTube.
Step 4: Previewing and Iterating on Your Prompt
Before generating the final video, it is smart to check a preview. Click the “Preview” button to generate a few still frames from your prompt. This shows you whether the AI understood your lighting command correctly. You can edit your prompt and preview again if the initial result looks wrong without waiting for a full video render.
Step 5: Rendering and Downloading Your Final Video
Once the preview looks correct, you are ready to create the final video. Click the “Generate” button to start the rendering process. After it completes, the video will appear in your project gallery, where you can download the .MP4 file to your computer.
How to Troubleshoot the 3 Most Common Lighting & Generation Issues

After you make a few videos, you will likely run into some common problems. My experience shows that nearly every issue comes down to the prompt, character consistency, or just patience. Here is how I solve the top three problems I see users face.
Do not repeatedly click “Generate” if the lighting is wrong. This will not fix the issue and just wastes time and resources. The only way to change the output is to go back and edit the text prompt. The preview button is your best friend for fixing issues fast.
Problem 1: The AI Misinterprets Your Lighting Command
Sometimes you will ask for “soft light” and get something that looks flat or boring. This happens when the prompt is not specific enough. The solution is to increase the specificity of your prompt and iterate on your vocabulary.
- Increase Specificity: Instead of “soft light,” try “soft, diffused window light coming from the right side.” This gives the AI more information to work with.
- Iterate Vocabulary: Try a synonym if one word isn't producing the desired effect. Swapping “soft” for “gentle” or “hazy” can sometimes produce a better result. Think of it like tuning a musical instrument by ear. You make a small adjustment and check the result until it's right.
Problem 2: The Character's Appearance is Inconsistent
You might find that your video portrait subject looks slightly different from one scene to the next. This breaks the illusion. The fix is to enable character consistency features and provide a detailed character description.
In the settings for your video, look for options related to character consistency. Activating this tells the AI to use the same base model for your character in all scenes. I also found that adding a unique detail to the prompt for all scenes, like “wearing a small silver earring,” helps the AI lock onto the character.
Pro Tip: You can try adding a unique, non-visible detail to the prompt for all scenes if character consistency is still failing, like “wearing a small silver ring on her right index finger.” Even though you can't see the ring, I've found this can help the AI ‘lock on' to the character model much more effectively.
Problem 3: The Video Rendering is Taking Too Long
Generating AI video takes a lot of processing power, so slow rendering is often expected behavior. The solution is to plan your workflow around the rendering time.
- Render Short Clips: When testing an idea, create very short 5-second clips instead of a full-minute video. This lets you check your work much faster.
- Batch Your Renders: Get your prompts ready during the day. Then start a batch of renders to run overnight or while you are away from your computer.
Problem 4: The Portrait Looks Unnatural or Has Artifacts (e.g., “Plastic Skin”)
Sometimes, the AI produces technically correct but aesthetically poor results, like skin that looks too smooth and “digital,” extra fingers, or strange objects in the background. The solution is to use negative prompts to tell the AI what to avoid.
- Use a Negative Prompt Parameter: Most advanced AI generators have a field for negative prompts. Look for a
negative_promptbox or a syntax like--no. - Be Specific in What You Exclude: To fix unnatural skin, your negative prompt could be:
--no plastic skin, smooth skin, airbrushed, cartoon, 3d render. To remove unwanted elements, you might use:--no extra limbs, bad anatomy, text, watermark.
Think of negative prompts as building a fence. You tell the AI the creative space to play in, but also where it is not allowed to go. This is essential for achieving a clean, professional, and believable result.
For specific real-world applications of these techniques, explore our detailed MagicLight Usecase guide for adding cinematic lighting effects to your photographs.
Contextual Bridge
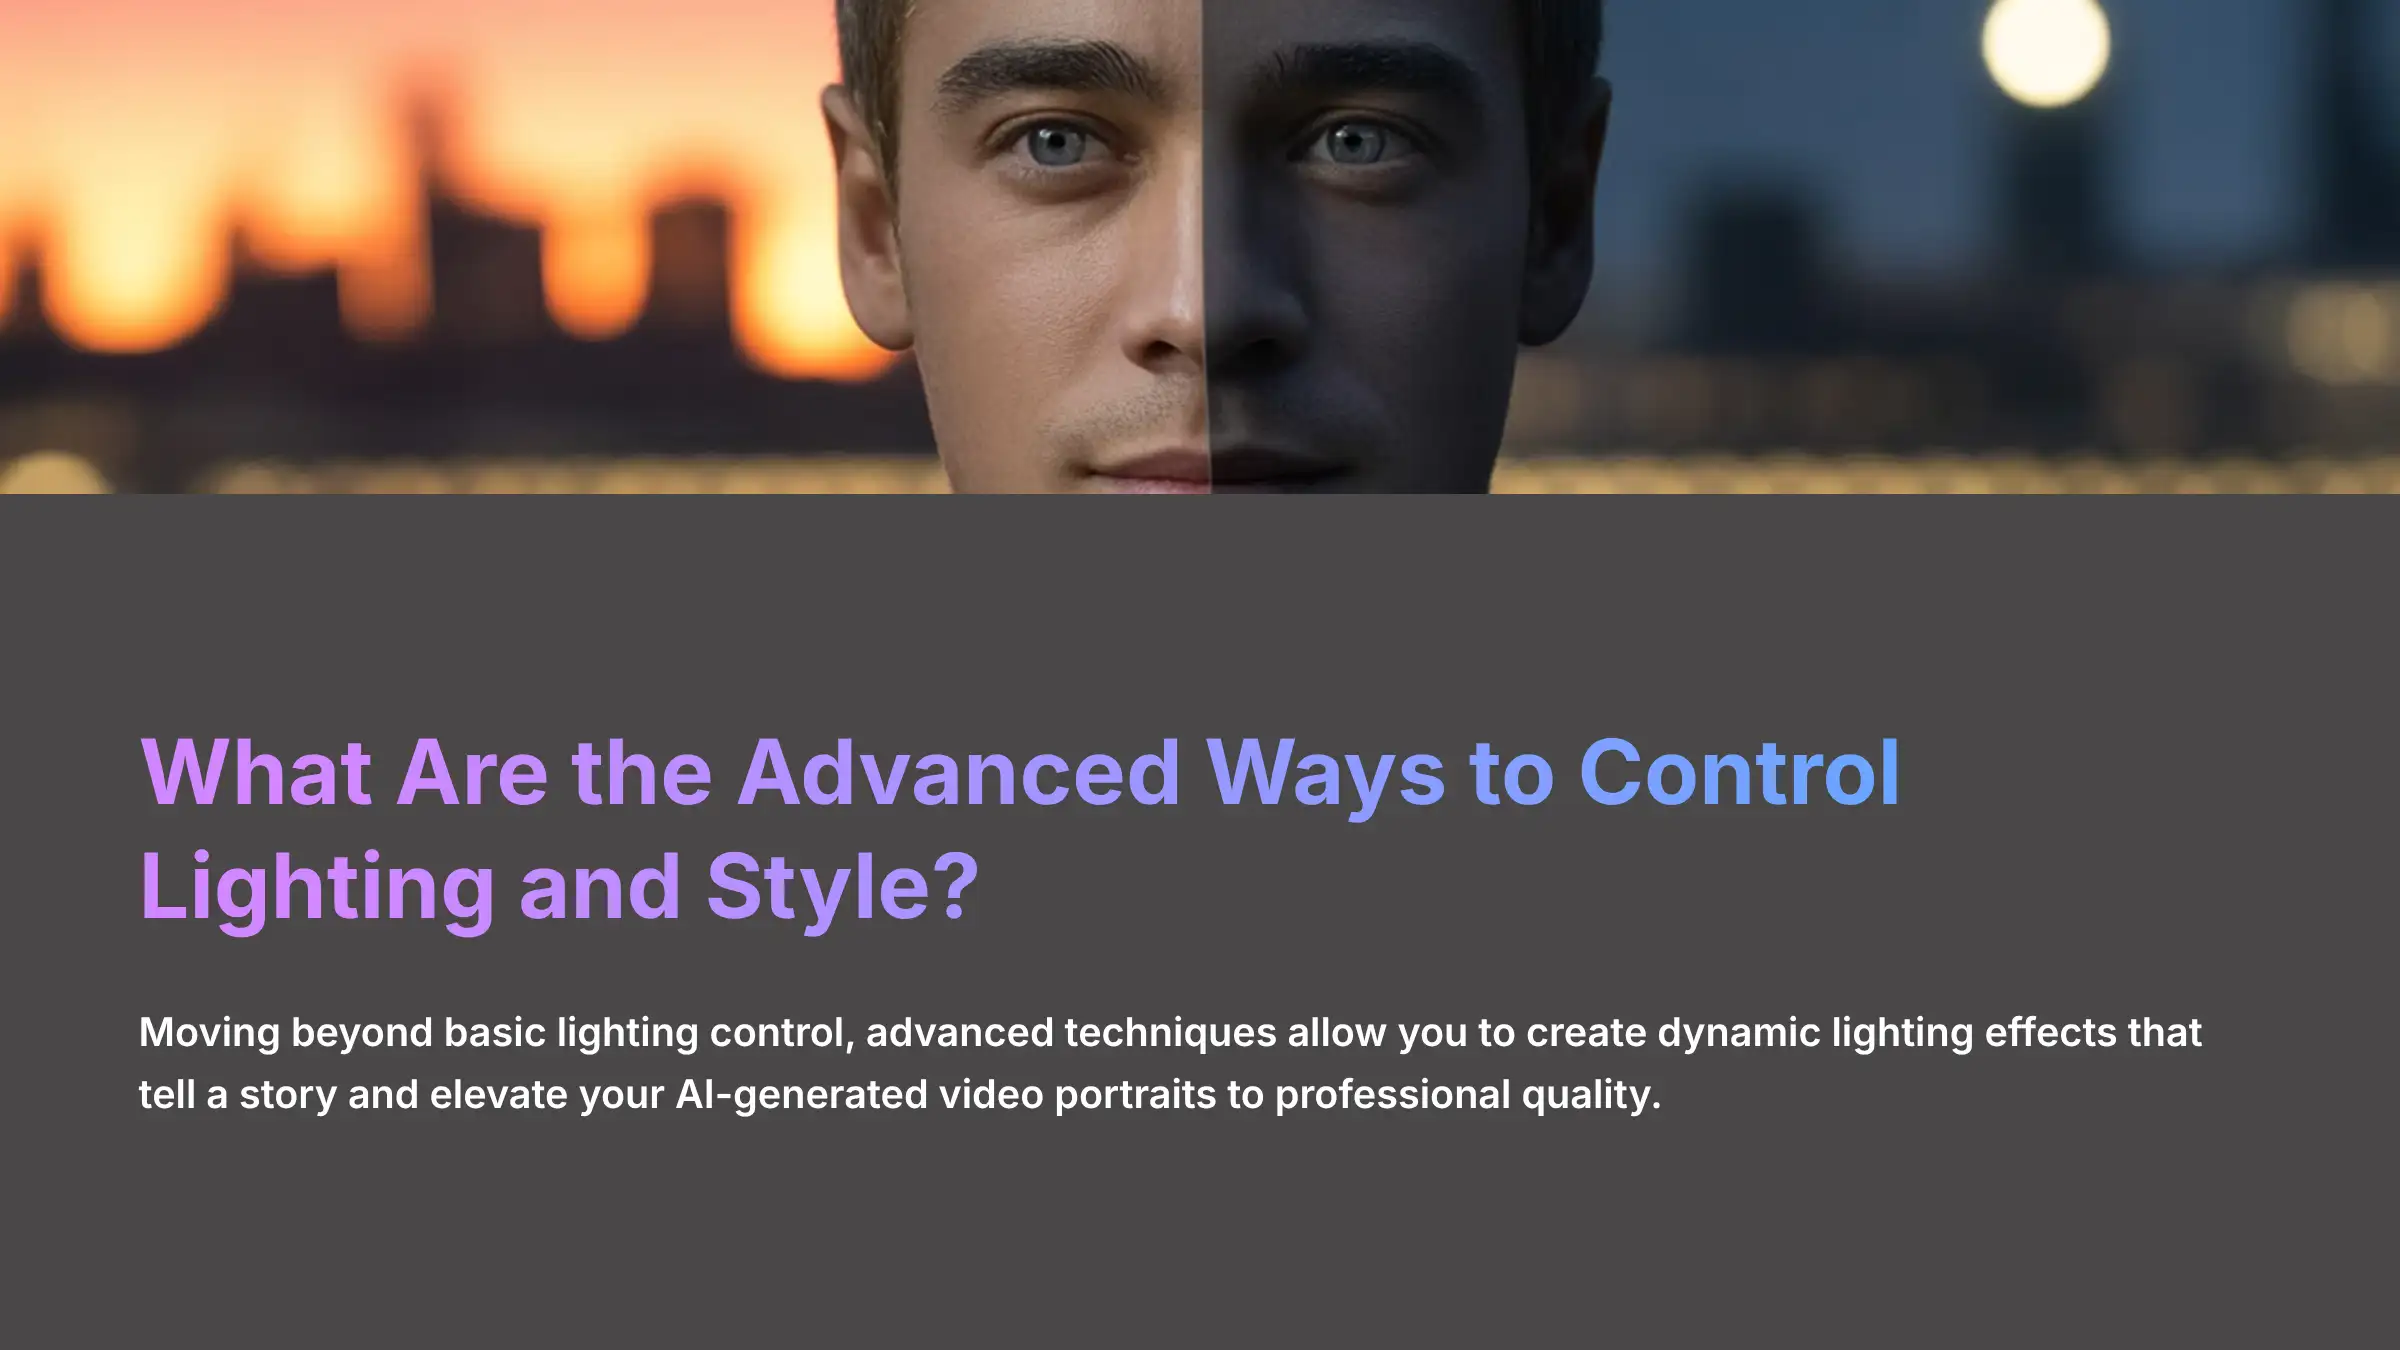
What Are the Advanced Ways to Control Lighting and Style?
Supplementary Content: Advanced Applications & Professional Workflows
Advanced Techniques: Scripting Dynamic Lighting & Creative Styles

Once you have mastered the basics, you can start creating some truly amazing visuals. The dynamic lighting technique is what separates basic users from advanced creators. It's how you can tell a story with light and not just show a scene.
These advanced methods are all still based on writing text prompts. But they involve structuring your prompts in a more complex way to achieve dynamic effects. Here are a few techniques that I use to make my video portraits stand out.
How to Script Dynamic Lighting Changes Scene-by-Scene
You can make the lighting change over time within a single video. This is done by structuring your prompt with “Scene 1:”, “Scene 2:”, and so on. Each scene can have a completely different lighting description.
Here is an example script to try:
Scene 1: A close-up portrait of a woman. The lighting is bright, warm sunlight.
Scene 2: The same portrait, but the lighting shifts to cool, mysterious moonlight.
Scene 3: The portrait is now lit only by the flickering glow of a single candle.
How to Mix Artistic Styles with Lighting Prompts for Unique Effects
A powerful creative method is to select a base artistic style and then override it with a specific lighting prompt. This can generate unique and unexpected looks that are impossible to get otherwise.
For example, you could select the “Anime” style from the dropdown menu. Then, in your prompt, you would add the phrase “with hyper-realistic, cinematic lighting.” The result is an anime character illuminated with the dramatic lighting of a live-action film.
Use Case: Animating a Still Portrait with Shifting Light and Shadow
You can use the dynamic lighting script to add emotion and movement to a static subject. This technique is fantastic for creating captivating social media posts or intro sequences. You are not animating the character's face, but animating the light that falls upon it.
Use the scene-by-scene script from the first technique. Apply it to a prompt for a still portrait where the character is not moving. The shifting light and shadows will create a sense of life and drama in an otherwise static image.
Pro Workflow: How to Integrate AI Video Generation with Video Editors
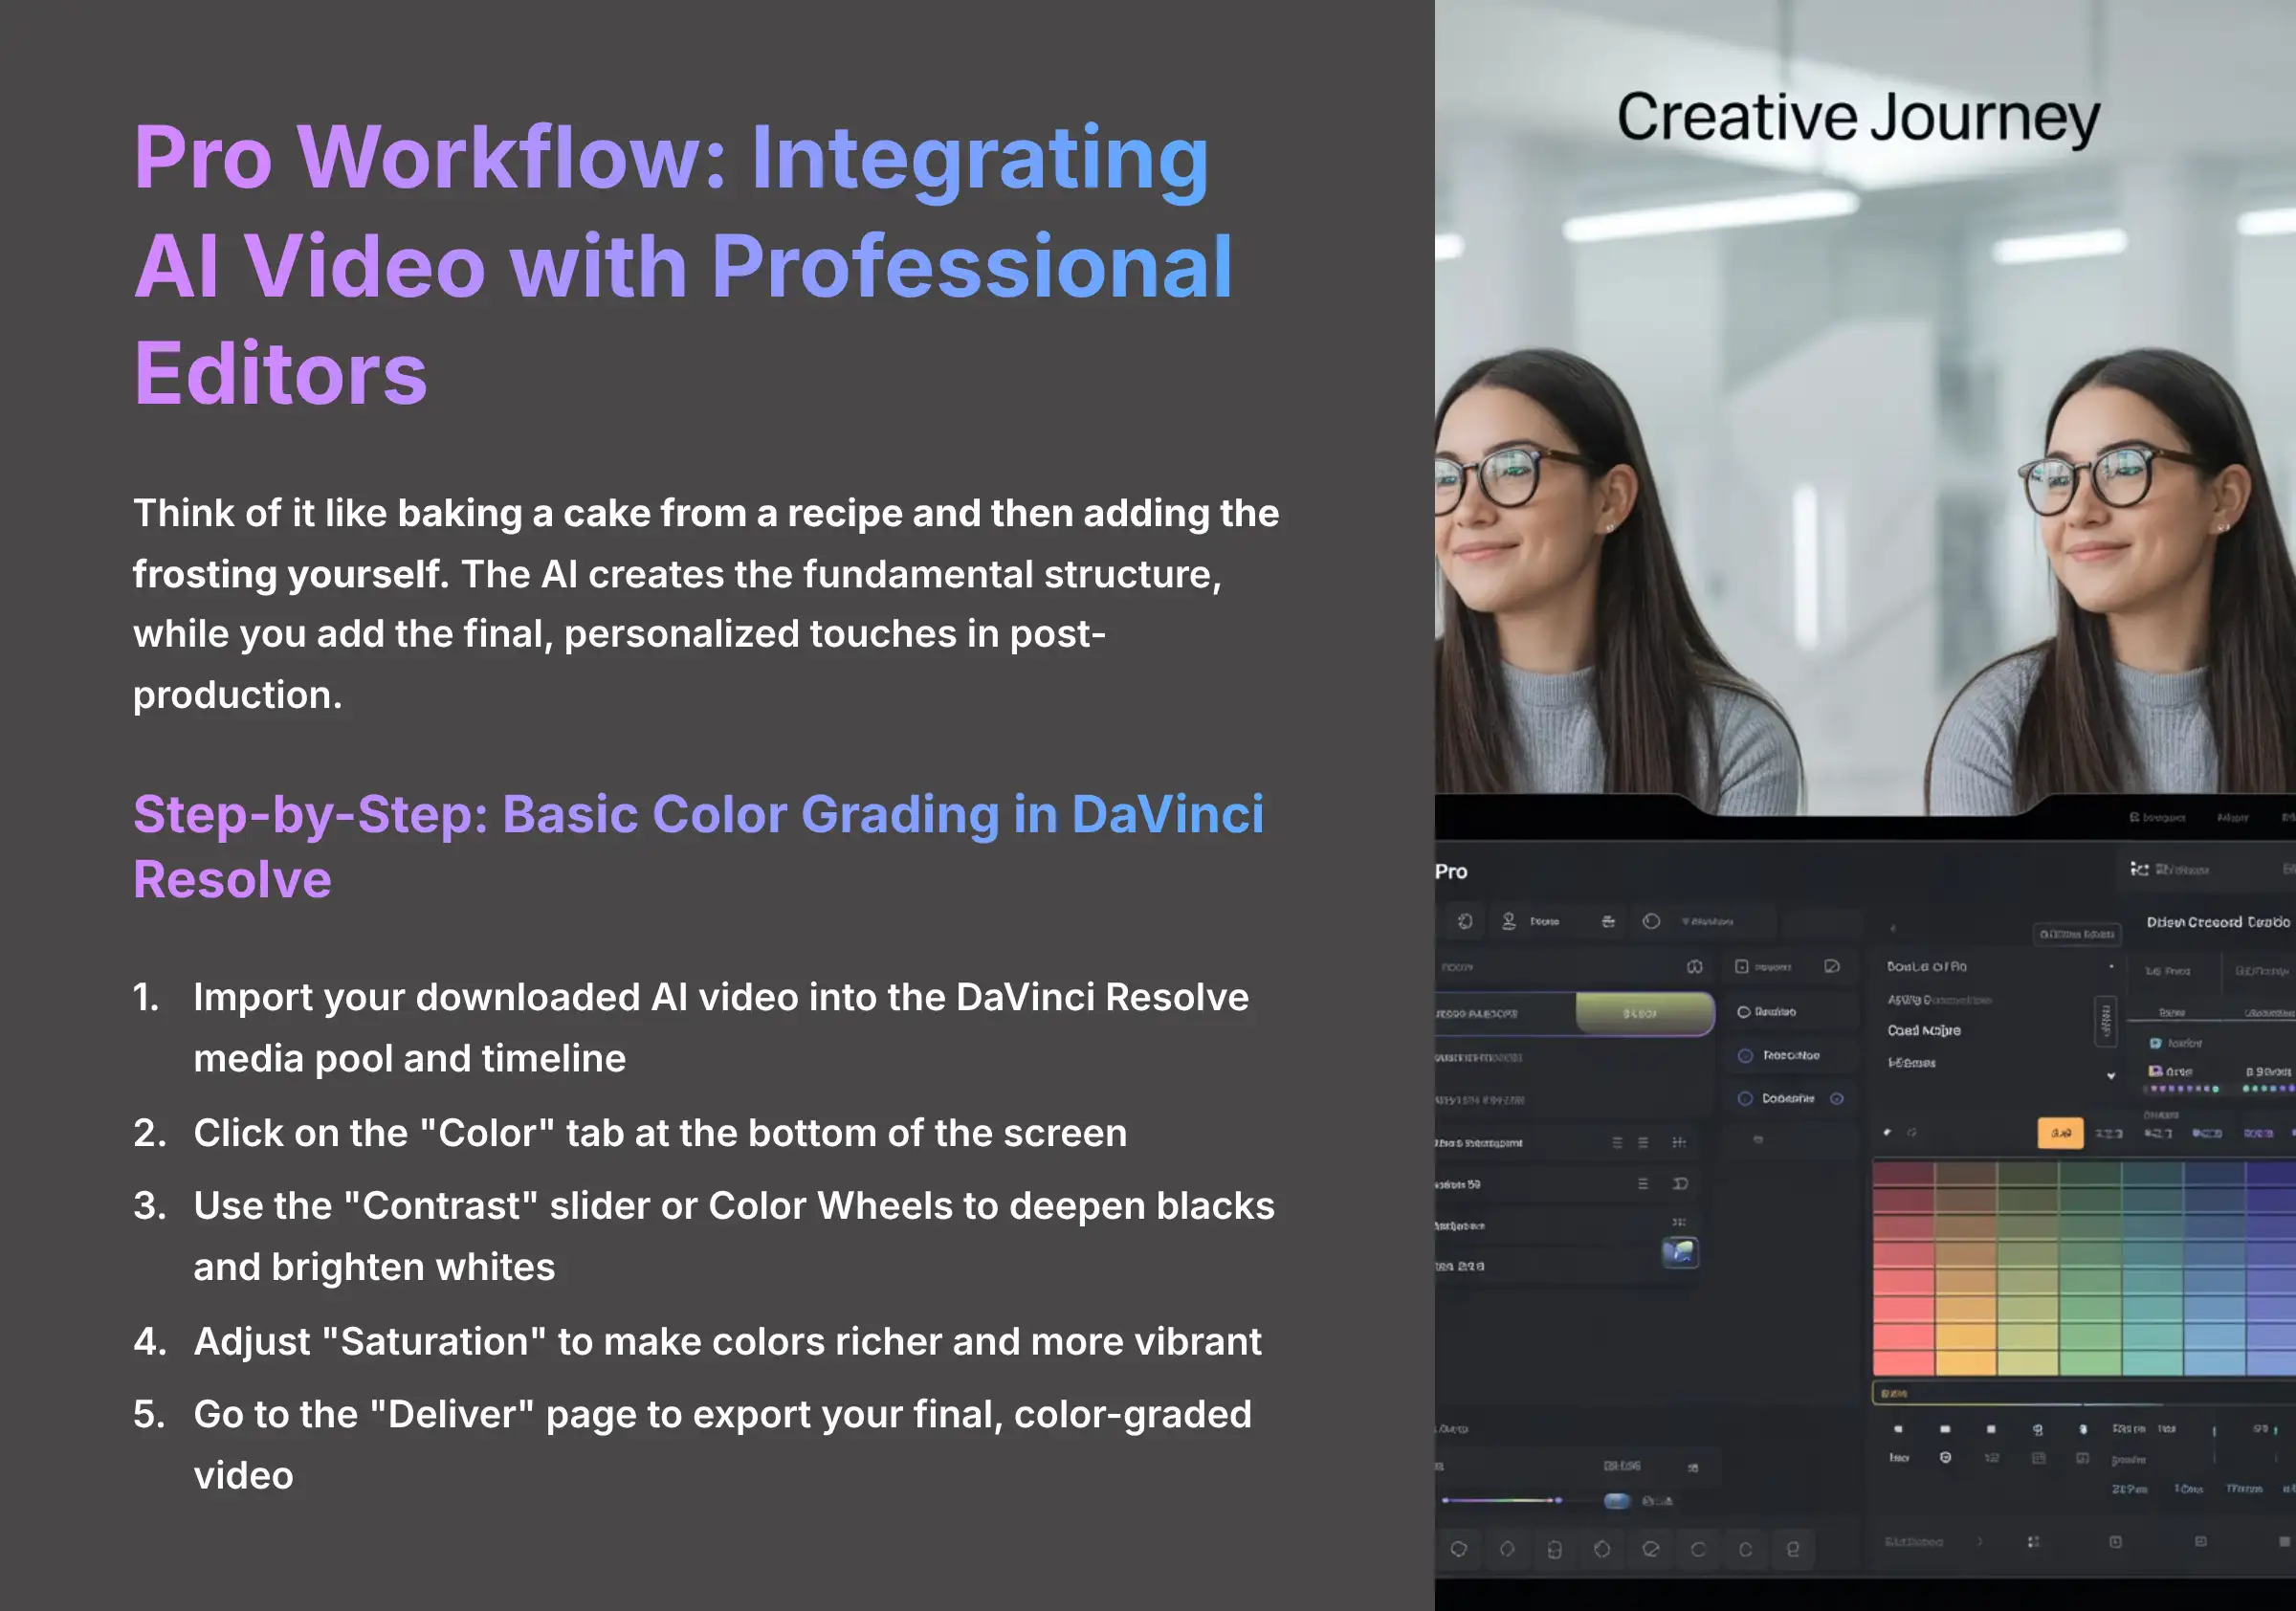
To get the absolute best results, you should integrate AI video generators into a larger video production workflow. The professional approach is to use these tools for what they do best: generating the core image and lighting direction. Then you use a professional video editor for what it does best: color and contrast refinement.
Think of it like baking a cake from a recipe and then adding the frosting yourself. The AI bakes the fundamental structure with the right ingredients. But you add the final, personalized decoration in post-production. This saves a huge amount of time trying to get perfect colors from a prompt.
The Export-Import Workflow: From AI to NLE
The process is simple. First, you create and render your video in the AI video generator, focusing on getting the light direction and quality correct. Then you export that video as an .MP4 file and import it into a Non-Linear Editor (NLE) like DaVinci Resolve or Adobe Premiere Pro.
Step-by-Step: Basic Color Grading in DaVinci Resolve
DaVinci Resolve has a powerful free version that is perfect for this. Once your video is imported, you can make precise adjustments.
- Import Your Clip: Drag your downloaded AI video into the DaVinci Resolve media pool and onto the timeline.
- Open the Color Page: Click on the “Color” tab at the bottom of the screen.
- Adjust Contrast: Use the “Contrast” slider or the Color Wheels to make the blacks deeper and the whites brighter.
- Boost Saturation: Use the “Saturation” knob to make the colors richer and more vibrant.
- Export: Go to the “Deliver” page to export your final, color-graded video.
Disclaimer: The information about AI video generation presented in this article reflects our thorough analysis as of 2025. Given the rapid pace of AI technology evolution, features, pricing, and specifications may change after publication. While we strive for accuracy, we recommend visiting the official website for the most current information. Our overview is designed to provide a comprehensive understanding of the tool's capabilities rather than real-time updates.
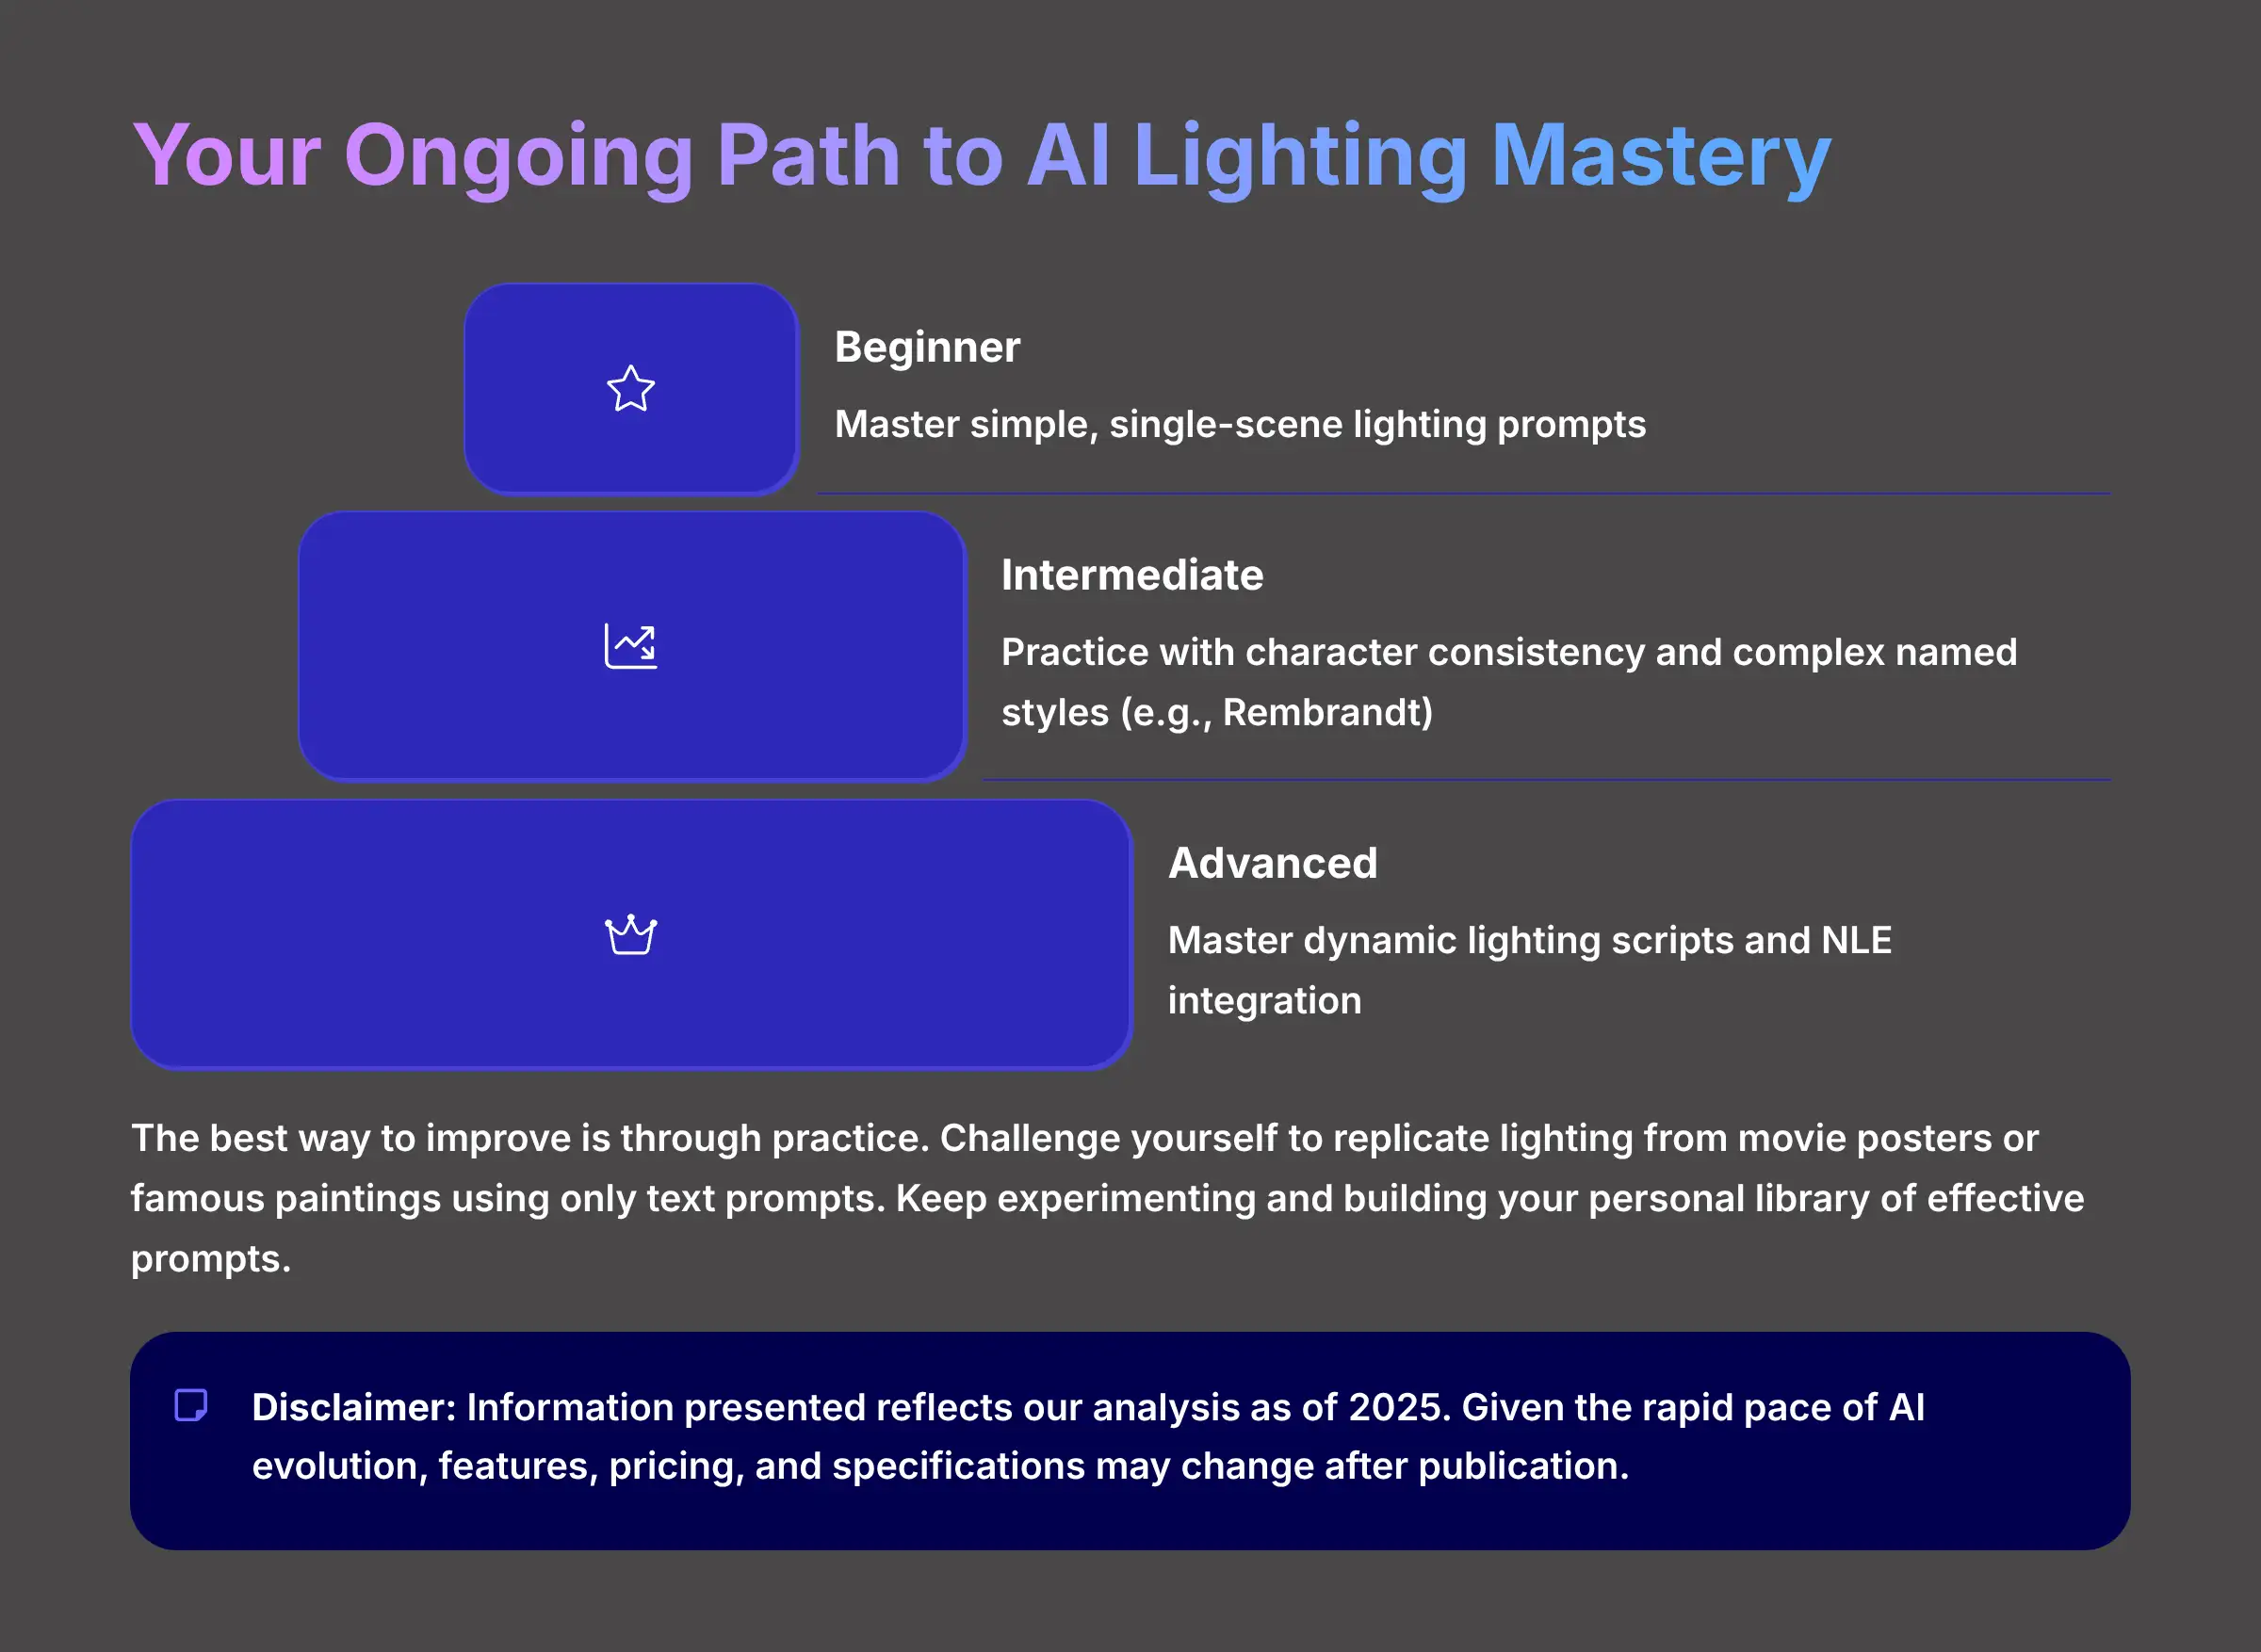
Conclusion: Your Ongoing Path to AI Lighting Mastery
You now have the core knowledge to control light in AI video generators. You understand that your words are your tools and that specificity is key. You can create a basic portrait, troubleshoot common issues, and even script dynamic lighting changes.
The best way to get better is to practice. I often challenge myself to replicate the lighting from a movie poster or a famous painting using only a text prompt. It's a fantastic exercise that will rapidly improve your prompting skills. Keep experimenting and building your personal library of great prompts.
Your Recommended Learning Path
- Beginner: Master simple, single-scene lighting prompts.
- Intermediate: Practice with character consistency and complex named styles (e.g., Rembrandt).
- Advanced: Master dynamic lighting scripts and NLE integration.
Essential Resources for Continued Learning
- A glossary of cinematography lighting terms.
- The official AI video generator documentation and community Discord.
- Our guide on The Best Free Video Editors for 2025.
To review these steps or share them with others, you can find a complete guide for this MagicLight Tutorial: How to Use AI to Enhance Lighting in Your Portraits.
For additional support and answers to common questions, don't forget to check our comprehensive MagicLight FAQs section which addresses the most frequently asked questions about this powerful AI video generation tool.


Leave a Reply