Is Latte Social the Right AI Repurposing Tool for You?
Take Our Quick Quiz to Find Out!
At AI Video Generators Free, we create many comprehensive Tutorials AI Video Tools guides, and this guide focuses on practical application to help you save time. By the end, you'll be able to make branded videos and master the AI-powered workflow with custom brand templates.
While Latte Social is a powerful contender, it's important to understand where it fits in the landscape of AI video clipping tools. You may have heard of alternatives like Opus Clip, known for its virality scoring, or Vidyo.ai, which is popular among podcasters for its advanced speaker detection. In this guide, we'll focus on Latte Social's unique strengths: its deep brand customization, robust manual editing controls, and powerful template system, which together provide a balance of automation and creative precision that is ideal for brand-conscious marketers and agencies.
Our recommendations come from extensive, hands-on experience; after testing over 200 AI video tools for our comprehensive 8-point technical assessment framework, we found Latte Social to be a standout performer in real-world projects.
Key Takeaways: Your Path to AI Content Mastery
- Complete Workflow Mastery: Achieve a complete automated content repurposing workflow, turning a single long-form video into a full week's worth of social media clips in under an hour.
- Brand Kit Excellence: Master the creation and application of Brand Kits, ensuring every video you produce is perfectly and consistently branded with your logos, colors, and fonts with one simple click.
- AI + Creative Control: Learn to harness AI while retaining creative control by combining AI-suggested clips with precise manual editing directly from the video transcript.
- Advanced Subtitle Mastery: Dive into advanced subtitle customization, using multiple animated styles like ‘Karaoke' and ‘Flash' to create highly engaging, attention-grabbing captions optimized for platforms like TikTok and Instagram Reels.
- Content Pipeline Optimization: Build a content pipeline by integrating Latte Social with your existing workflow, optimizing your process from video storage to social media scheduling.
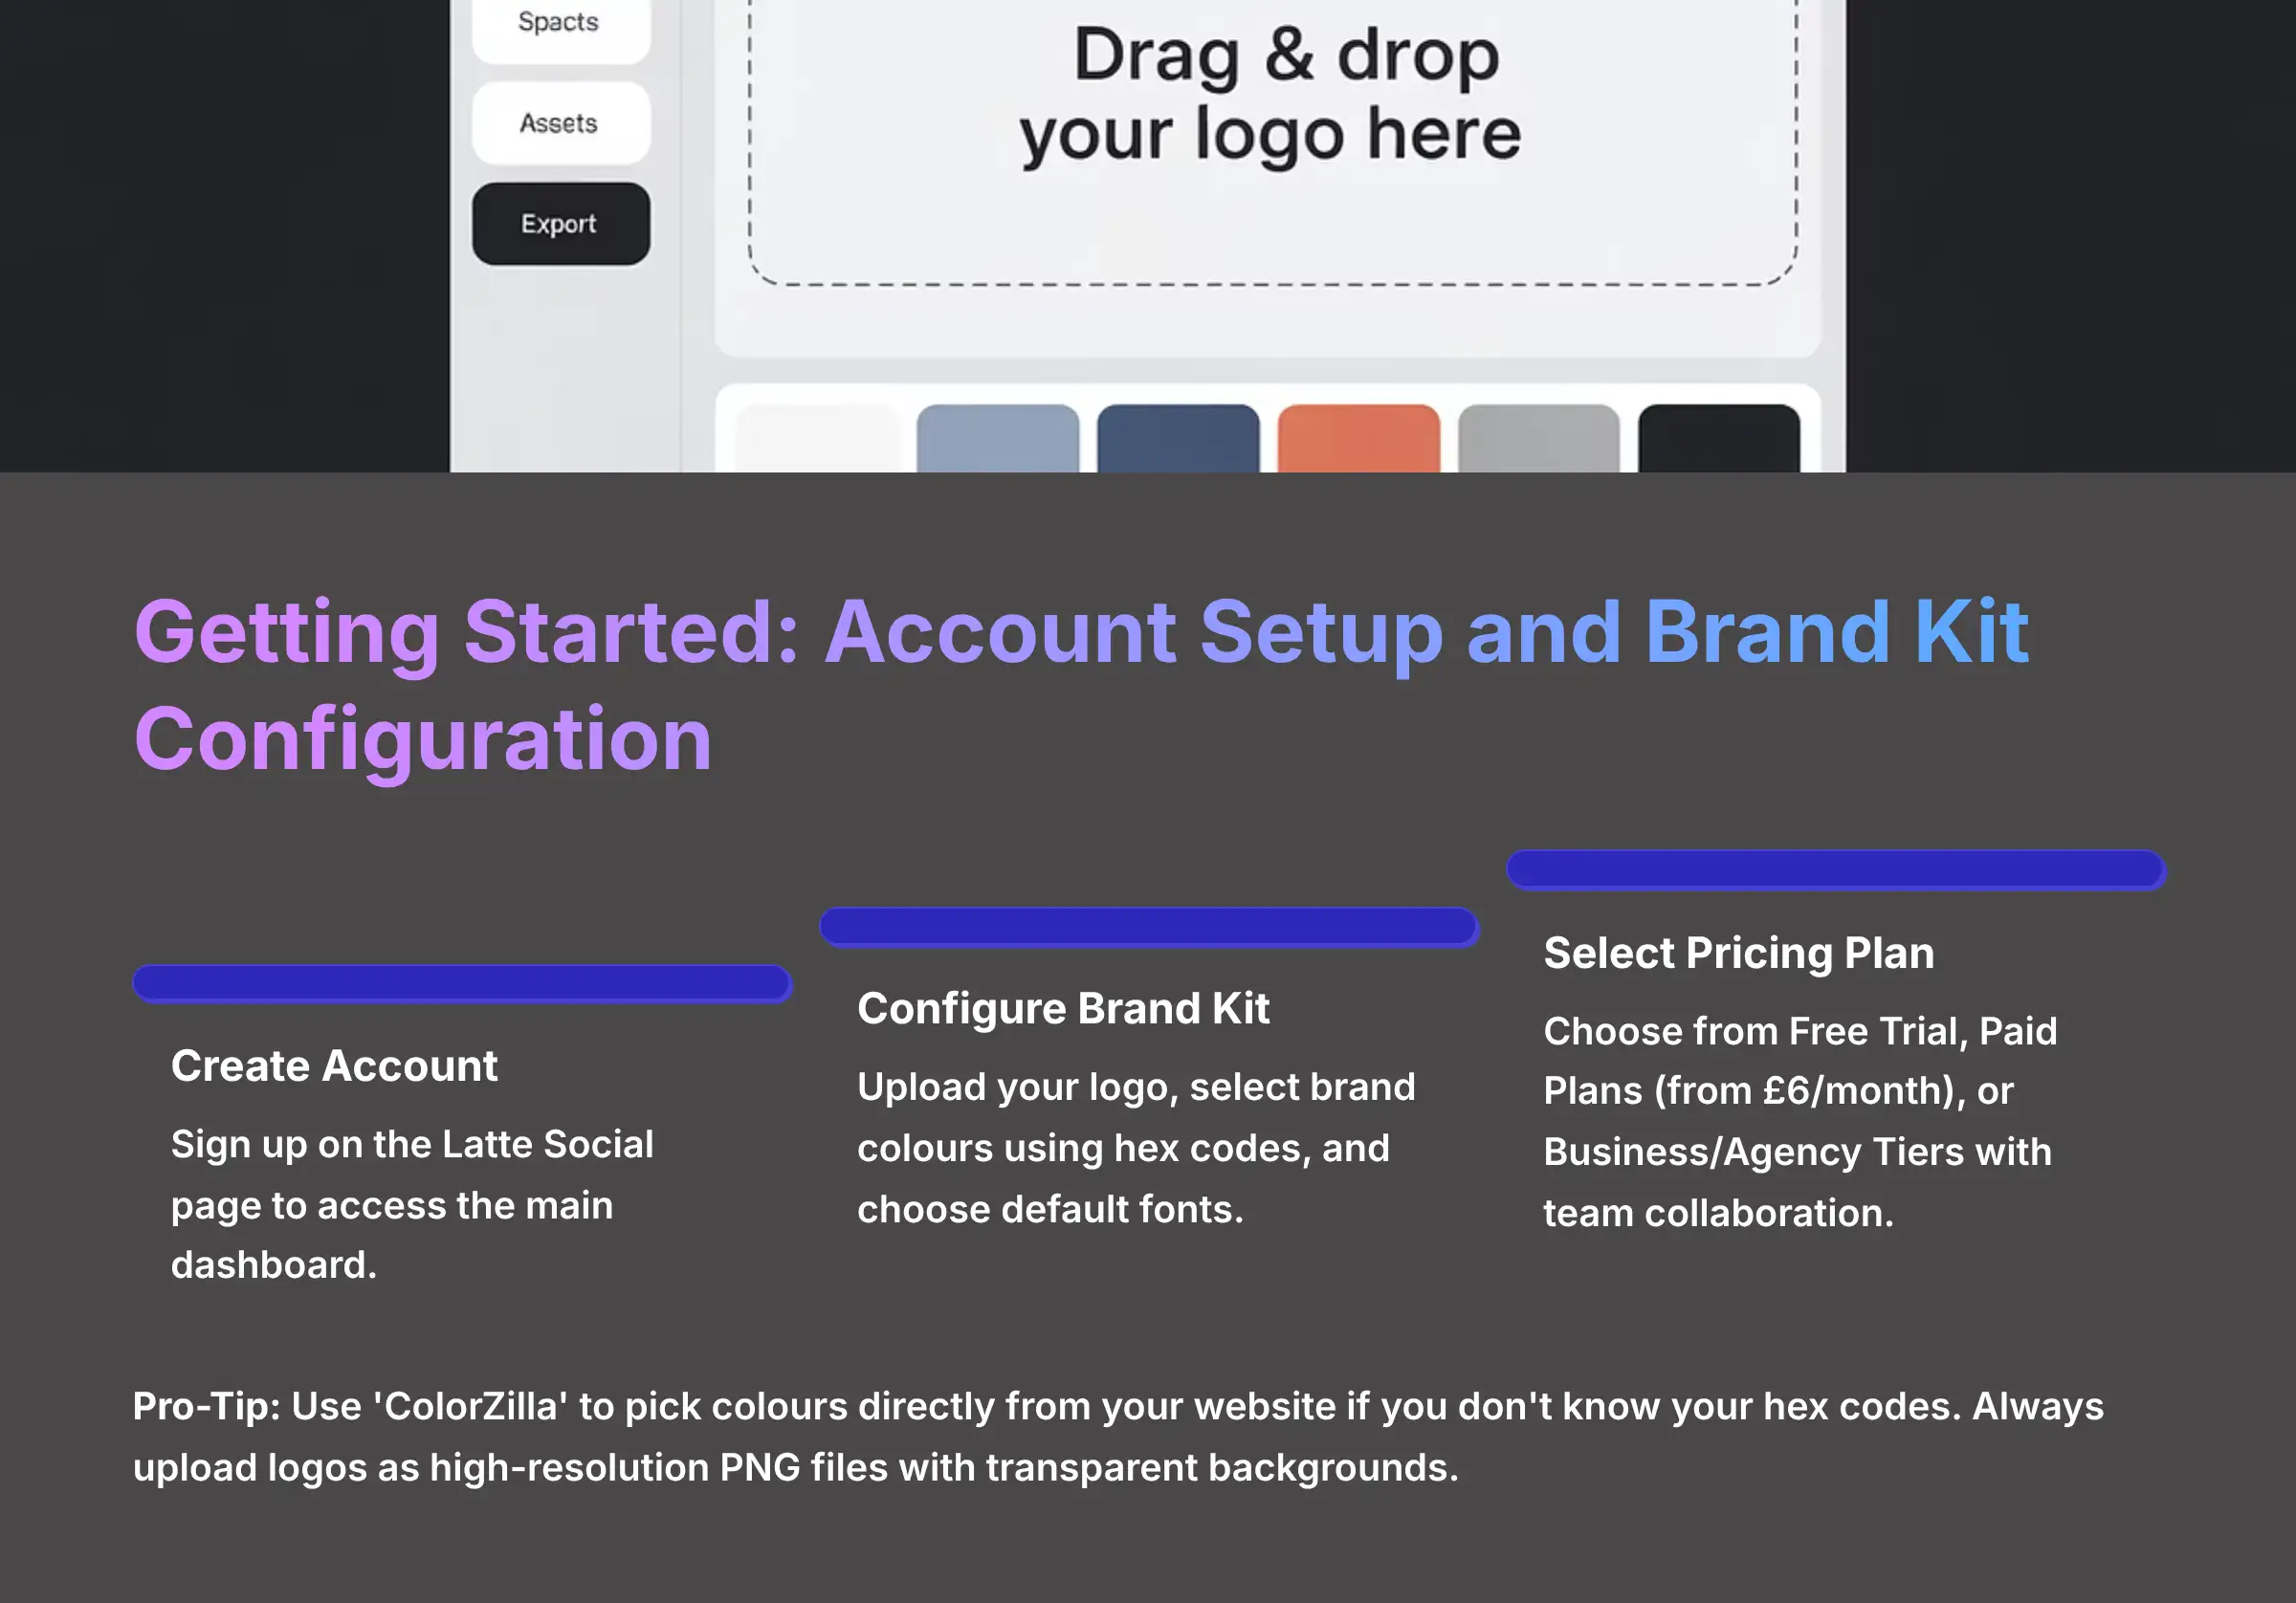
Section 1: Getting Started – Account Setup and Brand Kit Configuration
Your first step is setting up an account and configuring what I consider the most important feature for efficiency: the Brand Kit. Think of a Brand Kit as the digital uniform for your videos. It stores your logo, colors, and fonts so you can apply perfect branding to any clip instantly.
To start, you will create an account on the Latte Social sign-up page. Once inside, you'll see the main dashboard.

Before uploading anything, go to the “Brand Kit” section, usually found in your account settings.
Inside the Brand Kit interface, you will upload your logo, select your primary and secondary brand colors using their hex codes, and choose your default fonts. This simple setup is the foundation for saving time on every single video you create later. I call this the most important step because it automates consistency.
Understanding Latte Social's Plans and Pricing
Before you dive in, it's helpful to know how Latte Social structures its offerings. The platform provides a tiered subscription model:
- Free Trial: You can test the core features with limited processing minutes. Exports might be watermarked or limited to a lower resolution.
- Paid Plans: Starting at $6.00 per month, these unlock higher processing limits, HD exports, removal of watermarks, and access to premium subtitle animations.
- Business/Agency Tiers: Higher-tier plans typically include features like team collaboration (multiple user seats) and shared Brand Kits.
Check their official pricing page for the most current details, but be prepared that advanced features and the highest quality exports are premium features. For this tutorial, most steps can be completed on a trial or basic plan.
Action Point: Create your first Brand Kit. Upload your business logo, set your primary brand color, and select a default font you'll use for the rest of this tutorial. For a professional look, always upload your logo as a high-resolution PNG file with a transparent background. This prevents an ugly white box from appearing around your logo on video clips.
My team worked with a marketing agency that cut their per-video editing time by 15 minutes simply by having every client's Brand Kit pre-configured. It's an indispensable step for scaling your video output. Be careful here, though. Double-check your brand's hex color codes (#XXXXXX) before saving. Using an incorrect shade is a common mistake that can make content feel off-brand.
Pro-Tip: If you don't know your hex codes, use a free browser extension like ‘ColorZilla' to pick the color directly from your website.
Section 2: The Core Workflow – How to Create Your First AI Clip in 5 Minutes
Now let's get a quick win. The goal of this section is to show you the fundamental workflow and help you produce your first AI-generated clip in about five minutes. This process builds the confidence you need to explore the more advanced features later.
Here is the simple, five-step process:
- Step 1: Upload Your Content. You begin by dragging a video file into the uploader or pasting a video URL. Latte Social accepts various video formats.
- Step 2: Let the AI Work. After your upload is complete, Latte Social's AI gets to work. I like to think of it as a super-fast research assistant that reads your transcript and analyzes your audio to find moments of high energy or when key questions are asked. You will find these suggestions in the “AI Clips” tab.
- Step 3: Review and Select a Clip. Look through the AI-suggested clips and preview them. When you find one you like, simply add it to your project.
- Step 4: Apply Basic Customizations. This is where your earlier work pays off. Apply the Brand Kit you created to instantly add your logo. You can also select a default subtitle style.
- Step 5: Export for Social Media. For platforms like TikTok or Reels, select the 9:16 aspect ratio. Then, export the final MP4 file.
Pro Tip: Understanding Input Quality and AI Accuracy
The AI in Latte Social uses Natural Language Processing (NLP) and a speech-to-text transcription engine to find key moments. The quality of its suggestions is therefore directly tied to two things:
- Audio Clarity: Clear, crisp audio with minimal background noise will yield a highly accurate transcript and better clip suggestions.
- Input Limitations: Be mindful of the platform's constraints. Most plans have a maximum video length (e.g., 60-120 minutes) and file size you can upload at one time. Always check these limits before processing a long webinar.
Action Point: Follow the 5-step process using the sample video provided by Latte Social or your own 5-10 minute video. Your goal is to successfully download a 30-second, subtitled MP4 clip. For this first attempt, focus on speed, not perfection.
A common reaction I hear from new users is the ‘aha!' moment they have when the AI perfectly identifies a key highlight. Trust the AI as your starting point. A word of warning: the quality of your AI suggestions is directly tied to your source video's audio quality. You will struggle with the transcript accuracy if your audio is noisy, and the AI will struggle.
For those seeking more detailed information about Latte Social's capabilities, our comprehensive Latte Social Review automation analysis provides in-depth insights into the platform's strengths and potential limitations.
Section 3: Feature Deep Dive – How to Master Latte Social's Editor for Full Creative Control
With the basic workflow understood, you can now explore the editor's more powerful features. This is where you move from accepting AI suggestions to taking full creative control. You will master manual clip creation, advanced subtitle customization, and reusable templates.
Let's start with precision clip creation, then look at making your subtitles pop, and finally, show you how to automate your design work with templates.
How to Manually Create Clips for Pinpoint Precision
To create clips with pinpoint precision, you go from the “AI Clips” tab to the “Full Transcript” view. Here, you can read the entire transcript while the video plays alongside it. This is perfect for finding the exact moment you want to share.
Simply click and drag your mouse to highlight a specific section of the text in the transcript. A button labeled “Create Clip from Text” will appear. Clicking it generates a clip based only on your precise selection, giving you complete control over the start and end points.
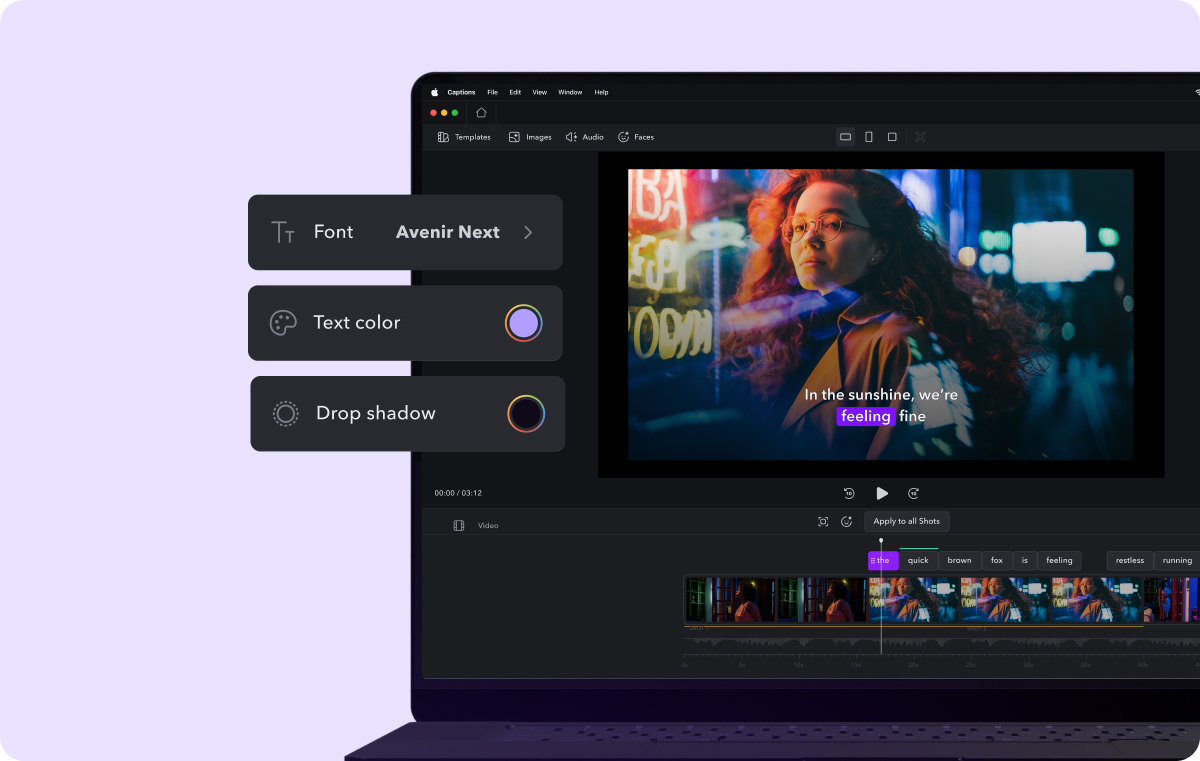
How to Customize Animated Subtitles Like a Pro
Latte Social offers multiple trendy subtitle templates, but the real power is in the customization panel. To access it, select a clip and open the “Customize Style” sub-menu in the editor. Here you can adjust almost any parameter.
You can change the font, primary color, size, and on-screen position. It also lets you add a text background or shadow for better readability on busy backgrounds. A fantastic feature I use often is the ability to click on a single word in the transcript editor and change its color for special emphasis. For users who need more flexibility, many pro-level plans on these platforms also allow you to export the subtitles as a separate .SRT (SubRip Subtitle) file. This is incredibly useful for uploading captions directly to platforms like YouTube or LinkedIn, or for use in other video editing software.
How to Build and Use Templates to Automate Your Branding
Building a template is the key to a scalable workflow. Once you have styled a clip perfectly, click the “Save as Template” button in the styling panel. You should give the template a descriptive name, like “Webinar TikTok Style – Inter Font.”
Now, when you start a new clip, you can go to the “Templates” tab. Applying your saved template instantly transforms the new clip with your preferred branding and subtitle style in a single click. This feature alone is a monumental time-saver.
Action Point: Go back to your project and manually create a new 15-second clip from the transcript. Customize this clip using the ‘Karaoke' style, apply your brand's secondary color to the highlighted word, and save this design as a new template named “My Custom Karaoke Style.”
From my testing, the ‘Karaoke' style is incredibly effective for educational content where you want to emphasize key terms as they are spoken. For high-energy marketing clips, the ‘Flash' style consistently grabs more attention. Just be careful not to over-design your subtitles. The main goal is readability, and using too many colors or complex animations can defeat their purpose.
For TikTok and Reels, a pro tip is to position your subtitles in the lower-middle third of the frame. This prevents them from being covered by the platform's user interface elements.
Section 4: Project-Based Tutorial – How to Turn One Webinar into a Viral TikTok Series
Now it's time to put everything together. This project combines all your new skills—from Brand Kits to custom templates—to show you exactly how a professional content team would turn one long webinar into a viral-ready series. This section is the contextual bridge where we combine all your new skills into a single, real-world project. We will walk through turning one long webinar into a multi-part series for a platform like TikTok. This project mimics exactly how a professional content team would repurpose a major piece of content.
The project follows five distinct steps:
- Step 1: Define the Project Strategy. The goal is clear: turn one 60-minute webinar into a 5-part TikTok series. Each part will focus on a single, valuable idea.
- Step 2: Mine the Content for Gold. After uploading the webinar, you will use a combination of AI suggestions and manual transcript selection to identify five distinct moments. Look for a key tip, a surprising statistic, a common mistake, or a great Q&A answer.
- Step 3: Apply the Brand Template. Style the very first clip perfectly using the custom template you created in the last section. Then, you can efficiently apply this same template to the other four clips for perfect consistency with one click each.
- Step 4: Add Series Context. For each clip, use the editor's “Text Overlay” tool. This is different from the subtitles. Add a small, static text box in a corner that says “Part 1 of 5,” “Part 2 of 5,” and so on.
- Step 5: Batch Export and Prepare for Publishing. Finally, export all five clips in the 9:16 format. Give them clear filenames like
Webinar_Tip_1_of_5.mp4, making them ready for scheduling.
Action Project: Take a long-form video you have that is over 10 minutes and create a 3-part series for Instagram Reels. Make sure all clips use the same template for consistent branding and are clearly labeled “Part 1,” “Part 2,” and “Part 3.”
Based on my experience, series-based content is a core growth hack on short-form platforms. It gives viewers a reason to follow you so they do not miss the next part. When creating a series, try to end each part with a hook, like “…but that's not the biggest mistake people make,” to tease the next video. But be warned: a common mistake is trying to cram too much into one clip. Each short video should deliver a standalone, potent concept.
If you're interested in exploring other approaches to content repurposing, check out our detailed comparison of the Best Latte Social Alternatives to understand which tool might work best for your specific use case.
Section 5: How to Troubleshoot the 3 Most Common Workflow Issues
Even the best tools can present challenges. This section is designed to help you solve the three most common problems I've seen users face. Knowing how to fix these issues will empower you to keep your content production moving smoothly.
Issue 1: What to Do When Video Processing Stalls or Fails
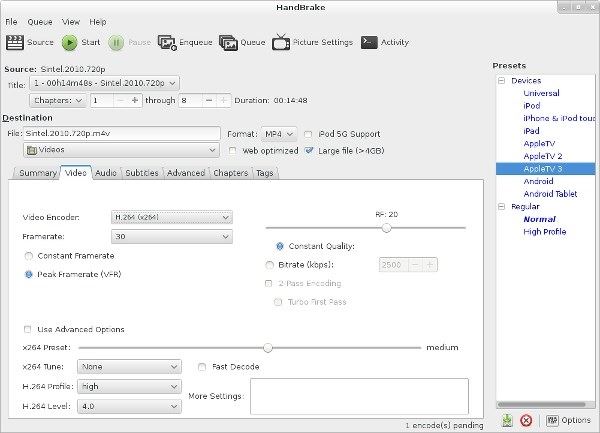
Sometimes, a video upload seems to get stuck at 99% and never completes processing. The cause is usually an unsupported video codec or a corrupted file that the platform cannot read properly. Before you panic, there is a simple troubleshooting process.
First, try a hard refresh of your browser (Ctrl/Cmd + Shift + R) and clear the browser cache, then try the upload again. You will need to re-encode the video if it fails a second time. I recommend a free tool called HandBrake to convert your video into a standard, web-friendly MP4 format, which almost always solves the problem. Many professional video editors I know run all their source videos through HandBrake as a standard preprocessing step to prevent unpredictable errors.
Issue 2: How to Fix Subtitle Drift and Synchronization Errors
Another common issue is when the animated subtitles appear slightly before or after the spoken words. This is called subtitle drift. You can fix this easily inside the clip editor's timeline mode.
Inside the timeline, you will see your subtitles represented as blocks. Select the specific subtitle block that is out of sync. You can then use the handles on the timeline to drag or “nudge” the start and end times of that block by milliseconds until it aligns perfectly with the audio waveform in the visual editor. My pro tip is to listen with headphones and focus on getting the timing of the very first word perfect; the rest of the sentence usually falls into place.
Issue 3: AI Transcription is Inaccurate or Confusing Speakers
Sometimes, the auto-generated transcript contains errors, especially with technical jargon, strong accents, or multiple speakers. This leads to poorly defined clips.
The solution is to manually clean up the transcript before you start creating clips. In the “Full Transcript” view, you can click into any text block and correct typos or misheard words. If the platform struggles with speaker detection (confusing who is talking), you may need to manually create your clips by highlighting the text of a single speaker to ensure the clip is coherent. A few minutes spent correcting the transcript can save you an hour of frustrating edits later.
Issue 4: How to Fix Low Quality or Pixelated Export Videos
If your final downloaded MP4 video appears blurry or pixelated, there are a few things to check. The most common cause is a low-resolution source file. You cannot export a high-quality video from a low-quality source.
First, verify that your original video file has at least a 1080p resolution. In Latte Social's export screen, also check that you have explicitly selected “HD 1080p” as the output quality. Keep in mind that the in-browser preview might be a lower quality render to save processing power; always download the final exported file to judge the true quality.
For practical examples of successful implementations, explore our detailed Latte Social Usecase: Creating a Week's Worth of Social Media Clips from One Podcast guide.
Section 6: Advanced Techniques – How to Optimize Your Content Pipeline
Once you have mastered the manual workflow, you can move to the highest level of efficiency: optimizing your content pipeline. This involves creating a system where your content moves from creation to scheduling with maximum efficiency. Imagine it as creating a digital assembly line for your content.
How to Build an Efficient Content Workflow
While Latte Social doesn't offer direct integrations with automation platforms like Zapier, you can still create an efficient workflow using your existing tools. Start by establishing a consistent process:
- Organize Source Content: Create a dedicated folder structure for your source videos, making them easy to locate and batch process.
- Batch Process Similar Content: Group similar videos (like webinar episodes or podcast segments) and process them together using the same templates.
- Create a Content Calendar: Use a spreadsheet or project management tool to track which clips are derived from which source videos, and when they should be published.
- Establish a Naming Convention: Use consistent filenames that include the source, clip number, and platform (e.g., “Webinar3Clip2TikTok.mp4″).
This structured approach helps you maintain organization even without automated integrations.
How to Maximize Output While Maintaining Quality
To scale your content production efficiently:
- Create Platform-Specific Templates: Develop separate templates optimized for each platform's unique requirements (TikTok, Instagram, LinkedIn).
- Batch Your Work: Dedicate specific time blocks for each part of the process – uploading videos one day, creating clips another day, and scheduling posts on a third day.
- Reuse Successful Formats: When a particular clip format performs well, save it as a template and apply that winning formula to future content.
- Focus on Quality Audio: Since transcription accuracy directly impacts AI clip suggestions, invest in improving your source audio quality rather than fixing poor transcripts later.
Disclaimer: The information presented in this article reflects our thorough analysis of Latte Social as of 2025. Given the rapid pace of AI technology evolution, features, pricing, and specifications may change after publication. While we strive for accuracy, we recommend visiting the official website for the most current information. Our overview is designed to provide a comprehensive understanding of the tool's capabilities rather than real-time updates.
Section 7: Conclusion – Your Next Steps and Further Resources
You have now journeyed from the initial setup and Brand Kit creation all the way to advanced pipeline optimization. You've learned how to create clips with the AI assistant, take full control with the manual editor, and apply those skills to a real-world project. You are well-equipped to make content repurposing a fast and efficient part of your workflow.
To continue your learning, here is a path I recommend based on skill level:
- Beginner: Focus on creating and saving your Brand Kit. Practice turning one long video into three different short-form clips using the core workflow.
- Intermediate: Start mastering manual clip creation from the full transcript. Experiment with at least ten different animated subtitle styles to see what works best for your brand.
- Advanced: Build the full webinar-to-TikTok series project. Challenge yourself to build an efficient content pipeline for your specific needs.
Here are a few complementary tools that work very well with Latte Social:
- Social Schedulers: Buffer, Hootsuite, and Publer for scheduling your exported clips.
- Audio Enhancement: Audacity or Adobe Audition to clean up your audio before uploading.
- Video Compression: HandBrake for optimizing video files before upload.
Is Latte Social the Right AI Repurposing Tool for You?
Latte Social Decision Framework
✅ Choose Latte Social If:
- You are a brand-focused marketer, agency, or creator who values a high degree of control over visual branding (logos, fonts, colors)
- You want a mix of AI speed and precise manual editing capabilities
- Your template system requirements are excellent for scaling branded content
- You need deep customization options for subtitles and branding
🔄 Consider Alternatives If:
- Your primary goal is to quickly find potentially “viral” moments with minimal effort (consider Opus Clip)
- You are primarily a podcast creator or interviewer needing advanced speaker detection (consider Vidyo.ai)
- You need extensive social media scheduling and direct platform integrations
- You require real-time collaboration features for large teams
Ultimately, Latte Social strikes a unique balance, making it a powerful asset for those who want to automate their workflow without sacrificing their brand's unique visual identity.
You now possess the knowledge to dramatically increase your content output without sacrificing quality. An efficient repurposing workflow is one of the most powerful assets a modern content creator can have.
If you found this guide helpful, you can find more information here: Latte Social Tutorial: A Guide to the Automated AI Content Repurposing Workflow.
For additional support and common questions, don't miss our comprehensive Latte Social FAQs: Common Questions and Answers resource.


Leave a Reply