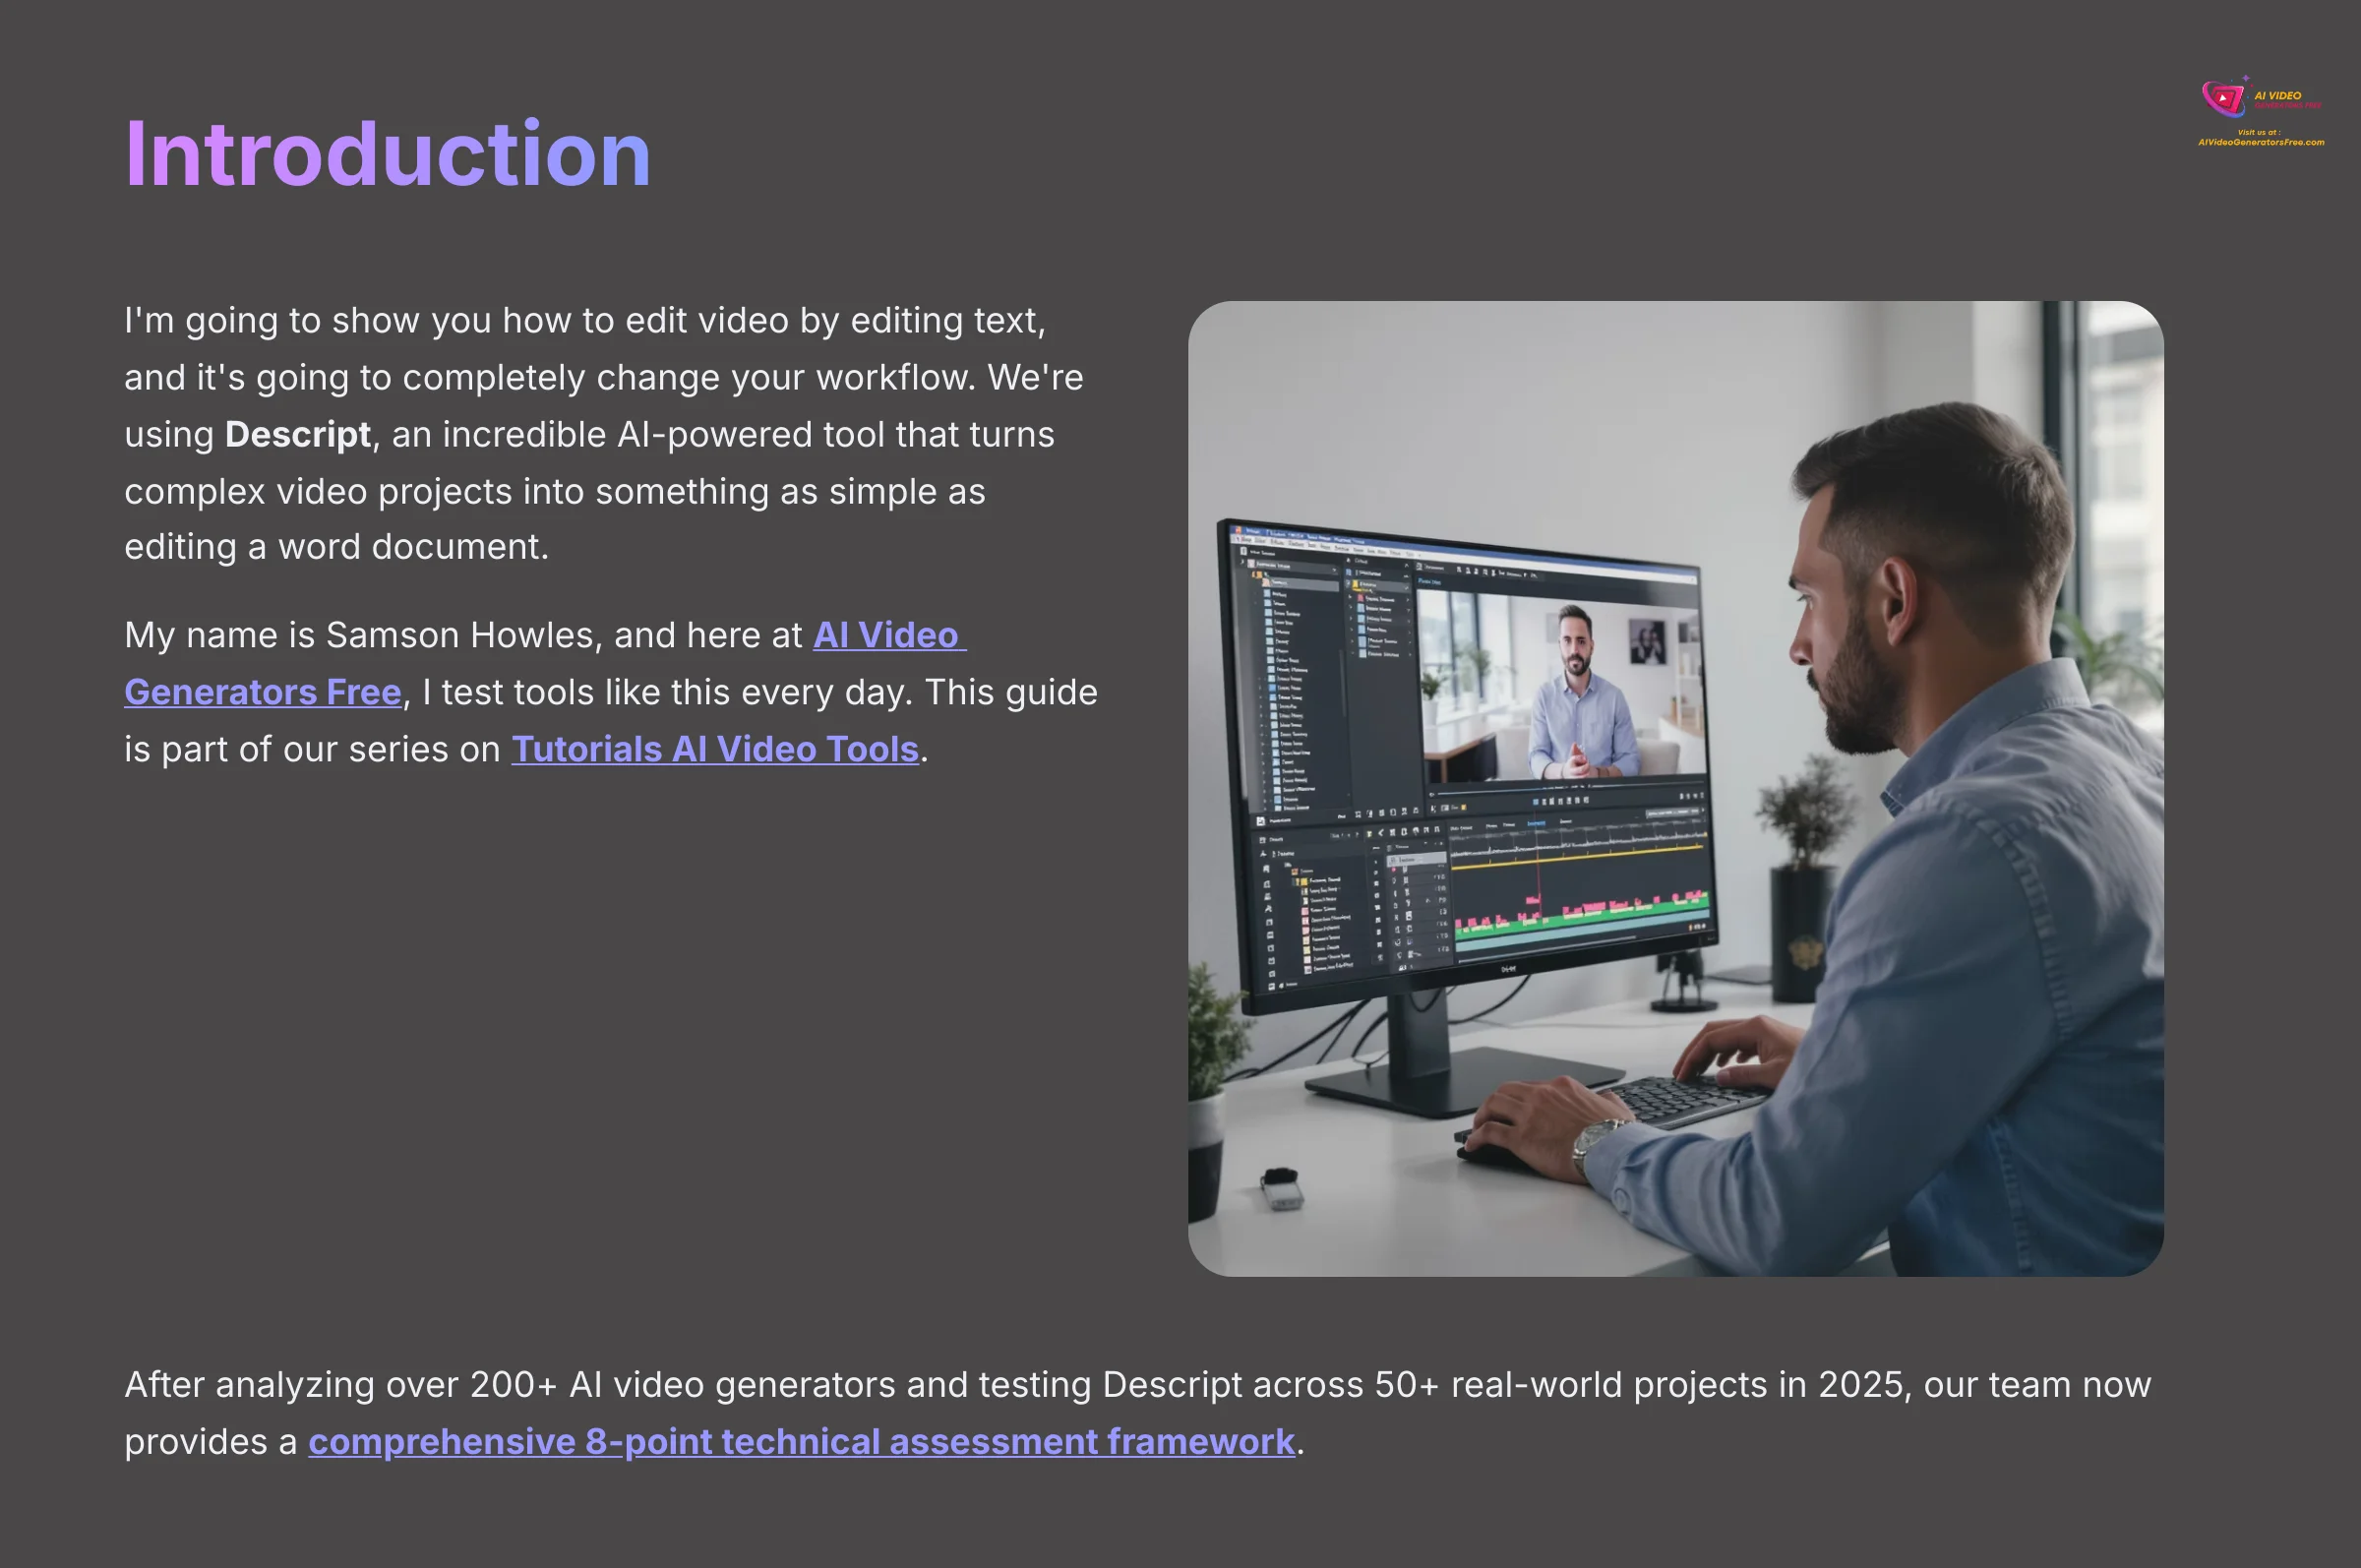
I'm going to show you how to edit video by editing text, and it's going to completely change your workflow. We're using Descript, an incredible AI-powered tool that turns complex video projects into something as simple as editing a word document. My name is Samson Howles, and here at AI Video Generators Free, I test tools like this every day. This Descript AI Tutorial will show you how this revolutionary tool helps content creators, marketers, and educators make their editing work dramatically faster. We'll cover everything from setup to advanced AI features like Studio Sound and Overdub. This guide is part of our series on Tutorials AI Video Tools where we focus on practical skills to help you master new technology.
After analyzing over 200+ AI video generators and testing Descript across 50+ real-world projects in 2025, our team at AI Video Generators Free now provides a comprehensive 8-point technical assessment framework that has been recognized by leading video production professionals and cited in major digital creativity publications.
Who is This Descript Tutorial For?
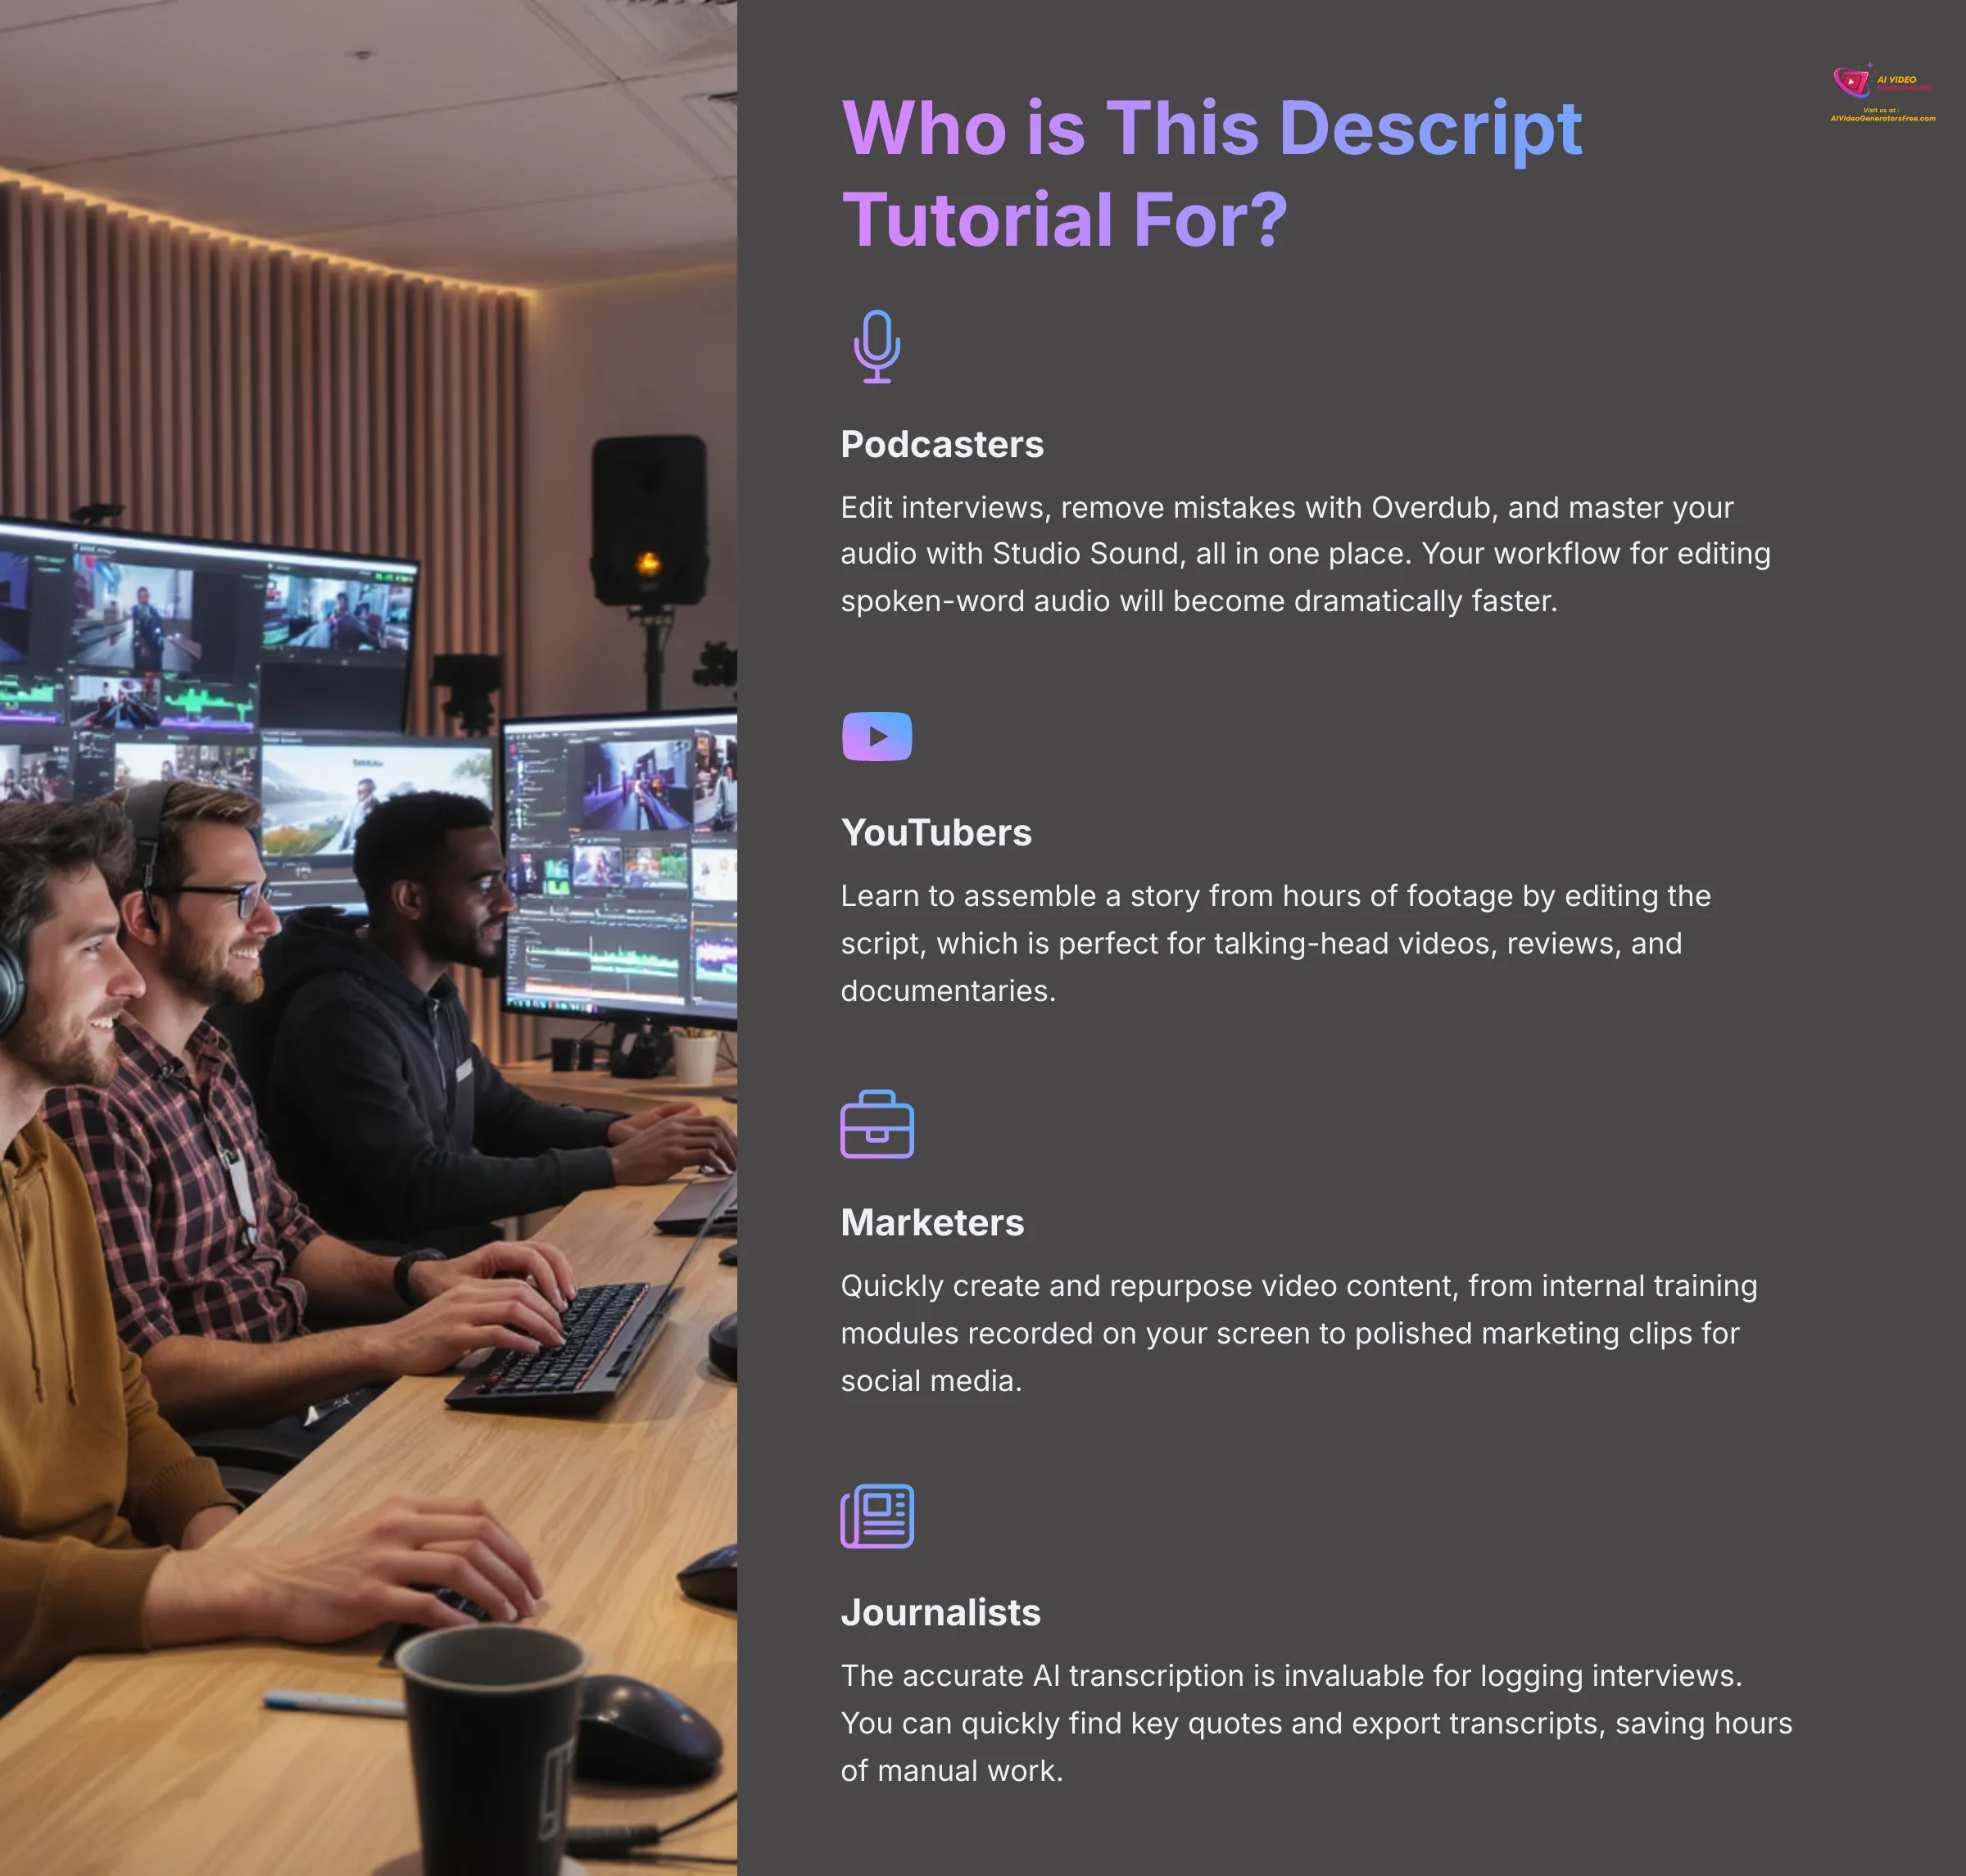
While Descript is a versatile tool, it offers unique advantages for specific types of creators. This tutorial is especially valuable if you are a:
- Podcaster: You can edit interviews, remove mistakes with Overdub, and master your audio with Studio Sound, all in one place. Your workflow for editing spoken-word audio will become dramatically faster.
- YouTuber or Video Creator: You'll learn to assemble a story from hours of footage by editing the script, which is perfect for talking-head videos, reviews, and documentaries.
- Marketer or Corporate Trainer: This guide shows you how to quickly create and repurpose video content, from internal training modules recorded on your screen to polished marketing clips for social media.
- Journalist or Researcher: The accurate AI transcription is invaluable for logging interviews. You can quickly find key quotes and export transcripts, saving hours of manual work.
Key Takeaways
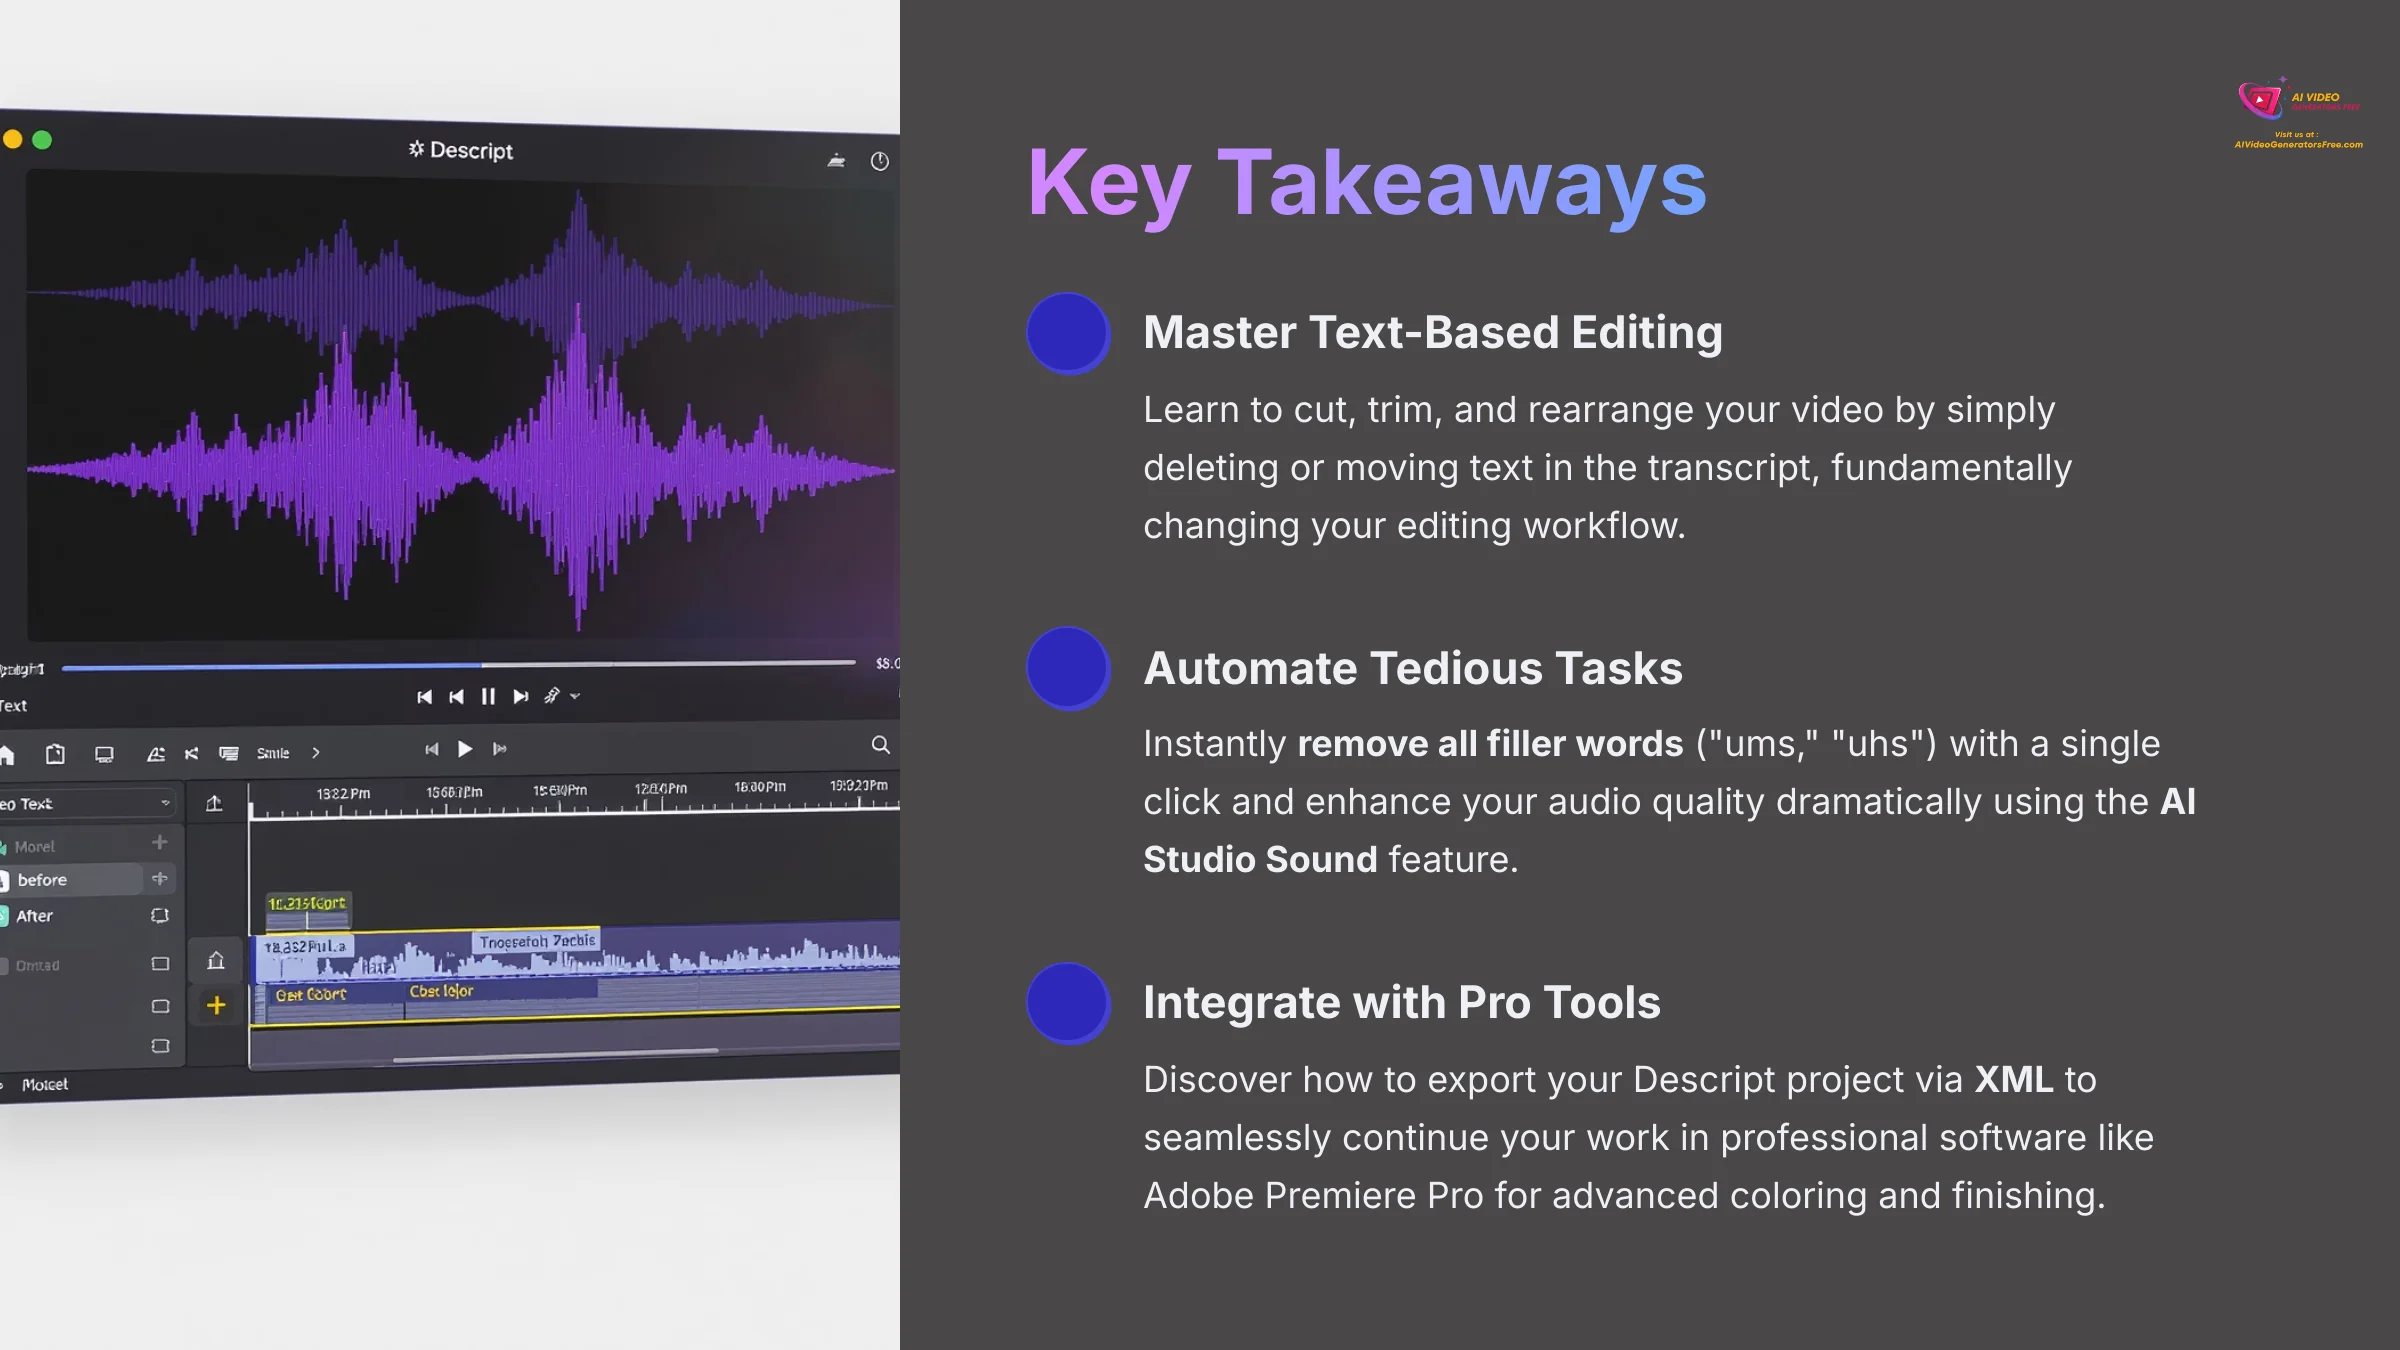
Key Takeaways
- Master Text-Based Editing: Learn to cut, trim, and rearrange your video by simply deleting or moving text in the transcript, fundamentally changing your editing workflow.
- Automate Tedious Tasks: Instantly remove all filler words (“ums,” “uhs”) with a single click and enhance your audio quality dramatically using the AI Studio Sound feature.
- Integrate with Pro Tools: Discover how to export your Descript project via XML to seamlessly continue your work in professional software like Adobe Premiere Pro for advanced coloring and finishing.
Module 1: Getting Started with Descript
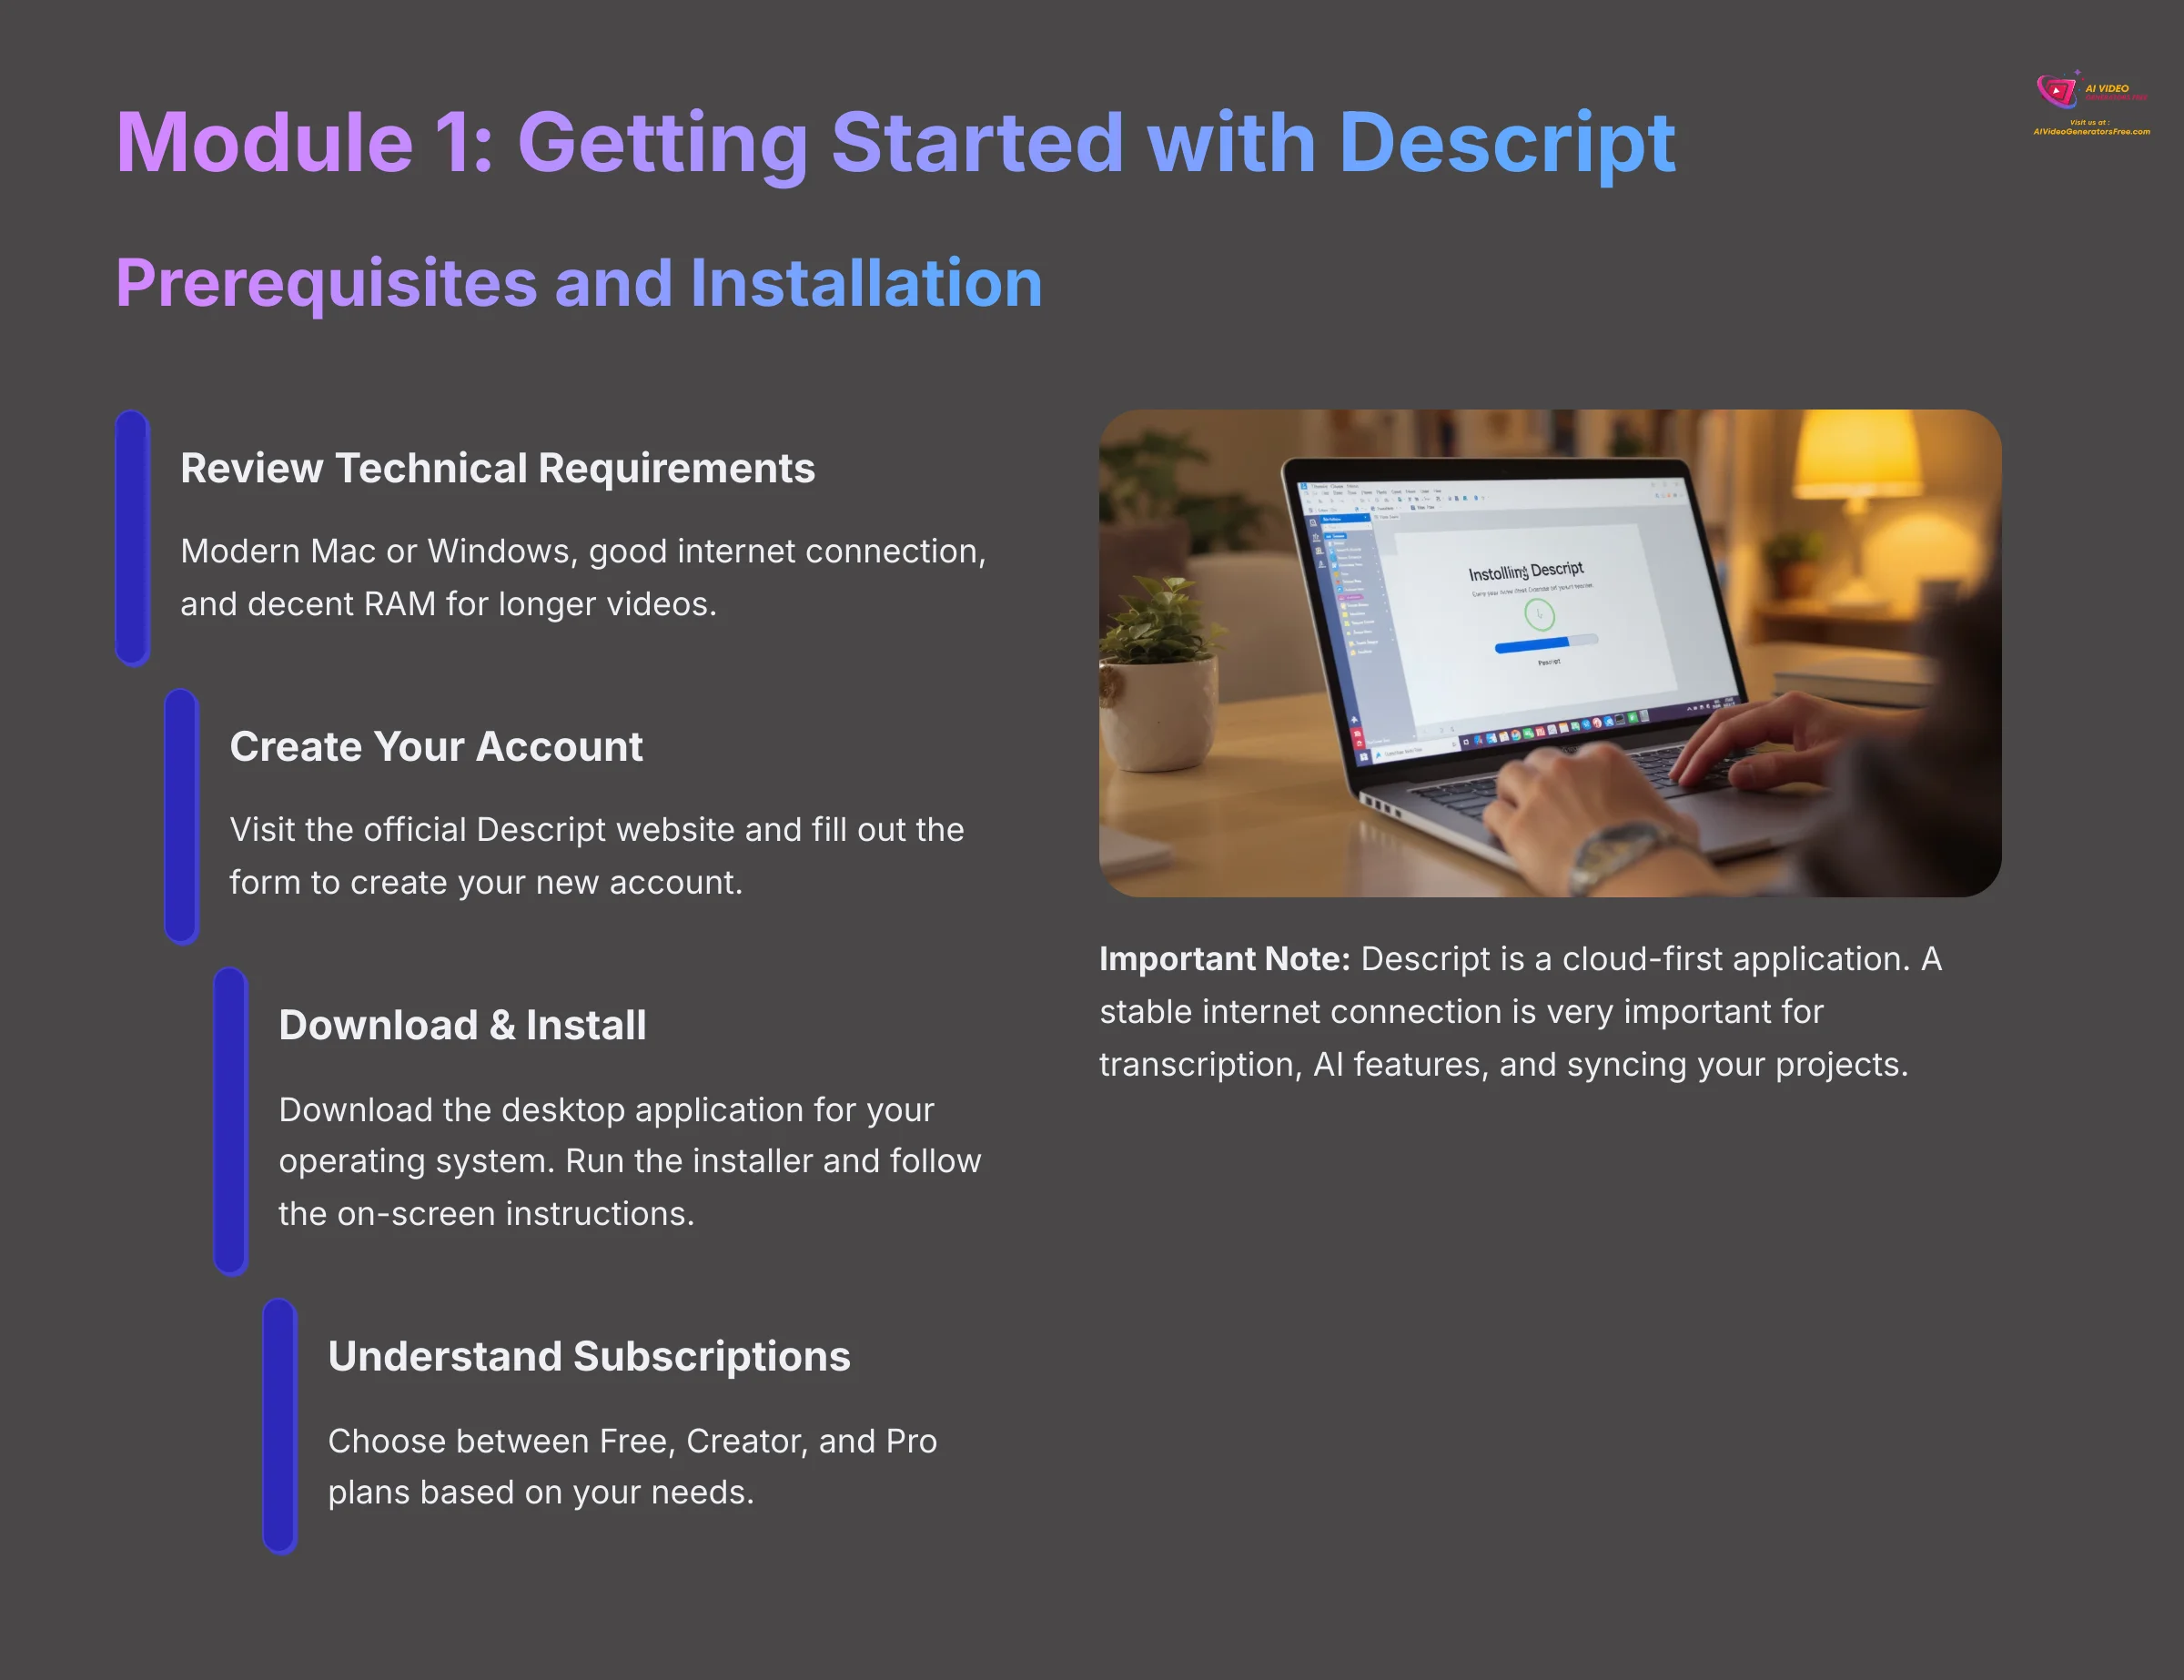
Prerequisites and Installation
Before you start, you need to get a few things ready. Having the right setup will make your experience smooth. This involves checking your computer, creating an account, and installing the software.
Here are the specific steps to get you started:
- Review Technical Requirements: Make sure your computer runs a modern version of Mac or Windows. You also need a good internet connection. I recommend having a decent amount of RAM for longer videos.
- Create Your Account: Go to the official Descript website. Fill out the form to create your new account.
- Download & Install: Download the desktop application for your operating system. Run the installer and follow the on-screen instructions.
- Understand Subscriptions: Descript uses a freemium model.
| Plan | Key Features |
|---|---|
| Free | Perfect for this tutorial, includes 1 hour of transcription per month, but exported videos have a Descript watermark. |
| Creator | Removes the watermark and increases transcription limits. |
| Pro | Unlocks unlimited Overdub vocabulary and advanced features like direct publishing to video hosting platforms. |
Important Note: Descript is a cloud-first application. A stable internet connection is very important for transcription, AI features, and syncing your projects. Also, be aware that Descript can handle longer video projects, but performance may vary based on the length and complexity of the project.
Action point: Create your Descript account and install the application on your computer.
The Descript Interface and Your First Project
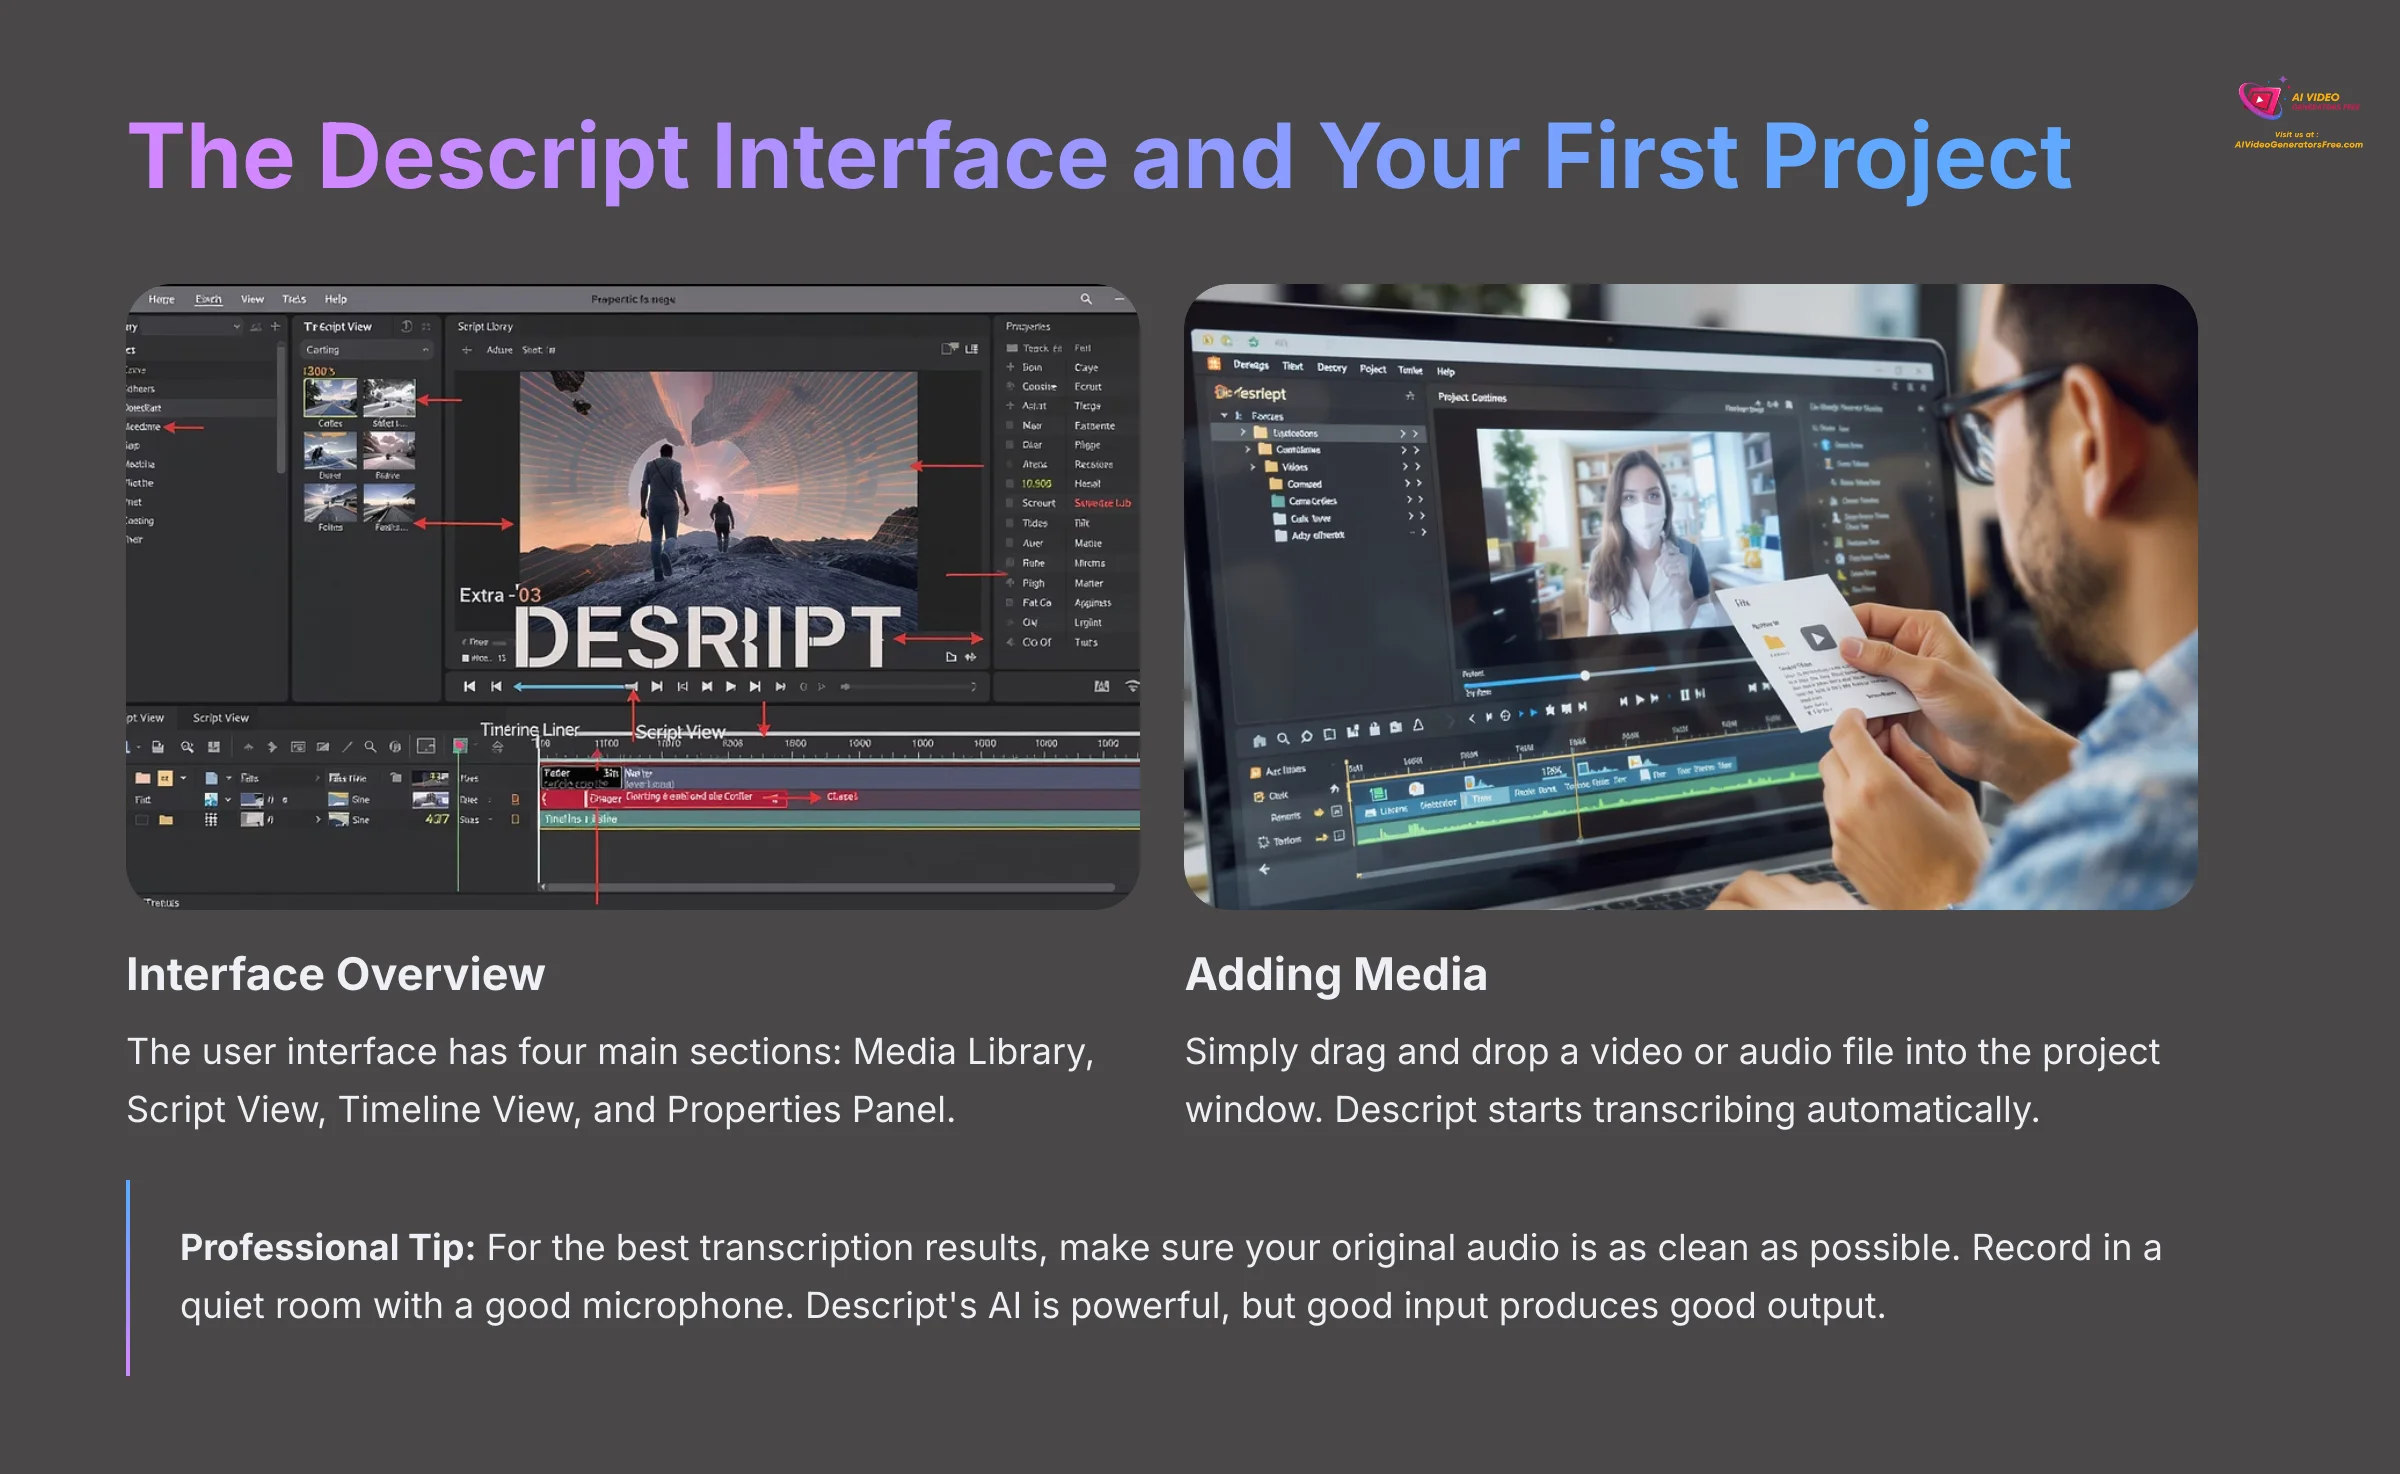
Now that you have Descript installed, let's open it up and look around. The interface is clean and organized into a few key areas. I'll walk you through creating your first project and importing a video.
Follow these steps to begin:
- Launch Descript and select “New Video Project” to start.
- The user interface has four main sections. The Media Library holds all your files. The Script View is where you edit the text. The Timeline View shows your video cuts visually. And the Properties Panel lets you adjust effects and settings.
- To add your media, simply drag and drop a video or audio file into the project window.
- Descript starts transcribing your file automatically using advanced speech-to-text (STT) technology. You can see a progress indicator showing how much time is left.
Professional Tip: For the best transcription results, make sure your original audio is as clean as possible. Record in a quiet room with a good microphone. Descript's AI is powerful, but good input produces good output.
Action point: Create a new video project and import a sample video file to see the transcription process in action.
Recording Directly in Descript (Screen and Camera)
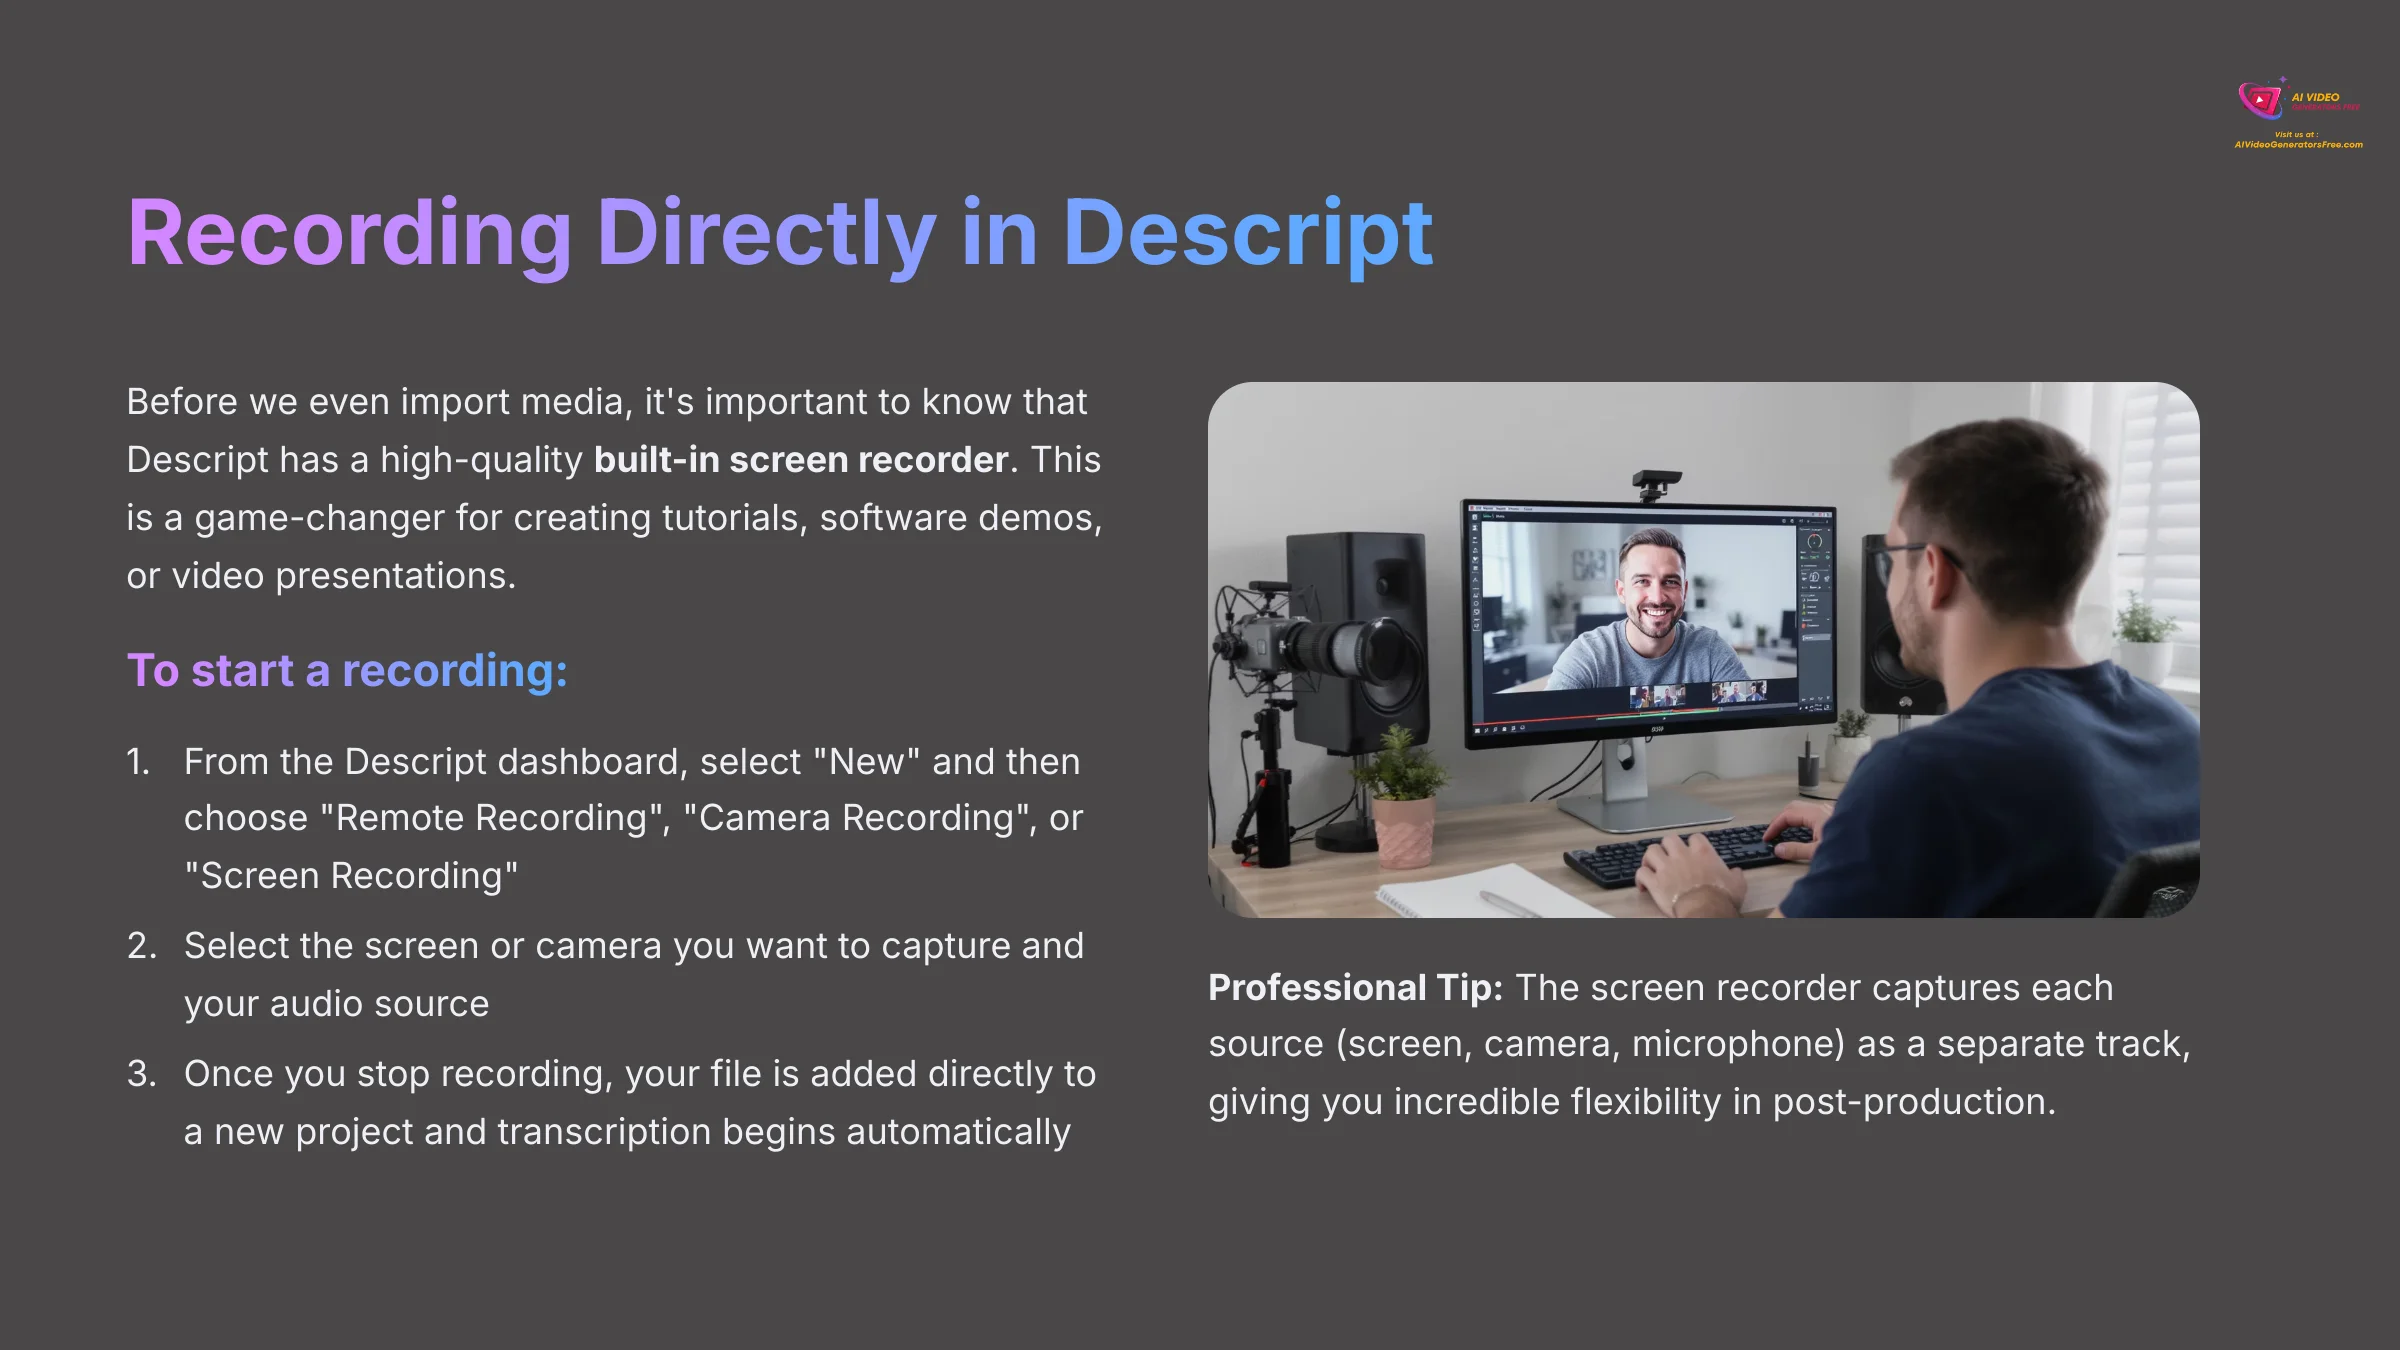
Before we even import media, it's important to know that Descript has a high-quality built-in screen recorder. This is a game-changer for creating tutorials, software demos, or video presentations, as it lets you record and edit in the same application.
To start a recording:
- From the Descript dashboard, select “New” and then choose “Remote Recording” (for guests) or “Camera Recording” / “Screen Recording”.
- Select the screen or camera you want to capture and your audio source (microphone).
- Once you stop recording, your file is added directly to a new project and transcription begins automatically.
Professional Tip: The screen recorder captures each source (your screen, your camera, your microphone) as a separate track. This gives you incredible flexibility in post-production. For example, you can resize your camera feed or apply Studio Sound to your microphone audio independently of the system audio.
Action point: Test the screen recording feature by recording a short demo of your desktop.
Module 2: The Core Workflow: Editing Video Like a Document
Now that we've shaped the basic project setup, it's time to dive into Descript's revolutionary core feature. In this module, we'll explore how text-based editing transforms traditional video editing into something as intuitive as working with a word processor.
Correcting the AI Transcript
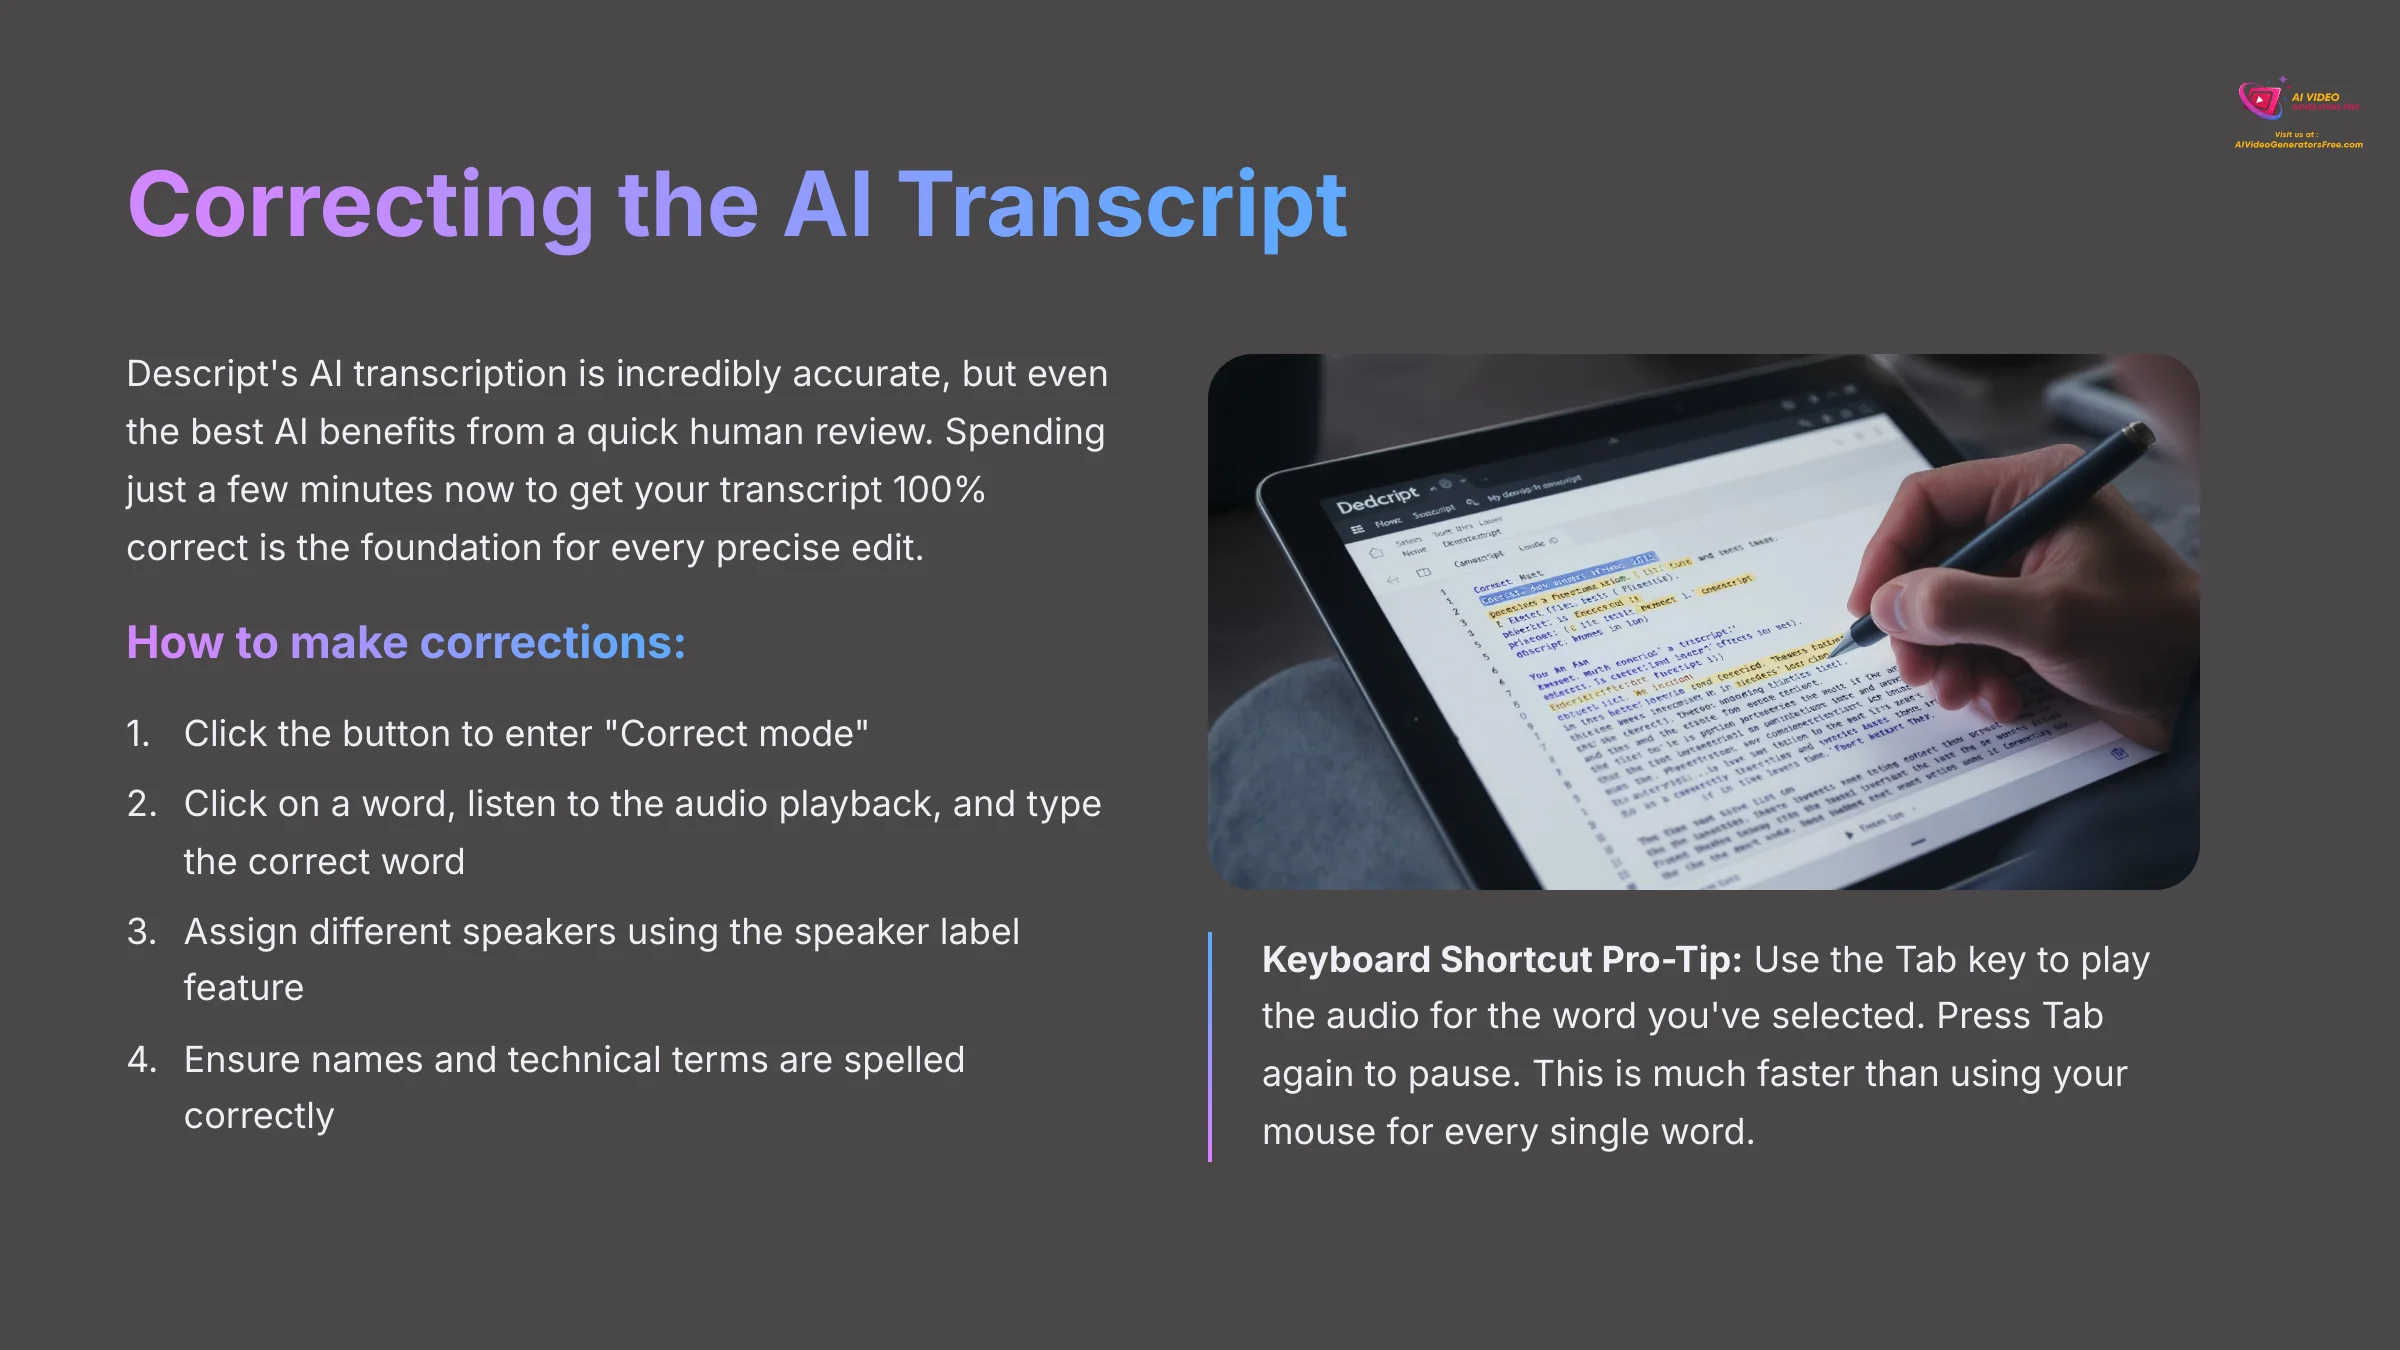
Descript's AI transcription is incredibly accurate, but even the best AI benefits from a quick human review. Spending just a few minutes now to get your transcript 100% correct is the foundation for every precise, magical edit we're about to make.
Here is how you can make corrections:
- Click the button to enter “Correct mode.” This mode lets you fix text without changing the video timeline itself.
- To make a fix, click on a word, listen to the audio playback, and type the correct word.
- You can also assign different speakers using the speaker label feature. This helps keep your transcript organized and enables speaker detection for multi-person content.
- Take advantage of Descript's natural language processing (NLP) capabilities by ensuring names and technical terms are spelled correctly.
Keyboard Shortcut Pro-Tip: Use theTabkey to play the audio for the word you've selected. PressTabagain to pause. This is much faster than using your mouse for every single word.
Action point: In your sample project, correct at least three words in the transcript to practice the workflow.
Your First Edit: Deleting Words, Sentences, and Paragraphs

This is where the magic happens. I'm going to show you how to cut video footage by simply deleting text from a script. This turns video editing into a process as simple as editing a text document, enabling non-destructive editing workflows that traditional timeline editors can't match.
Let's make our first edit:
- Make sure you are back in “Edit mode” and not “Correct mode.”
- Here is the main idea: anything you delete from the script is instantly cut from the video and audio.
- Try highlighting a single word. Then highlight a full sentence, and then an entire paragraph.
- Now, press the
DeleteorBackspacekey on your keyboard. - Look at the result. The video preview will jump, and you will see a new cut appear on the timeline.
The first time I edited a video by deleting a paragraph was a complete game-changer. It transformed my view of editing from a technical chore to a creative storytelling process.
Action point: In your sample project, find a sentence you don't like, highlight it, and delete it. Play back the video to see the instant result.
One-Click Magic: Removing Filler Words Automatically
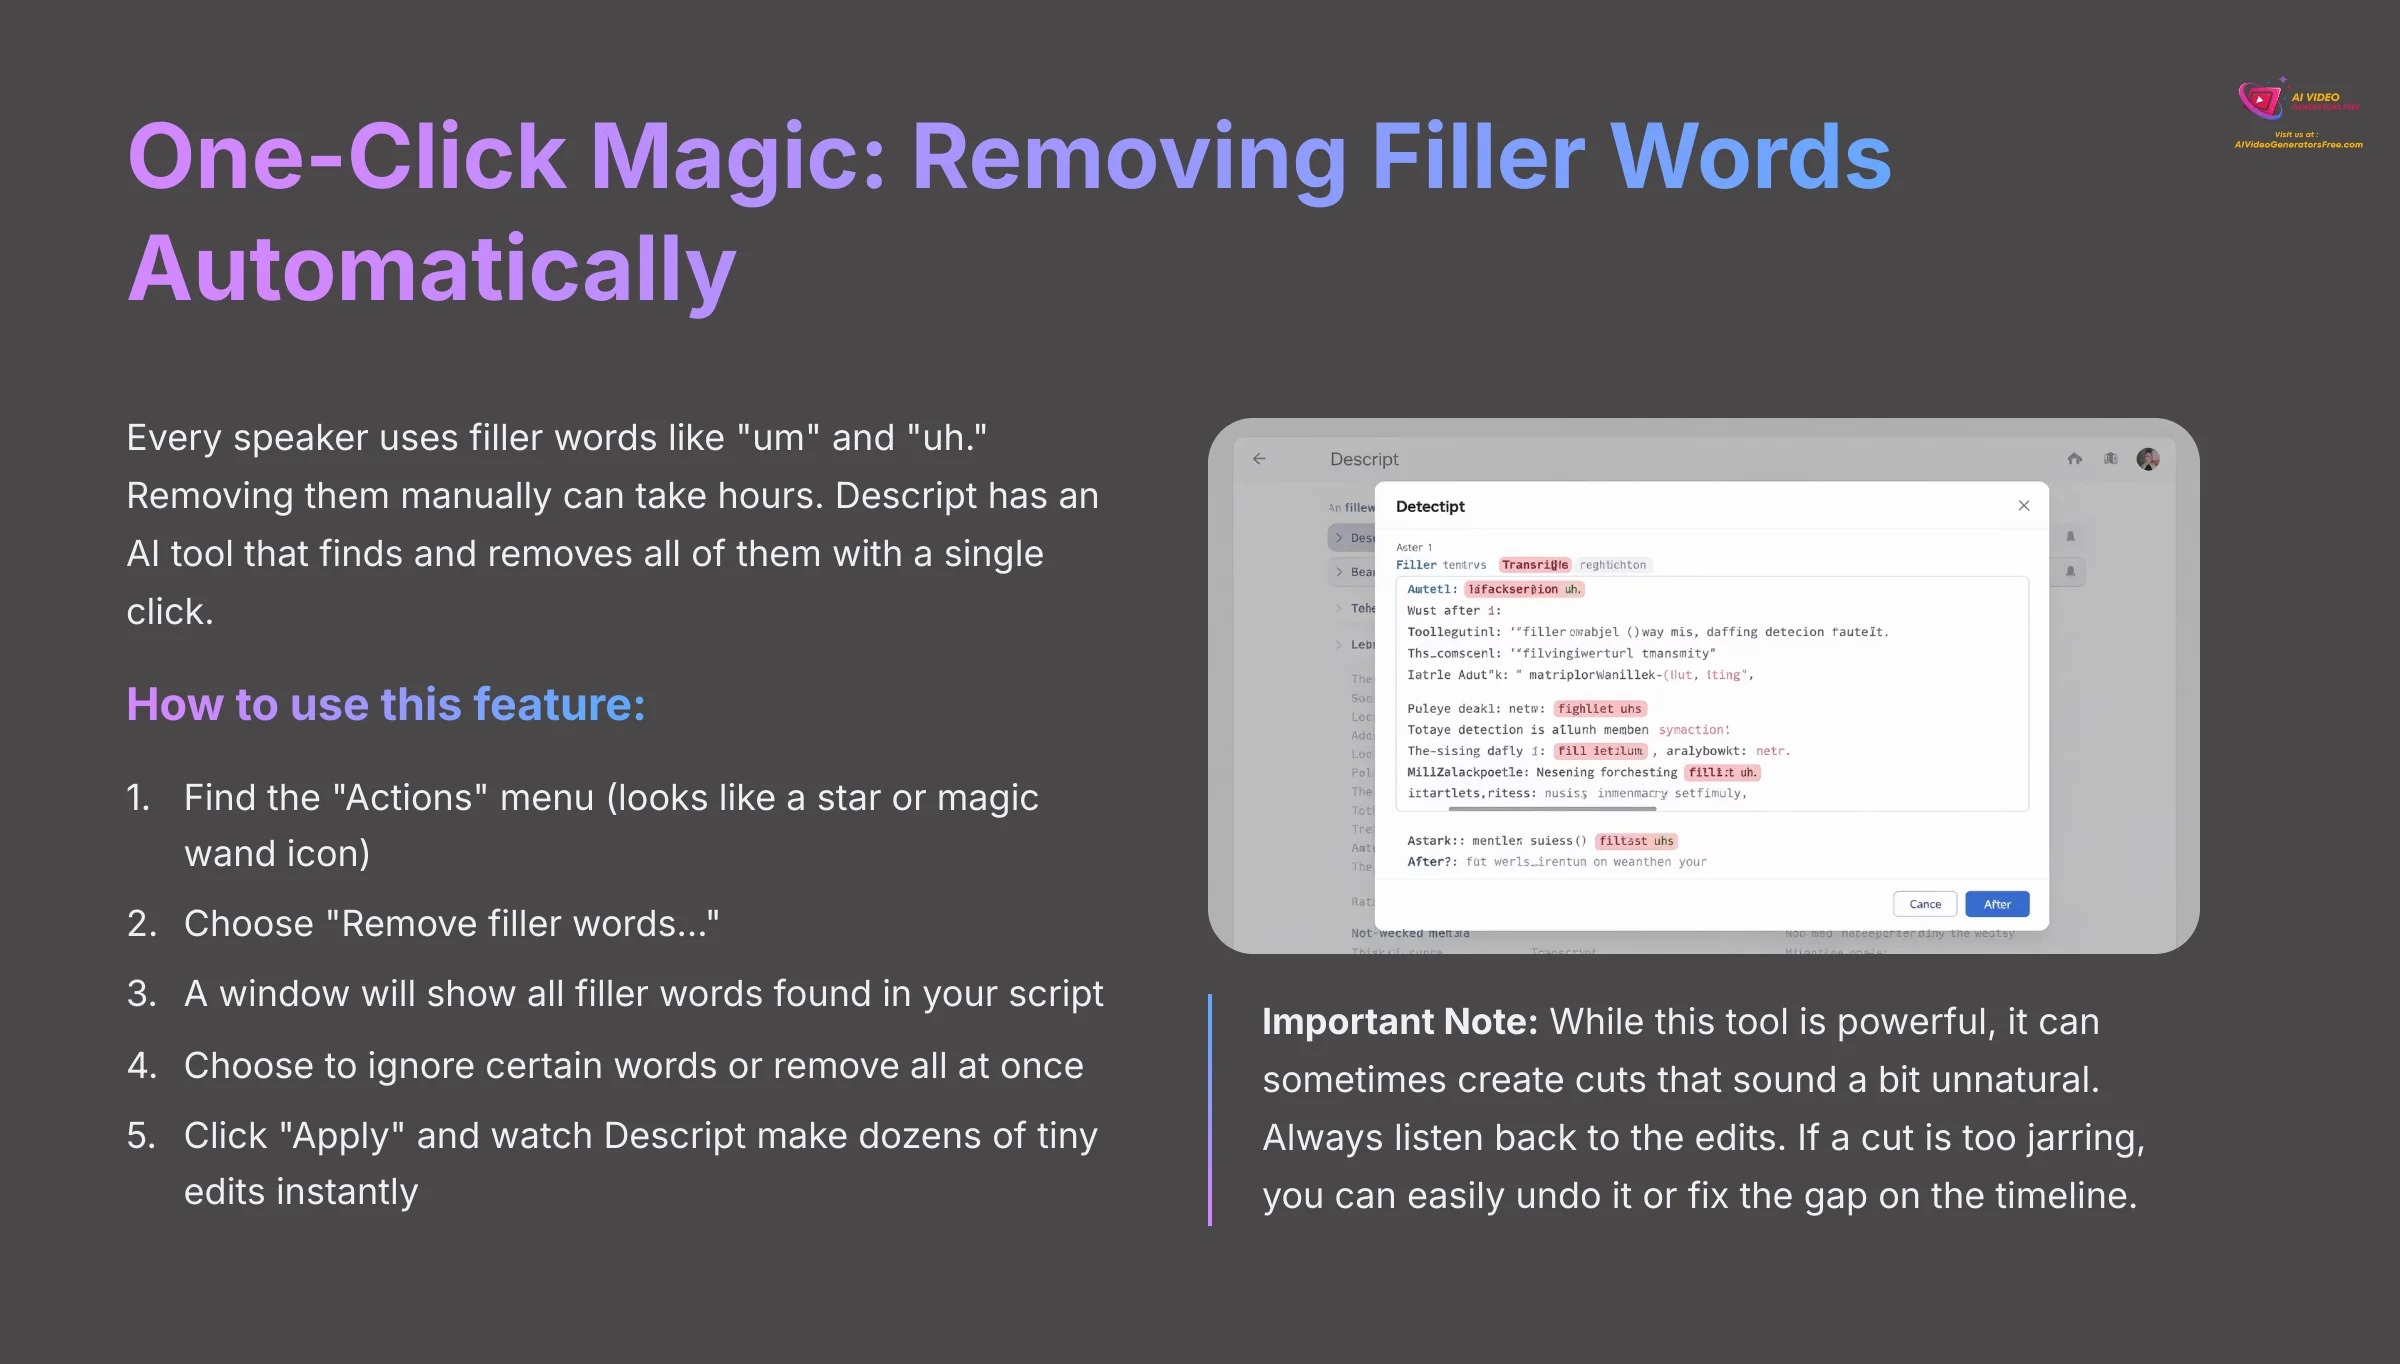
Every speaker uses filler words like “um” and “uh.” Removing them manually can take hours. Descript has an AI tool that finds and removes all of them with a single click, saving a massive amount of time through automated content processing.
Here's how to use this feature:
- Find the “Actions” menu, which looks like a star or magic wand icon.
- From the menu, choose “Remove filler words…”
- A new window will pop up showing all the filler words found in your script using advanced speech pattern recognition.
- You can choose to ignore certain words or remove all of them at once.
- Click “Apply.” You will see Descript make dozens of tiny edits to your project instantly.
Important Note: While this tool is powerful, it can sometimes create cuts that sound a bit unnatural. Always listen back to the edits. If a cut is too jarring, you can easily undo it (Ctrl+ZorCmd+Z) or fix the gap on the timeline.
Action point: Use the remove filler words feature on your project and listen to the before and after results.
Module 3: Enhancing Your Video with AI Magic
Now that we've mastered the structural editing capabilities, it's time to explore Descript's AI-powered enhancement tools. These generative AI features can dramatically improve both your audio and visual quality with minimal effort.
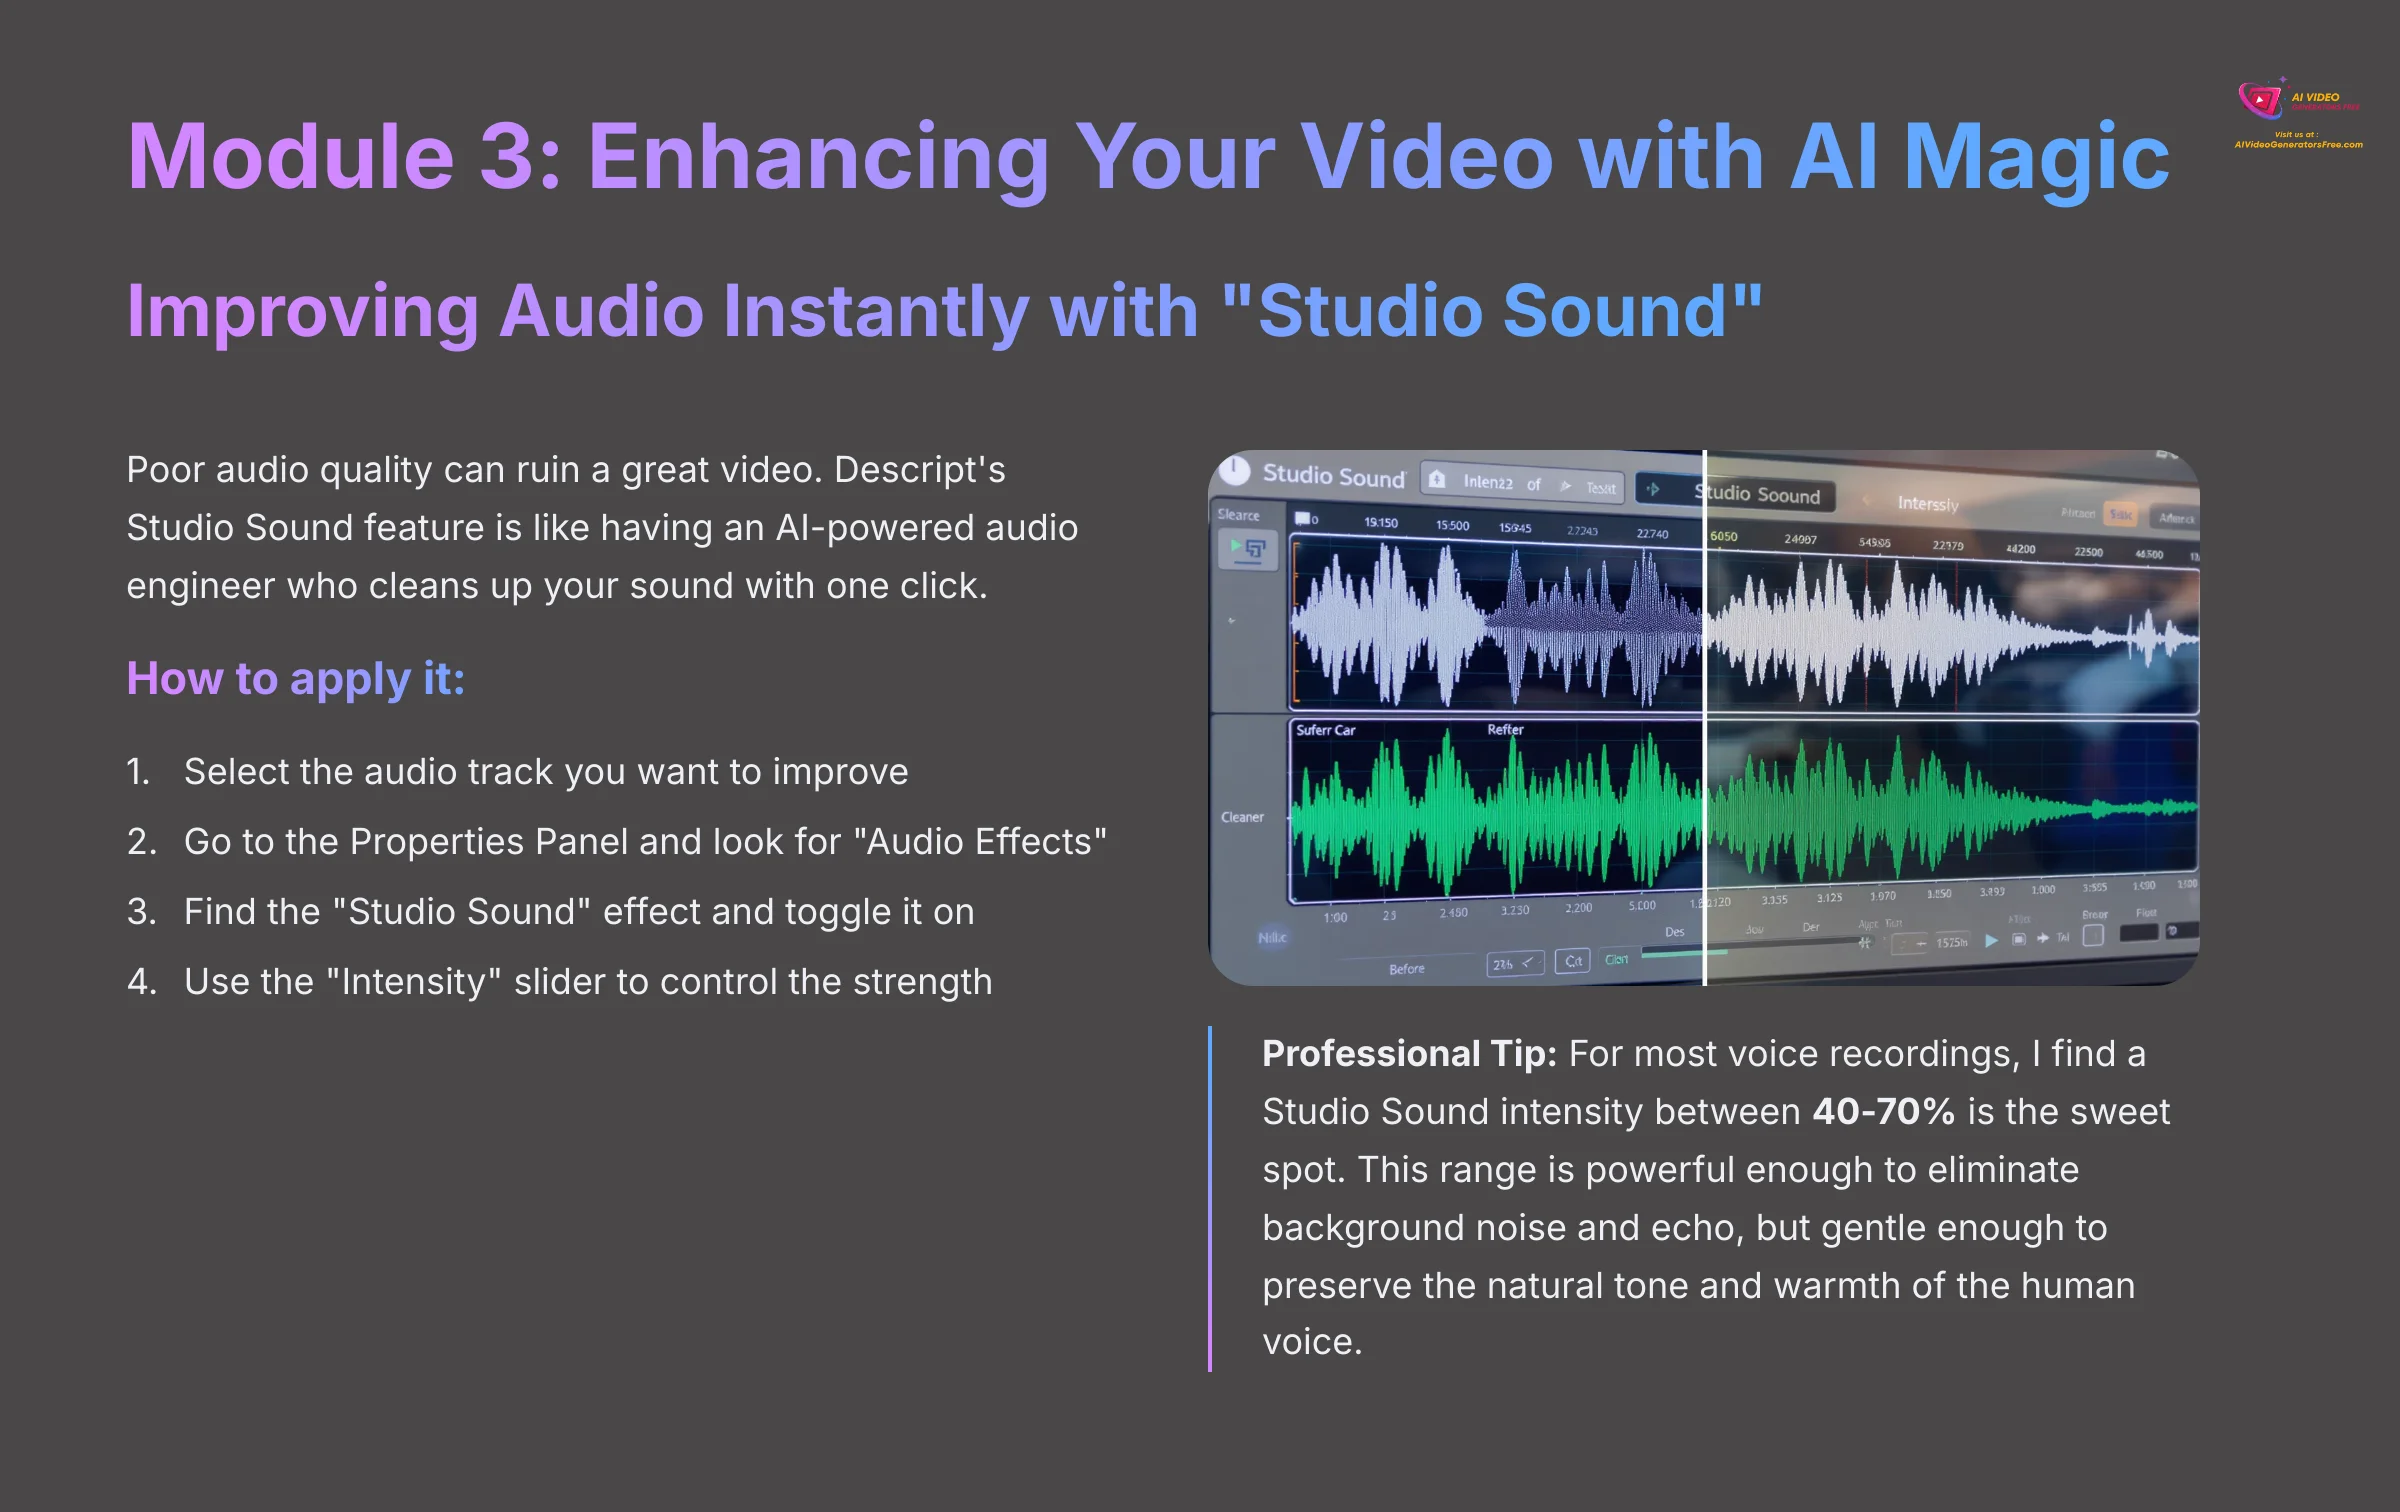
Improving Audio Instantly with “Studio Sound”
Poor audio quality can ruin a great video. Descript's Studio Sound feature is like having an AI-powered audio engineer who cleans up your sound with one click. It removes background noise and makes voices sound rich and clear using advanced audio processing algorithms.
Follow these steps to apply it:
- Select the audio track you want to improve in the script or on the timeline.
- Go to the Properties Panel and look for the “Audio Effects” section.
- Find the “Studio Sound” effect and toggle the switch to turn it on.
- Use the “Intensity” slider to control how strong the effect is.
Professional Tip: For most voice recordings, I find a Studio Sound intensity between 40-70% is the sweet spot. This range is powerful enough to eliminate background noise and echo, but gentle enough to preserve the natural tone and warmth of the human voice. Pushing it to 100% can sometimes sound over-processed and artificial.
Action point: Apply Studio Sound to your audio and experiment with different intensity levels to hear the difference.
Correcting Mistakes with AI Voice Cloning (“Overdub”)
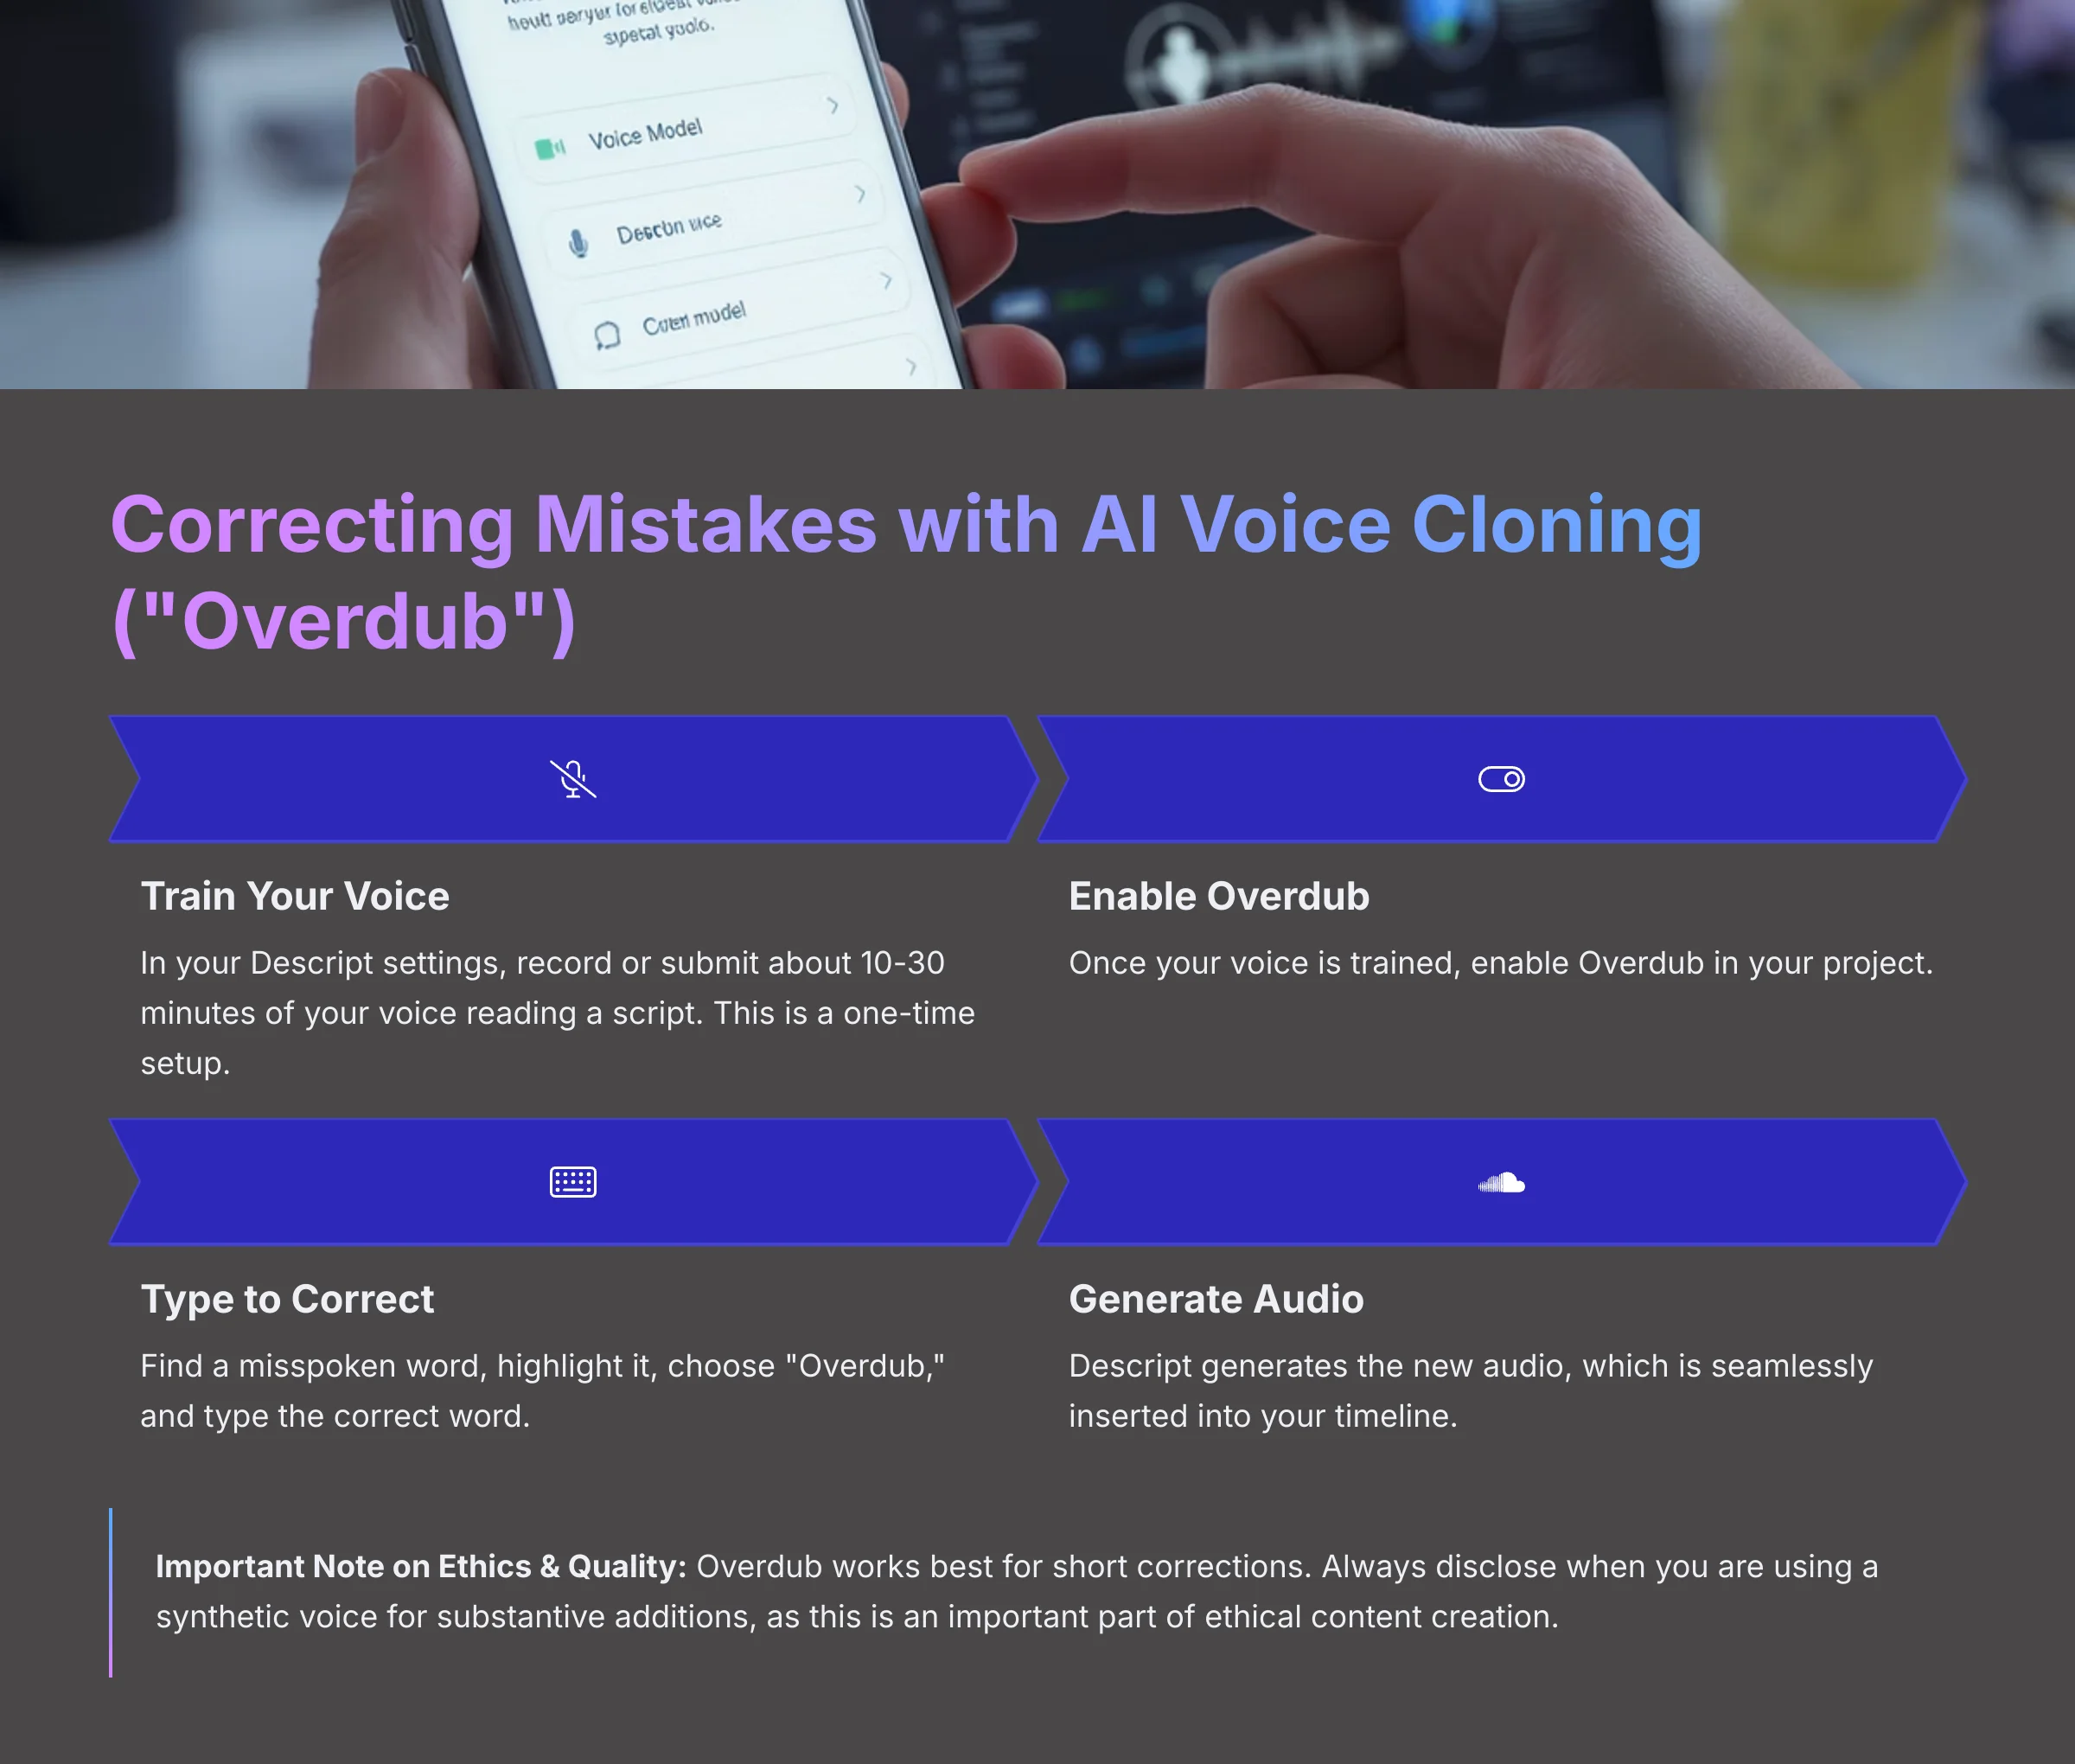
One of Descript's most powerful generative AI features is Overdub. After training it on your voice, you can correct verbal mistakes or add new words by simply typing them. Descript then generates the new audio in a synthetic version of your own voice. This avoids the need for tedious re-recordings.
Here's the basic workflow to use Overdub:
- Train Your Voice: In your Descript settings, you'll need to record or submit about 10-30 minutes of your voice reading a script. This is a one-time setup.
- Enable Overdub: Once your voice is trained, you can enable Overdub in a project.
- Type to Correct: Find a misspoken word in your script. Highlight it, choose “Overdub,” and type the correct word.
- Generate Audio: Descript will generate the new audio. You can listen and confirm it sounds right before it's seamlessly inserted into your timeline.
Important Note on Ethics & Quality: Overdub is incredibly powerful, but it works best for short corrections of one or two words. Longer generated sentences can sometimes sound slightly artificial. Always disclose when you are using a synthetic voice for substantive additions, as this is an important part of ethical content creation.
Action point: If you have access to Overdub, train your voice and try correcting a single word in your project.
Fixing Gaze with the “Eye Contact” AI Effect
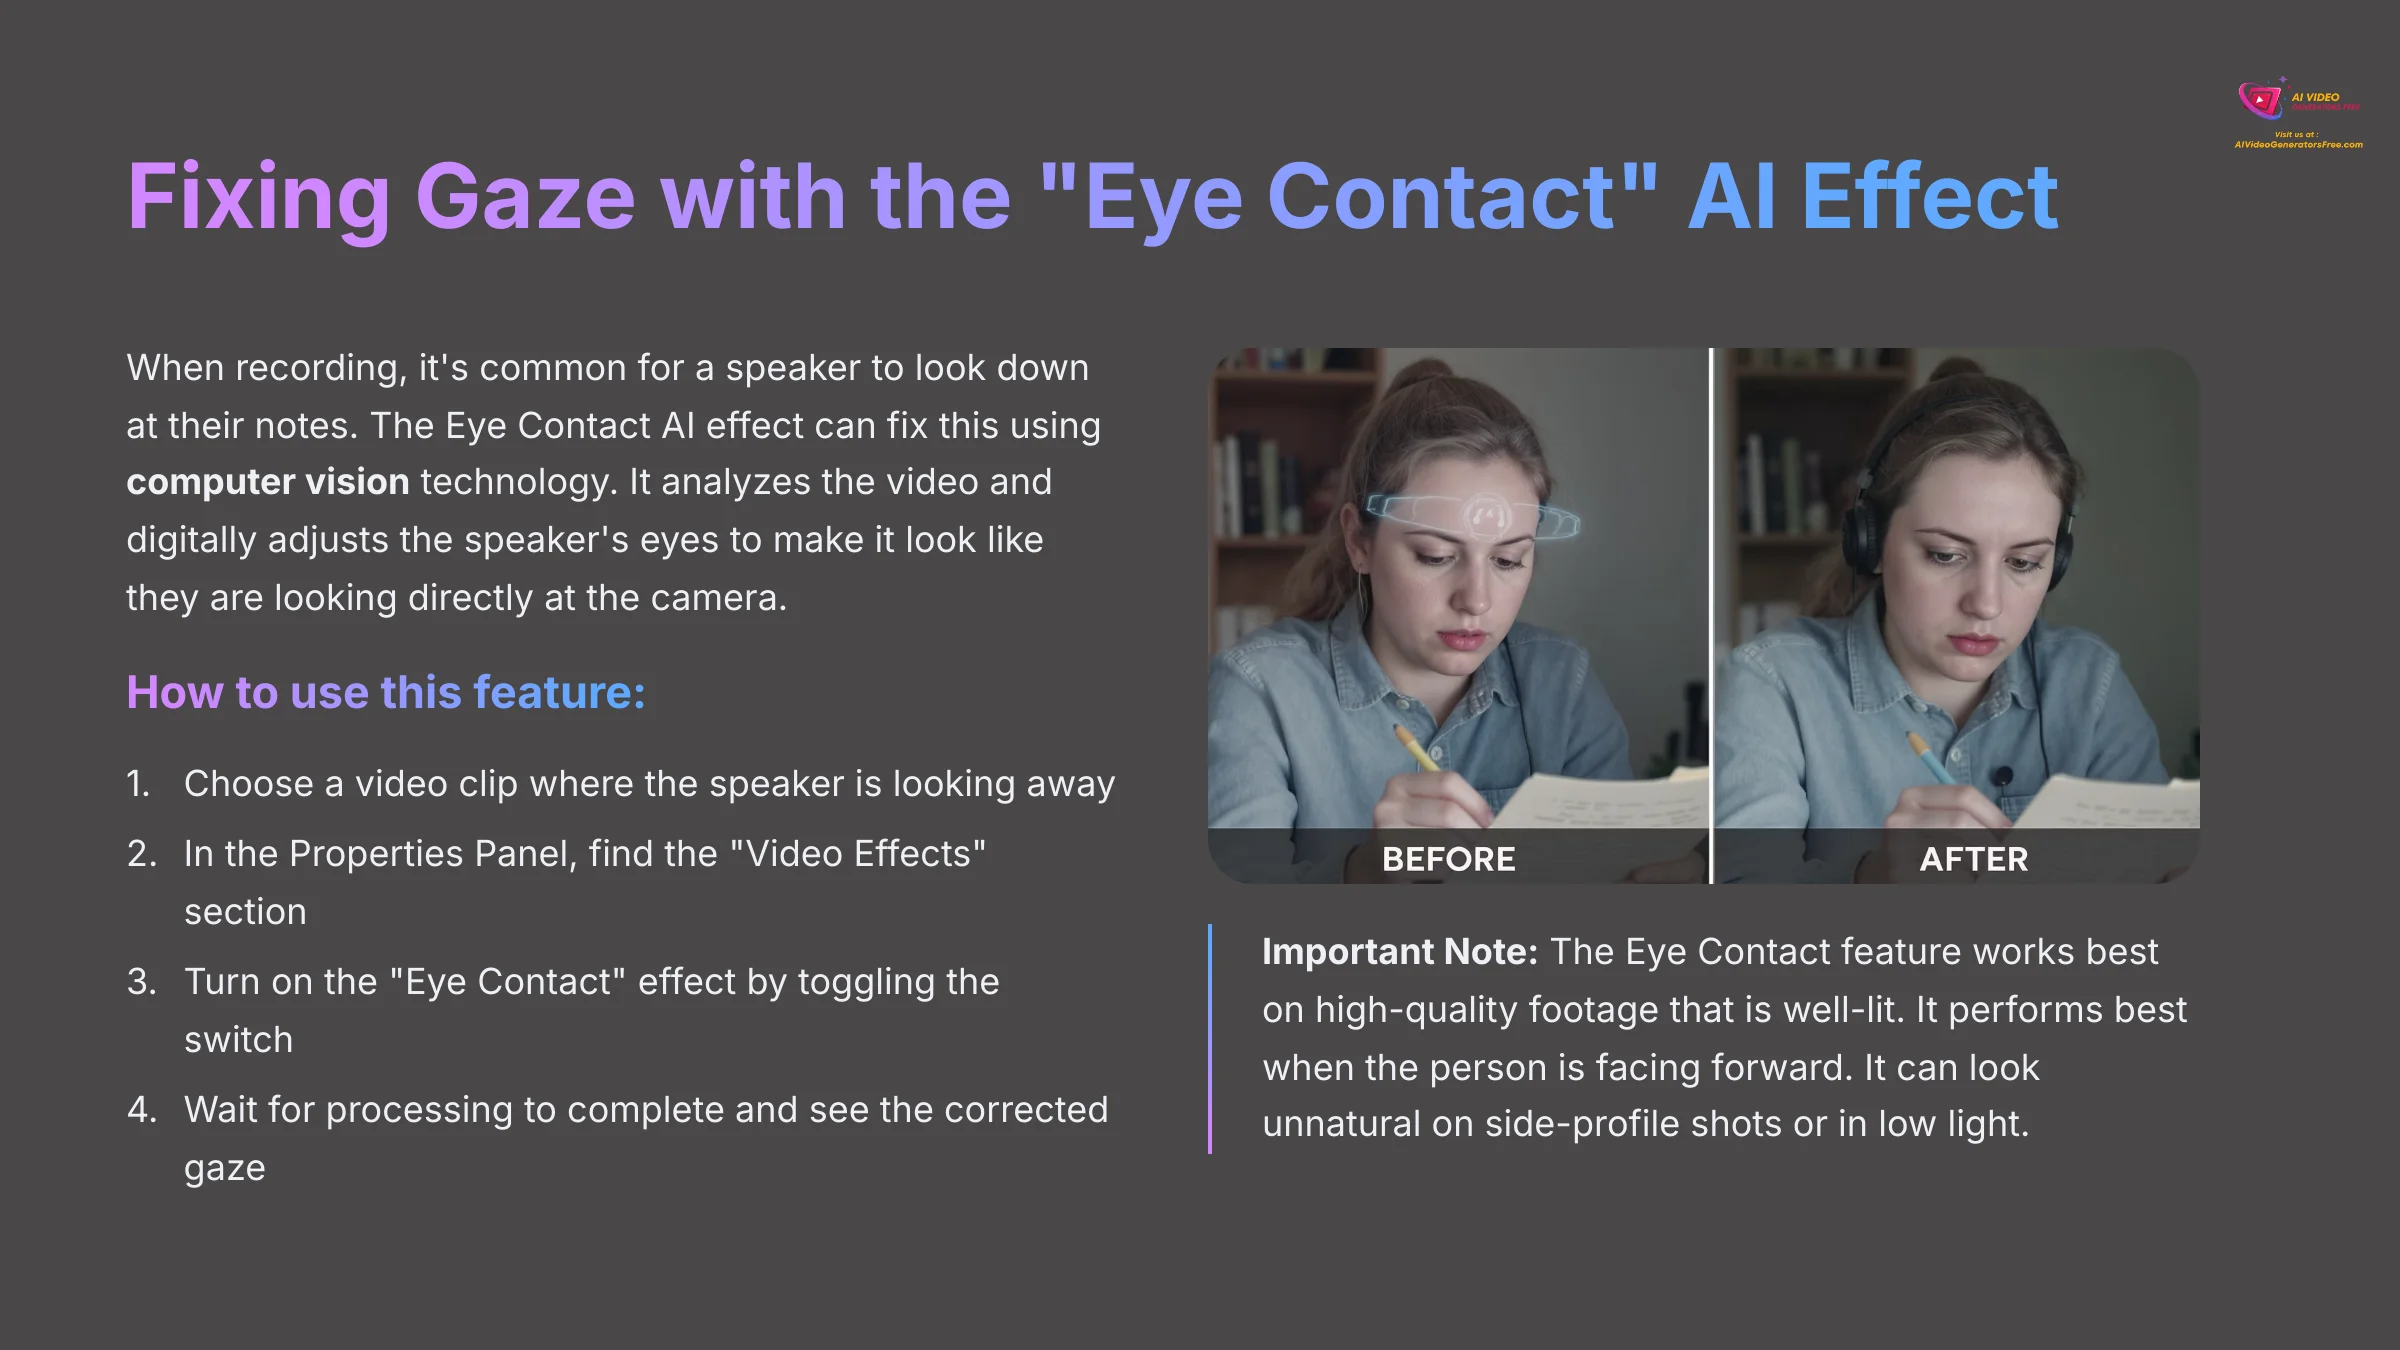
When recording, it's common for a speaker to look down at their notes. The Eye Contact AI effect can fix this using computer vision technology. It analyzes the video and digitally adjusts the speaker's eyes to make it look like they are looking directly at the camera.
Here is how to use this feature:
- Choose a video clip where the speaker is looking away from the camera.
- In the Properties Panel, find the “Video Effects” section.
- Turn on the “Eye Contact” effect by toggling the switch.
- The effect might take a moment to process. Afterward, you will see the speaker's gaze corrected.
Important Note: The Eye Contact feature works best on high-quality footage that is well-lit. It performs best when the person is facing forward. It can look unnatural on side-profile shots or in low light, so use it for small corrections.
Action point: Test the Eye Contact effect on a video where you or someone else is looking slightly away from the camera.
Module 4: Advanced Workflows and Professional Integration
Moving from basic editing to professional workflows, this module covers how to leverage Descript's collaborative features and integrate with industry-standard tools for complex projects.
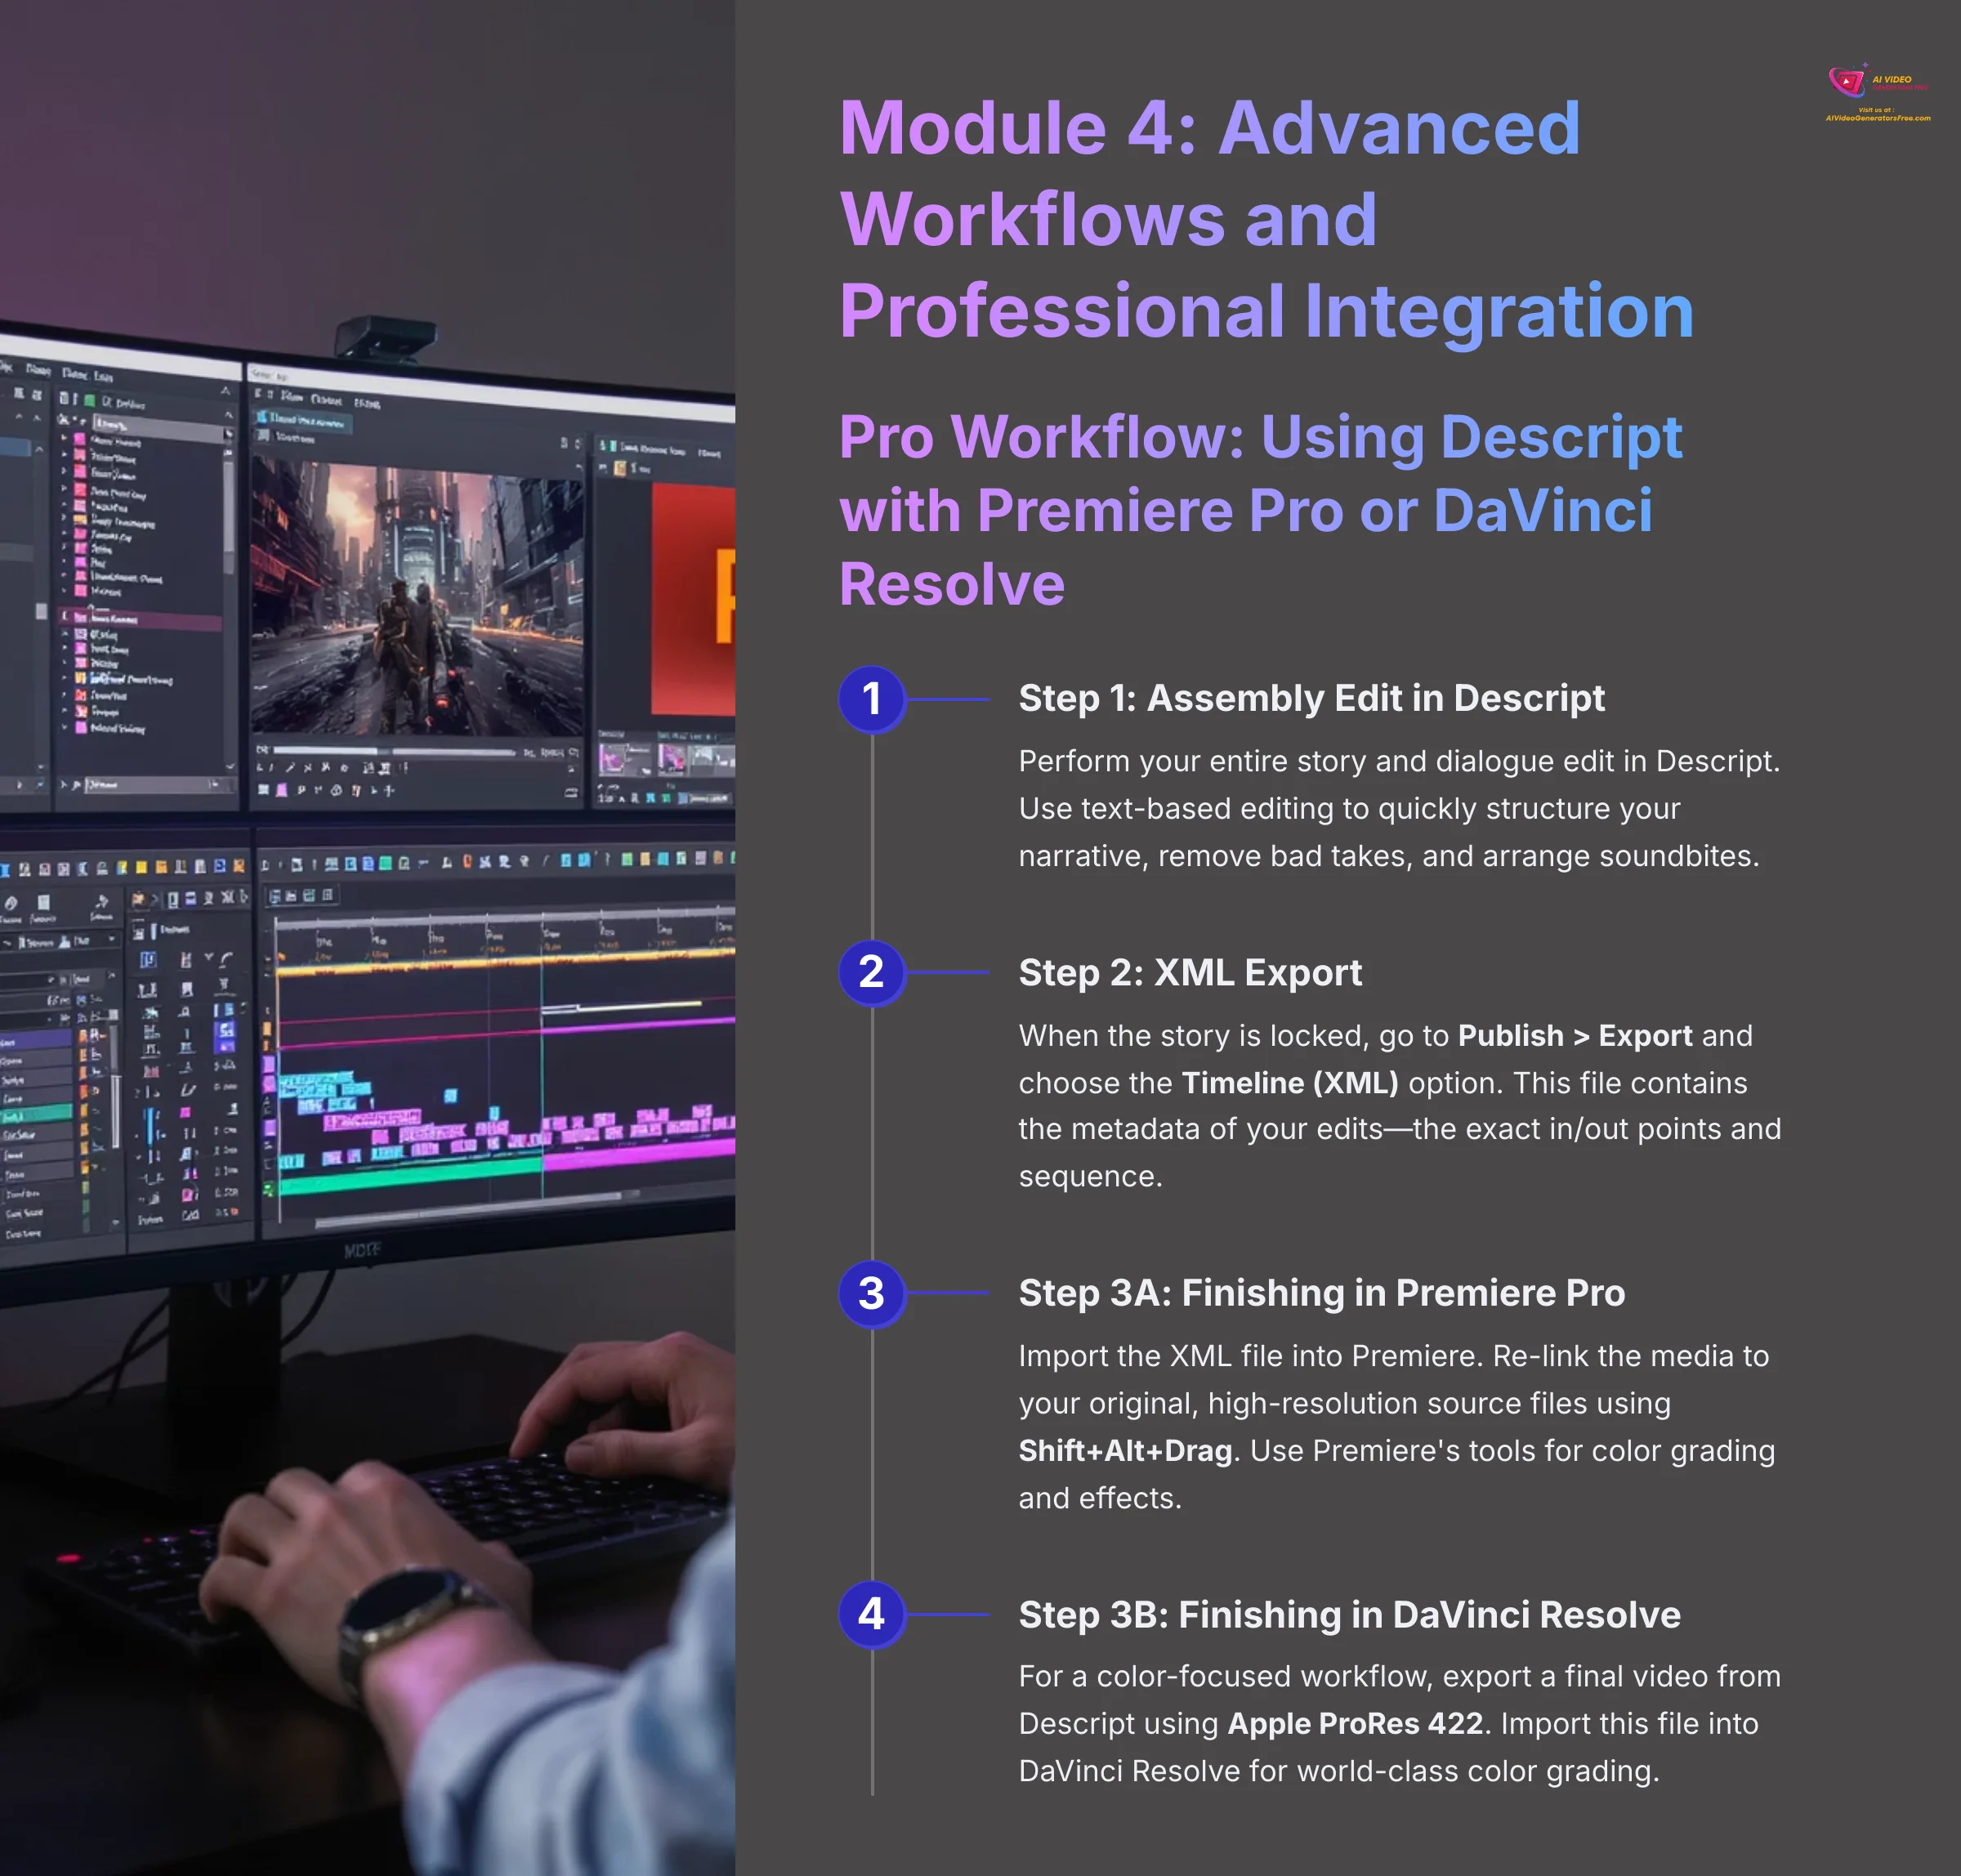
Pro Workflow: Using Descript with Premiere Pro or DaVinci Resolve
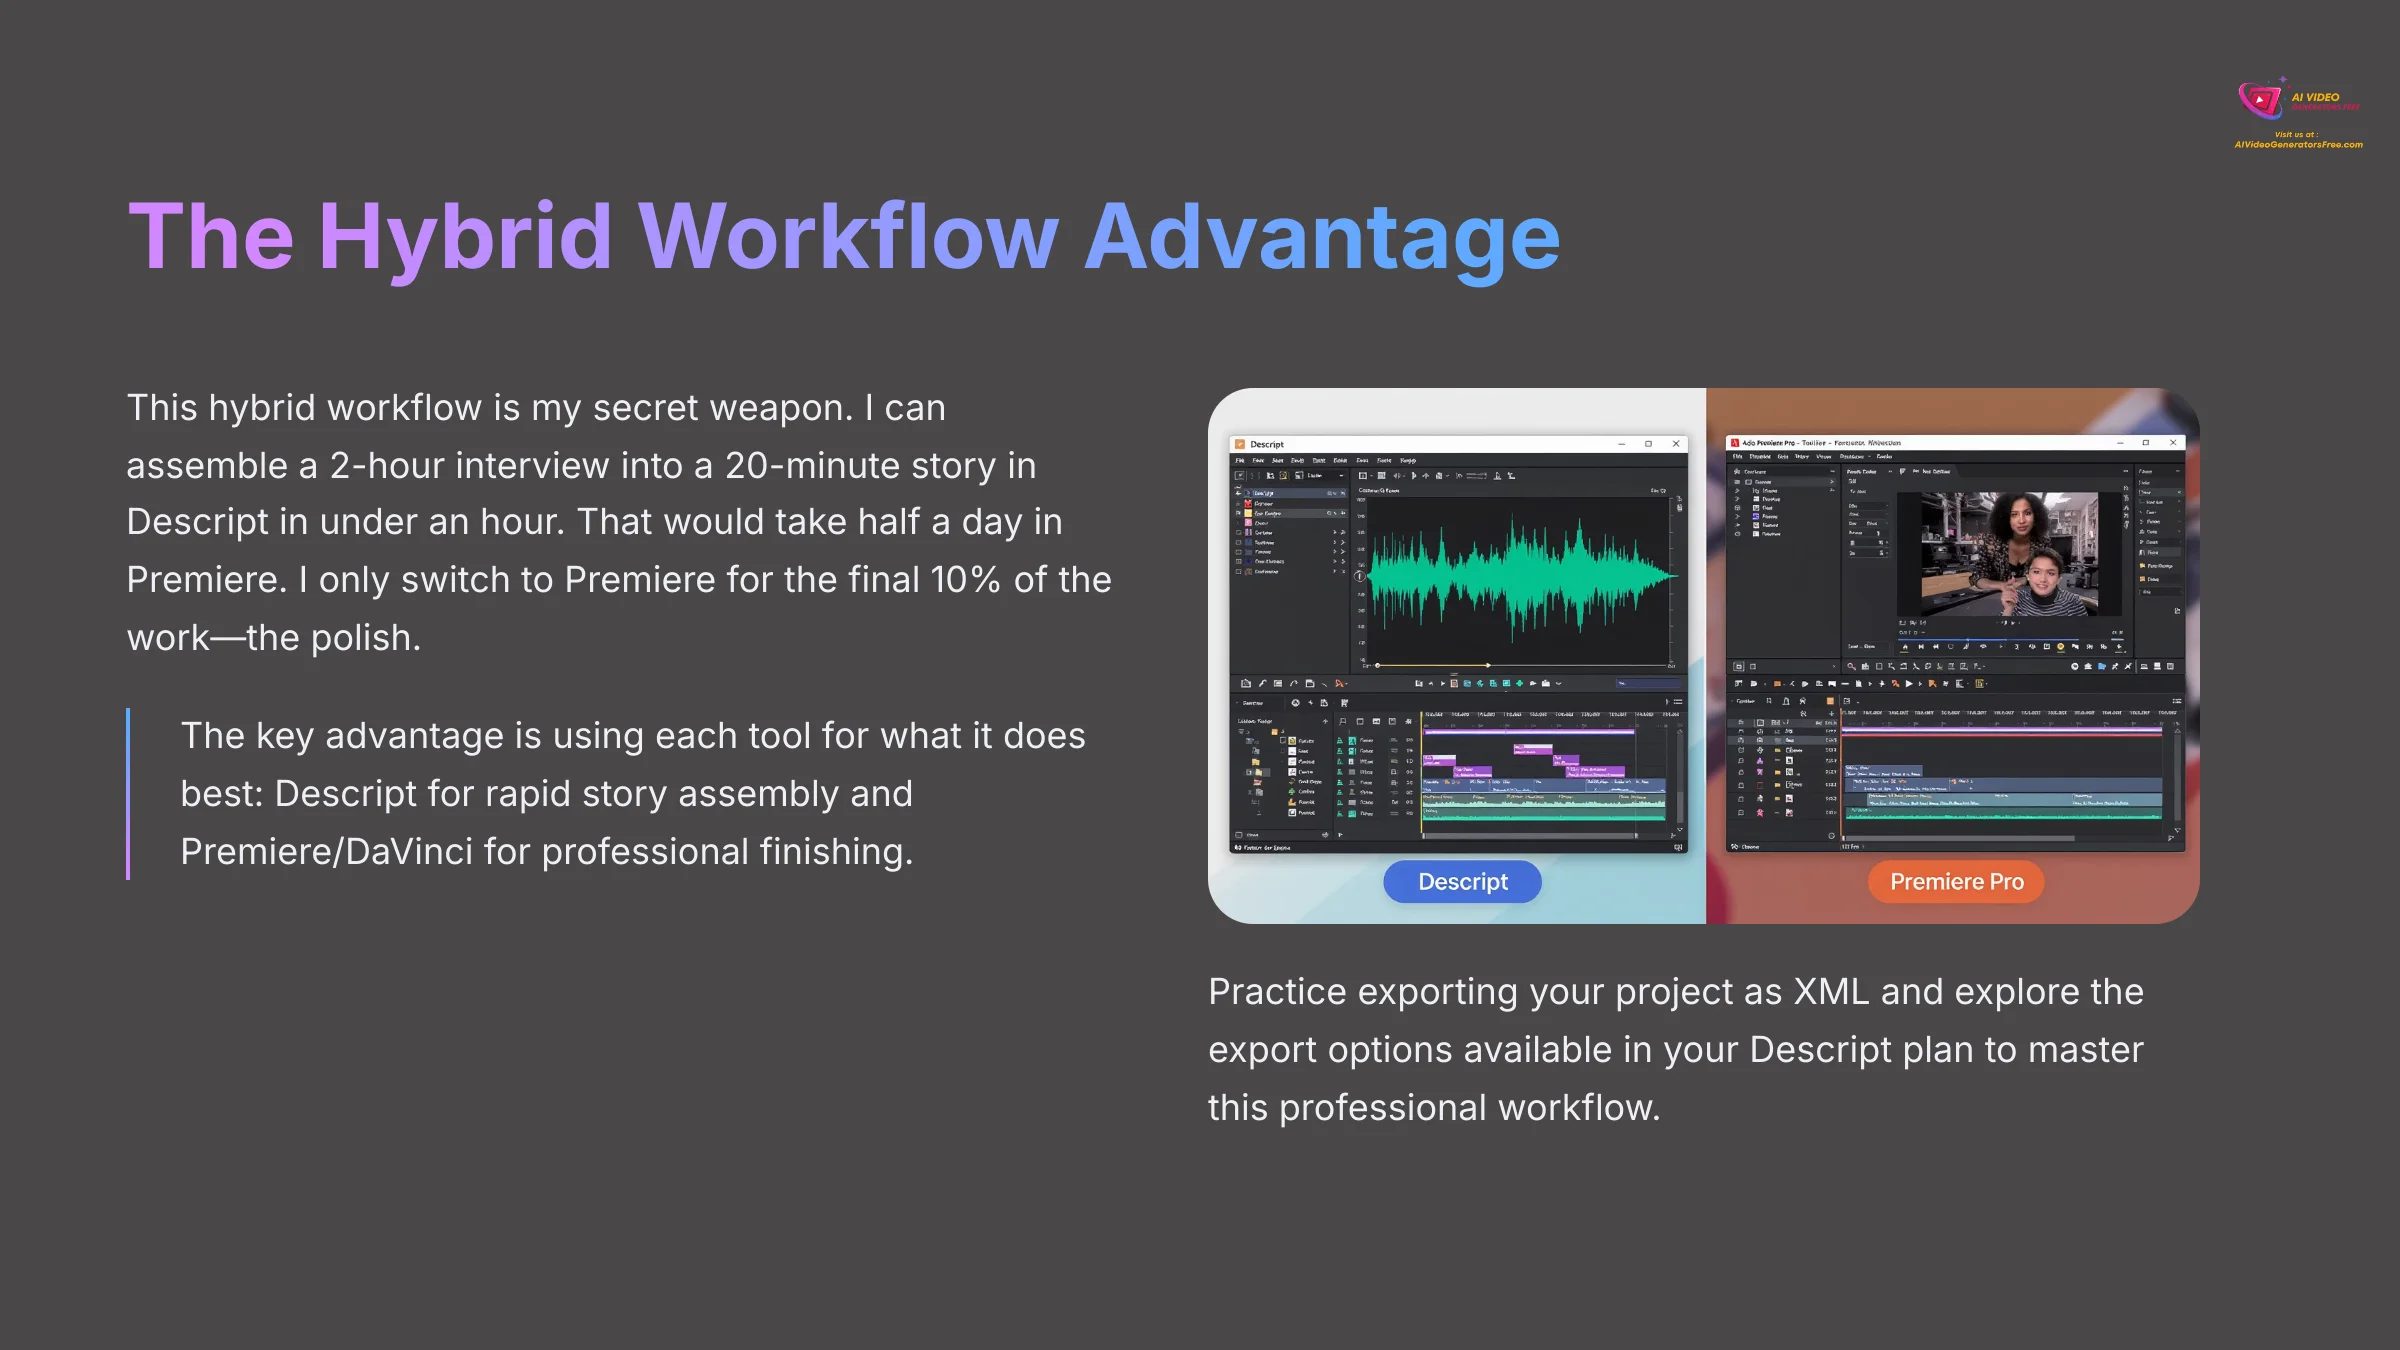
Descript is incredibly fast for editing dialogue and assembling stories, but some projects need advanced tools for color grading or visual effects. I'll show you how to use Descript for a fast rough cut and then move your project to a professional editor like Premiere Pro or DaVinci Resolve.
This hybrid workflow lets you use each tool for its strengths:
- Step 1 (The Assembly Edit in Descript): Perform your entire story and dialogue edit in Descript. This is called the “assembly” or “paper edit.” Use text-based editing to quickly structure your narrative, remove bad takes, and arrange soundbites. This is the part that is 10x faster in Descript.
- Step 2 (The XML Export): When the story is locked, go to Publish > Export and choose the Timeline (XML) option. This file format doesn't contain video; it contains the metadata of your edits—the exact in/out points and sequence of your clips.
- Step 3 (Path A – Finishing in Premiere Pro): Import the XML file into Premiere. The software will re-create your Descript timeline but will require you to “relink” the media to your original, high-resolution source files using the Shift+Alt+Drag command. Now you can use Premiere's superior tools for complex color grading, motion graphics, and advanced visual effects.
- Step 3 (Path B – Finishing in DaVinci Resolve): For a color-focused workflow, some professionals prefer to export a final, flattened video file from Descript using a high-quality codec like Apple ProRes 422. This single file can then be imported into DaVinci Resolve for world-class color grading and finishing.
This hybrid workflow is my secret weapon. I can assemble a 2-hour interview into a 20-minute story in Descript in under an hour. That would take half a day in Premiere. I only switch to Premiere for the final 10% of the work—the polish.
Action point: Practice exporting your project as XML and explore the export options available in your Descript plan.
Creating Social Media Clips Effortlessly with “Compositions”
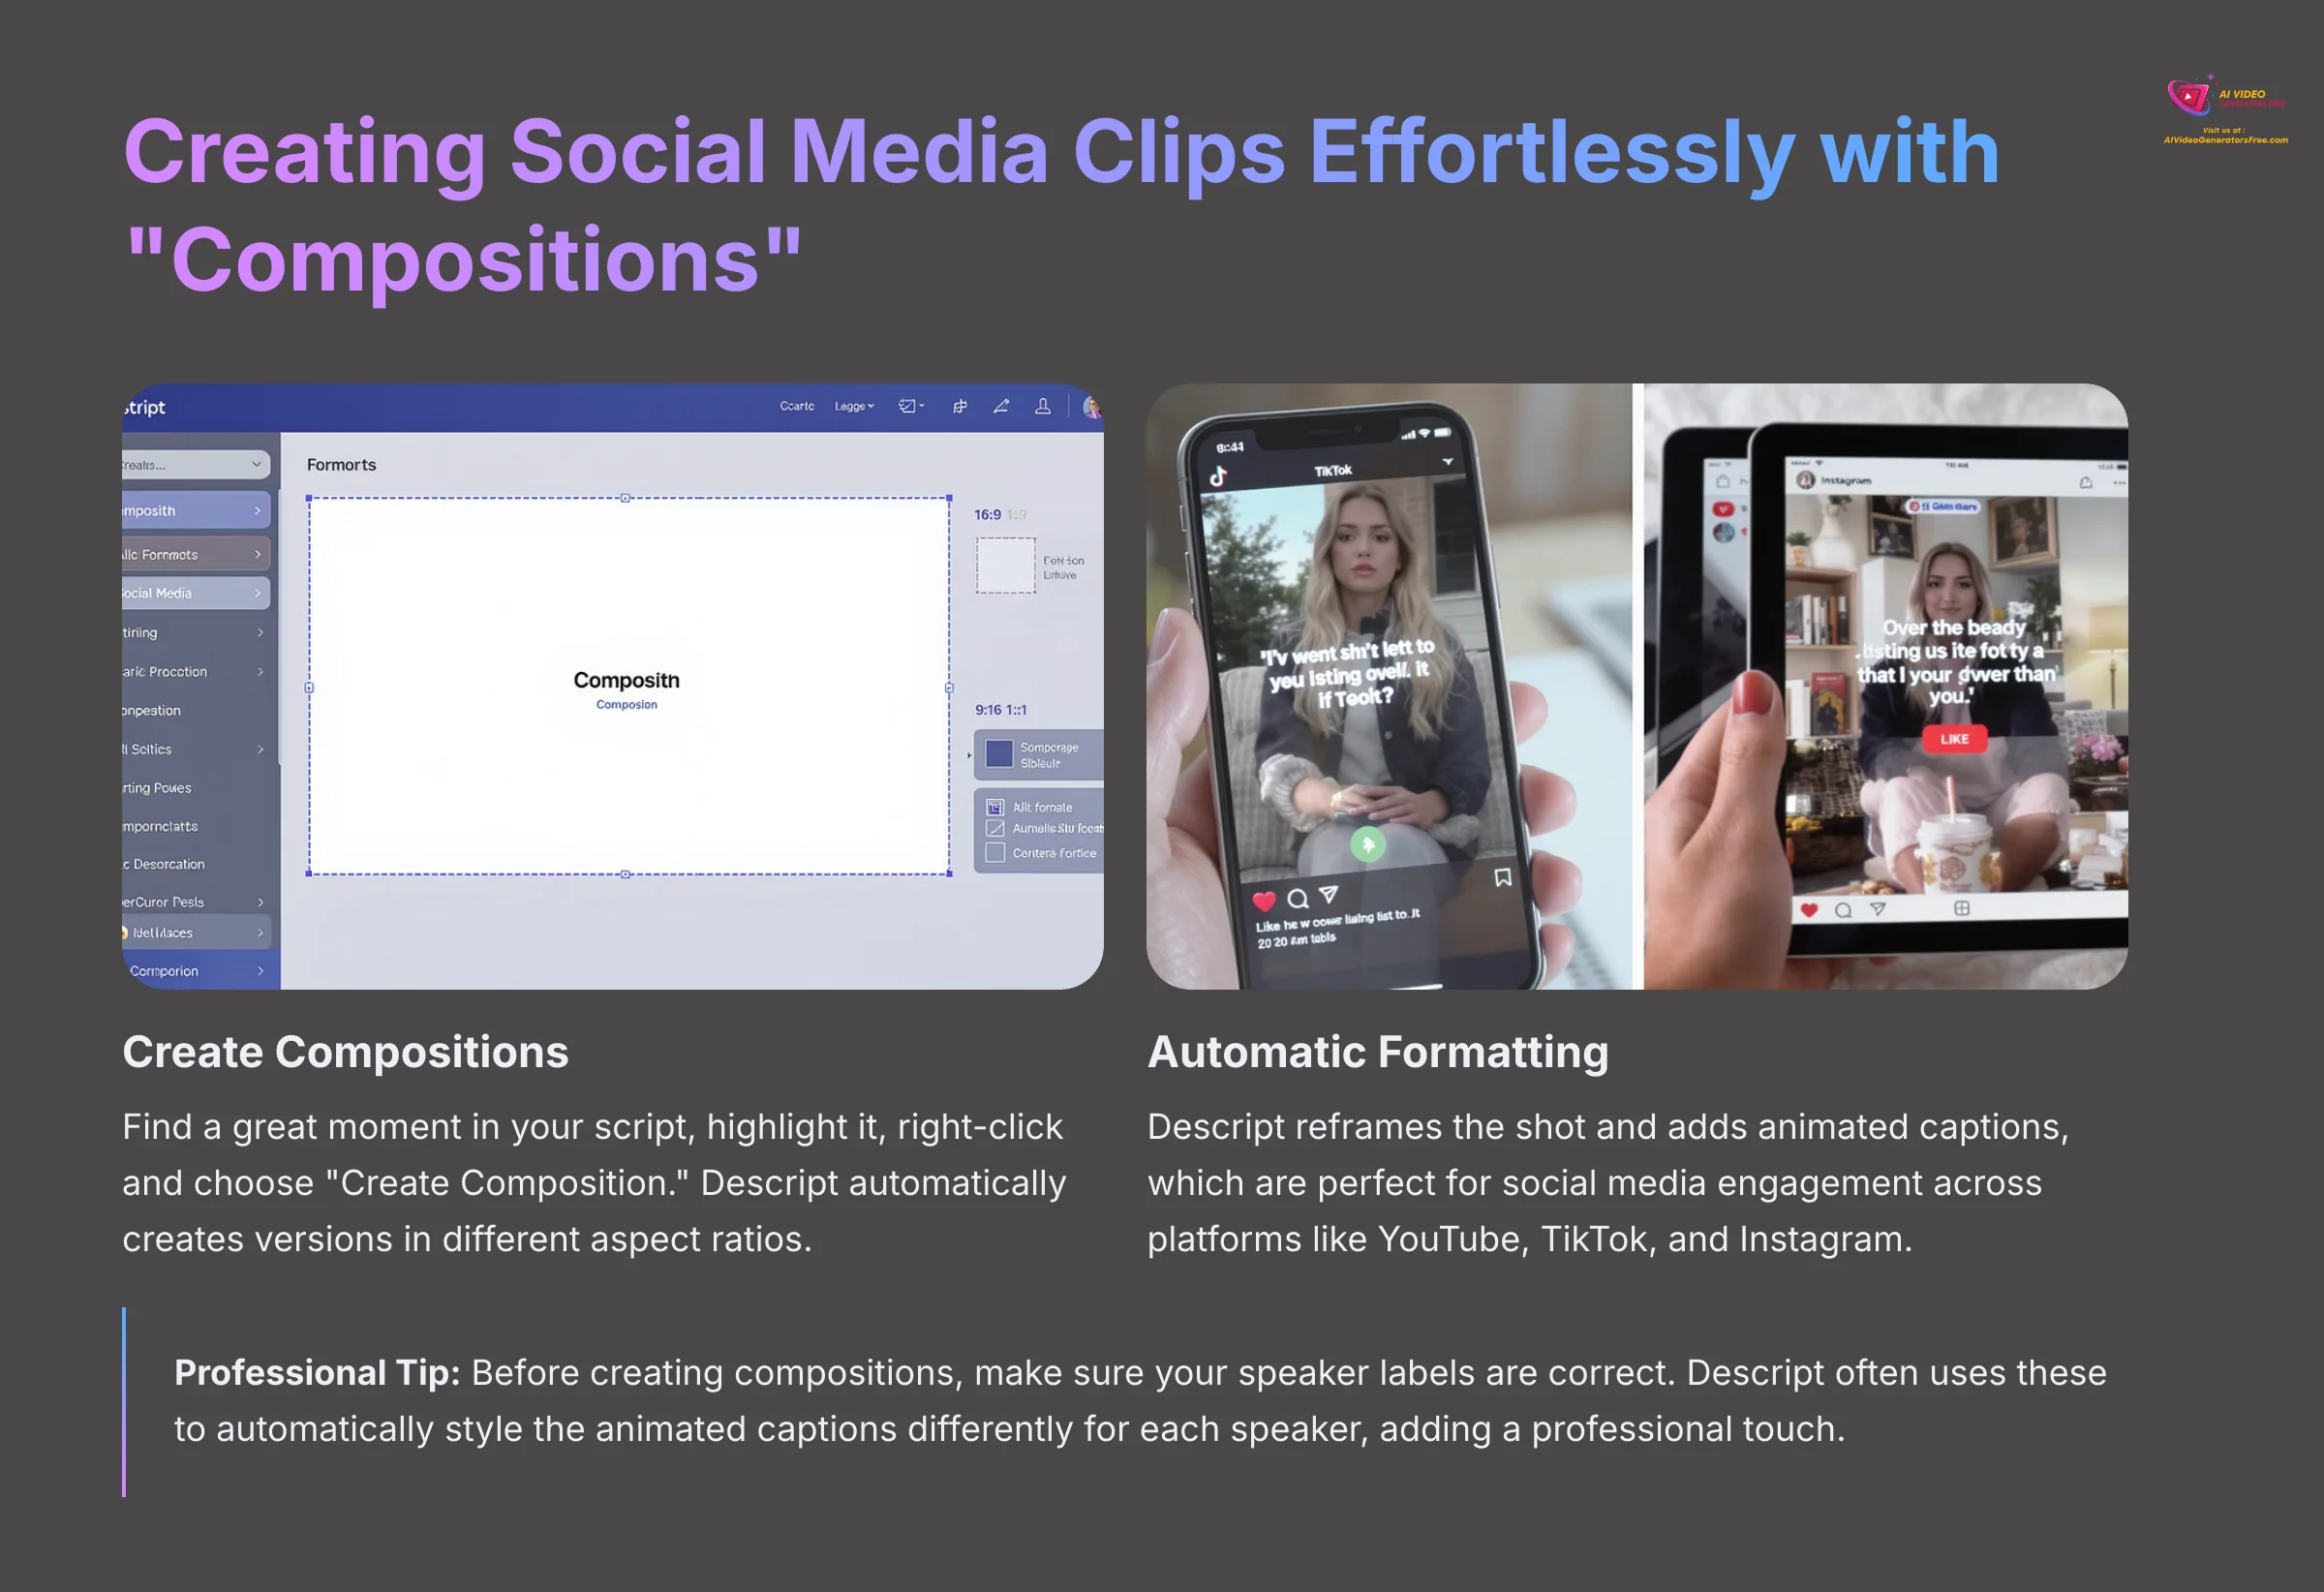
Turning long videos into short, engaging clips for social media is a lot of work. Descript's Compositions feature acts as a content multiplier, helping you repurpose content for social media with automated aspect ratio conversion and animated captions.
Follow these steps to create social media clips:
- Once your project is done, find a great sentence or moment in your script and highlight it.
- Right-click on the highlighted text and choose “Create Composition.”
- Descript automatically creates versions of that clip in different aspect ratios, such as 16:9 for YouTube, 9:16 for TikTok, and 1:1 for Instagram.
- It also automatically reframes the shot and adds animated captions, which are perfect for social media engagement.
Professional Tip: Before creating compositions, make sure your speaker labels are correct. Descript often uses these to automatically style the animated captions differently for each speaker, adding a professional touch.
Action point: Create a composition from your best 30-second segment and explore the different aspect ratio options.
Module 5: Troubleshooting Common Descript Challenges
Even the most advanced AI tools occasionally need fine-tuning. This section addresses the most common issues you'll encounter and provides proven solutions to maintain professional results.
Fixing AI Voice Artifacts and Timeline Sync Issues
Sometimes AI tools create results that need a little fine-tuning. You might notice an AI-generated voice sounds a bit robotic or that some edits feel jarring. Here is my guide to fixing these common issues and making your project sound polished and professional.
Here are some common problems and their solutions:
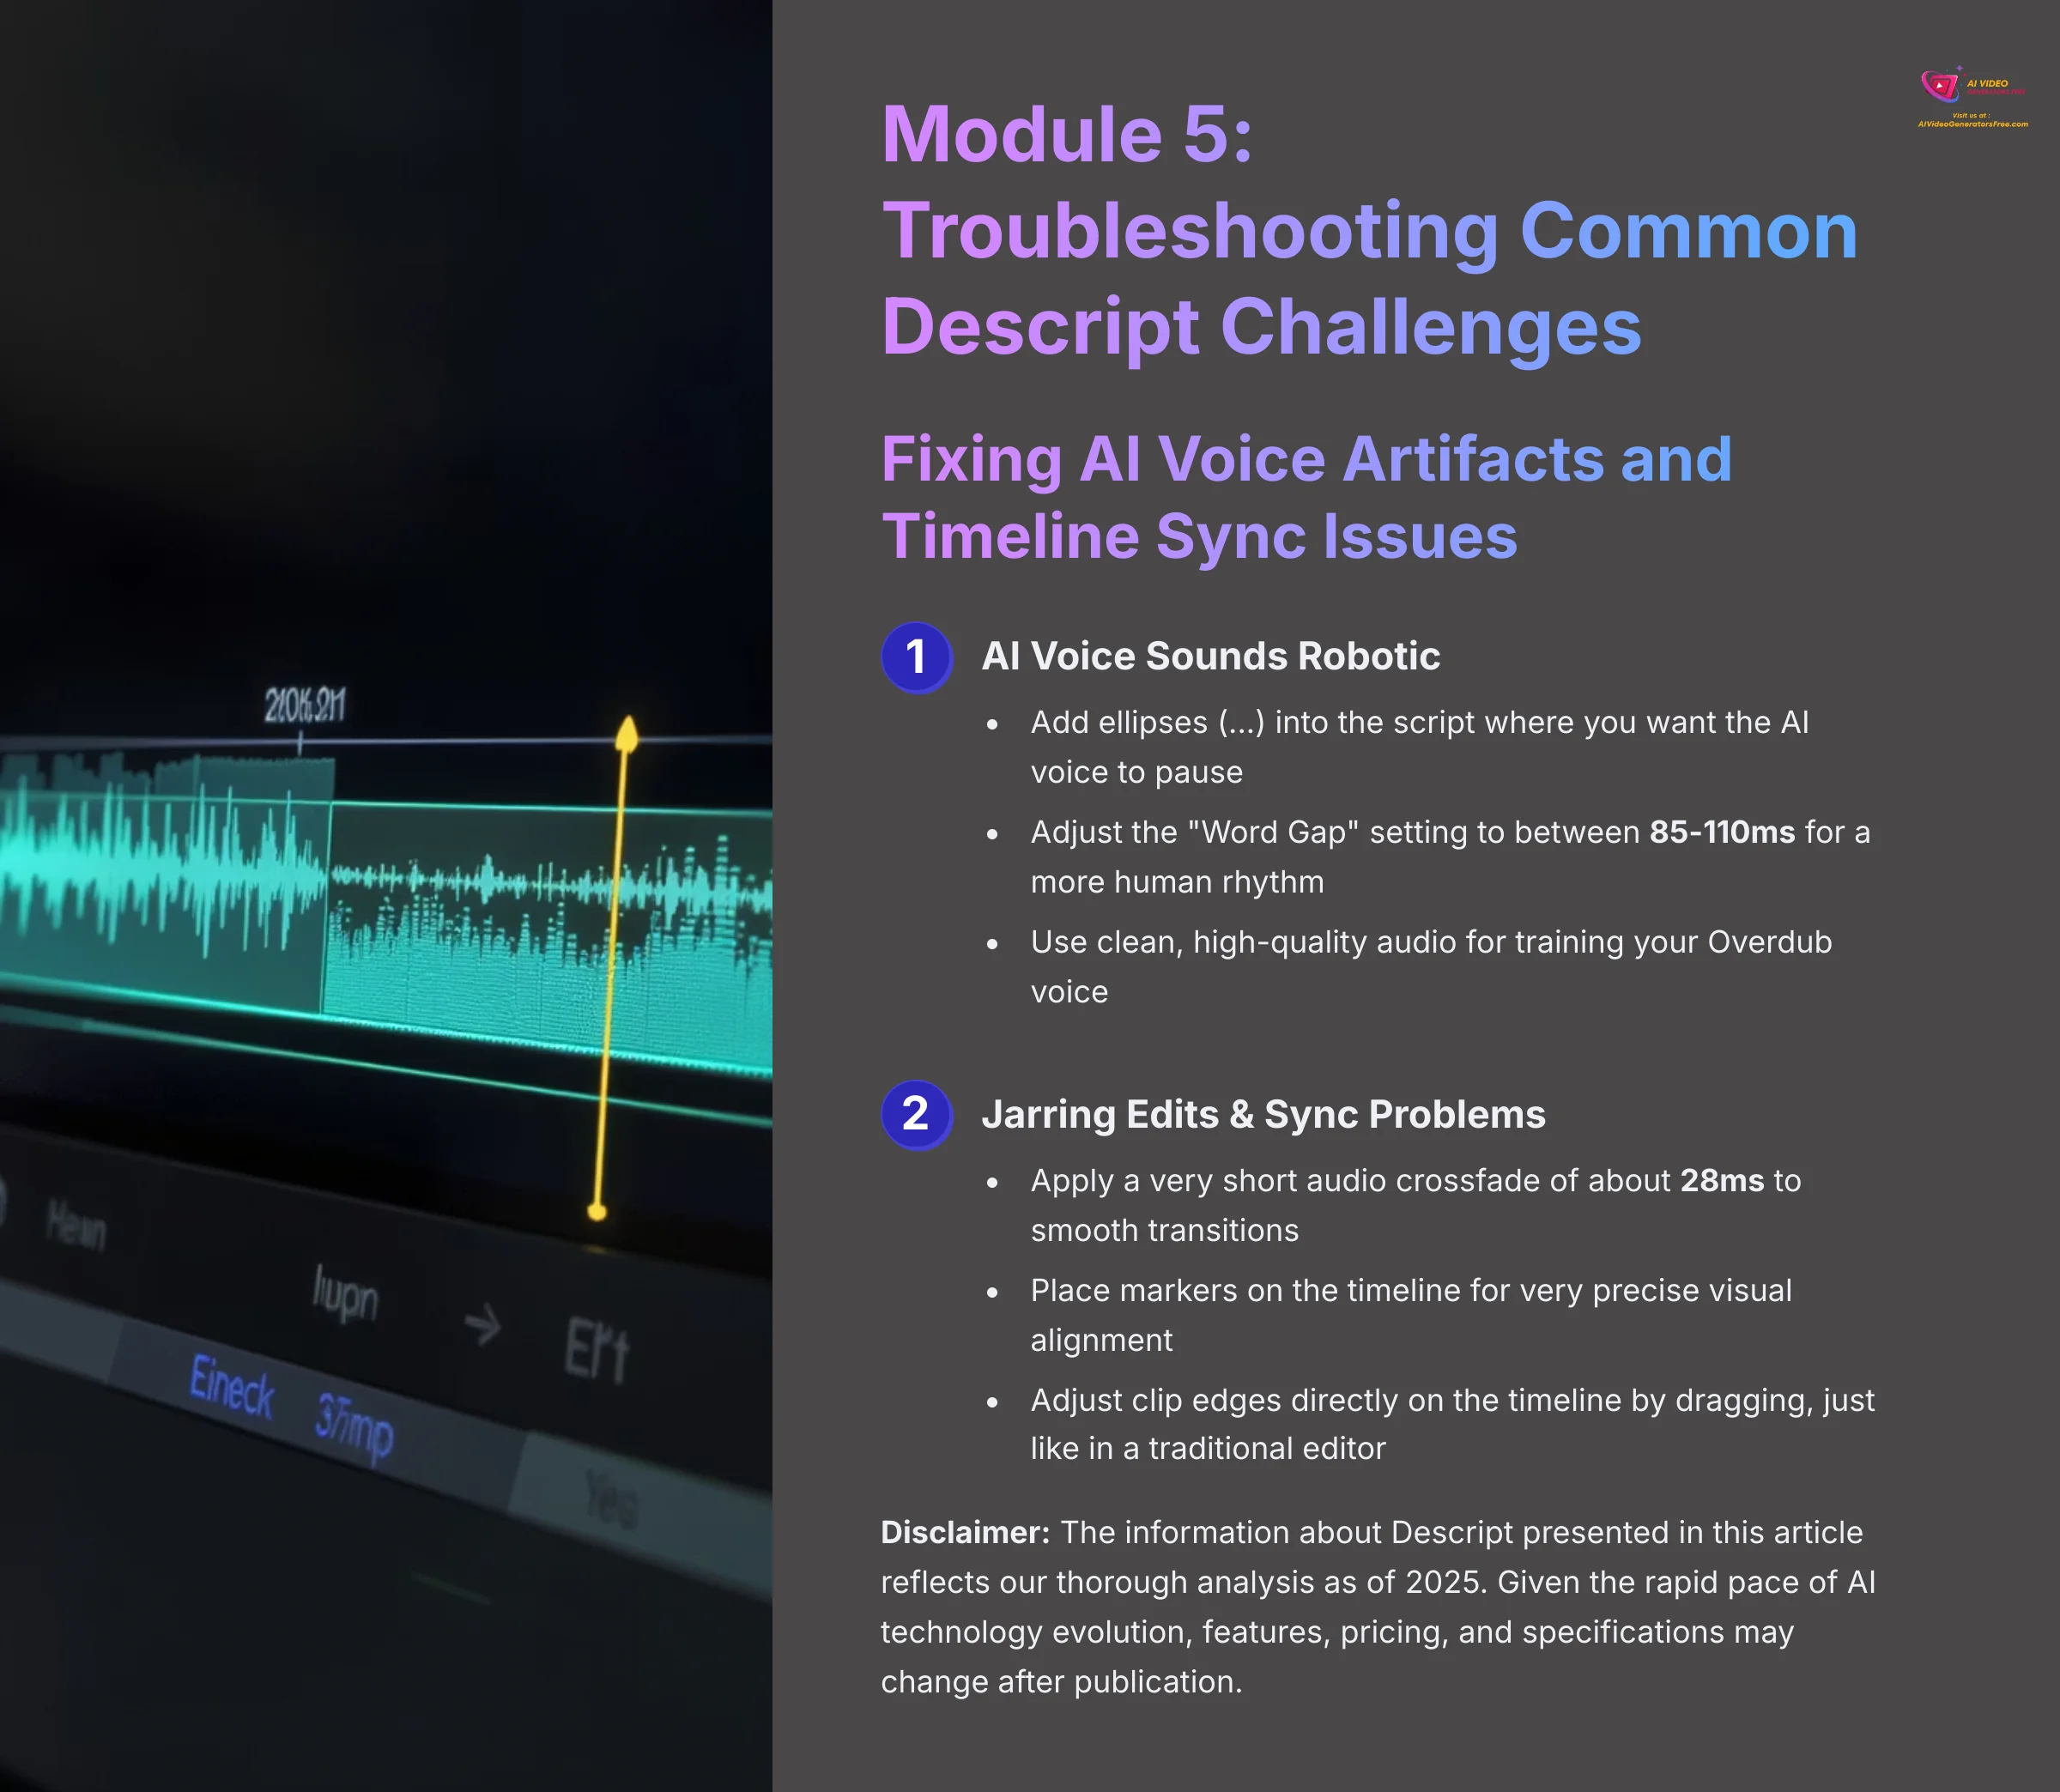
Issue 1: AI Voice Sounds Robotic.
-
Solution 1 (Pacing): You can add ellipses (
...) into the script where you want the AI voice to pause. This creates a natural-sounding break, just like when a human takes a breath. - Solution 2 (Word Gaps): Adjust the “Word Gap” setting to between 85-110ms. This changes the space between words for a more human rhythm.
- Solution 3 (Source Audio Quality): The quality of an AI voice depends on the audio used to train it. Always use clean, high-quality audio for training.
Issue 2: Jarring Edits & Sync Problems.
- Solution 1 (Audio Crossfades): If a cut sounds too abrupt or you hear a slight pop, the fix is a simple audio crossfade. In the timeline view, apply a very short crossfade of about 28ms. This is long enough to smooth the audio transition between clips seamlessly but so short the listener will never consciously notice it.
- Solution 2 (Manual Markers): You can place markers on the timeline for very precise visual alignment. This is great for perfecting lip-sync on edited clips.
Professional Tip: For fine-tuning visual timing, you can adjust the edge of a clip directly on the timeline by dragging it, just like in a traditional editor. This is great for perfecting an edit you first made in the script.
Action point: Practice applying audio crossfades to smooth any jarring cuts in your project.
Disclaimer: The information about Descript presented in this article reflects our thorough analysis as of 2025. Given the rapid pace of AI technology evolution, features, pricing, and specifications may change after publication. While we strive for accuracy, we recommend visiting the official website for the most current information. Our tutorial is designed to provide a comprehensive understanding of the tool's capabilities rather than real-time updates.
Conclusion and Next Steps

You've now learned the complete workflow for editing videos in Descript by editing text. We went from importing a file and correcting the transcript to making cuts, applying AI enhancements like Studio Sound and Overdub, and exporting for professional use. The core value of editing video like a document completely changes how you can approach content creation, enabling non-destructive workflows that are faster and more intuitive than traditional timeline editing.
To continue your journey, I recommend the following learning path:
- Intermediate: Practice a project with multicamera editing inside Descript to handle multiple video sources.
- Advanced: Train a custom Overdub voice using your own voice for seamless corrections and additions.
- Expert: Look into the Descript API to automate the creation of repetitive videos and integrate with your existing workflows.
To take your skills even further, I highly recommend these resources:
- The official Descript Help Center for detailed documentation and feature updates.
- The r/DescriptPro community on Reddit for real-world user discussions and creative solutions.
- The official Descript Certification course to formally validate your new skills and learn advanced techniques.
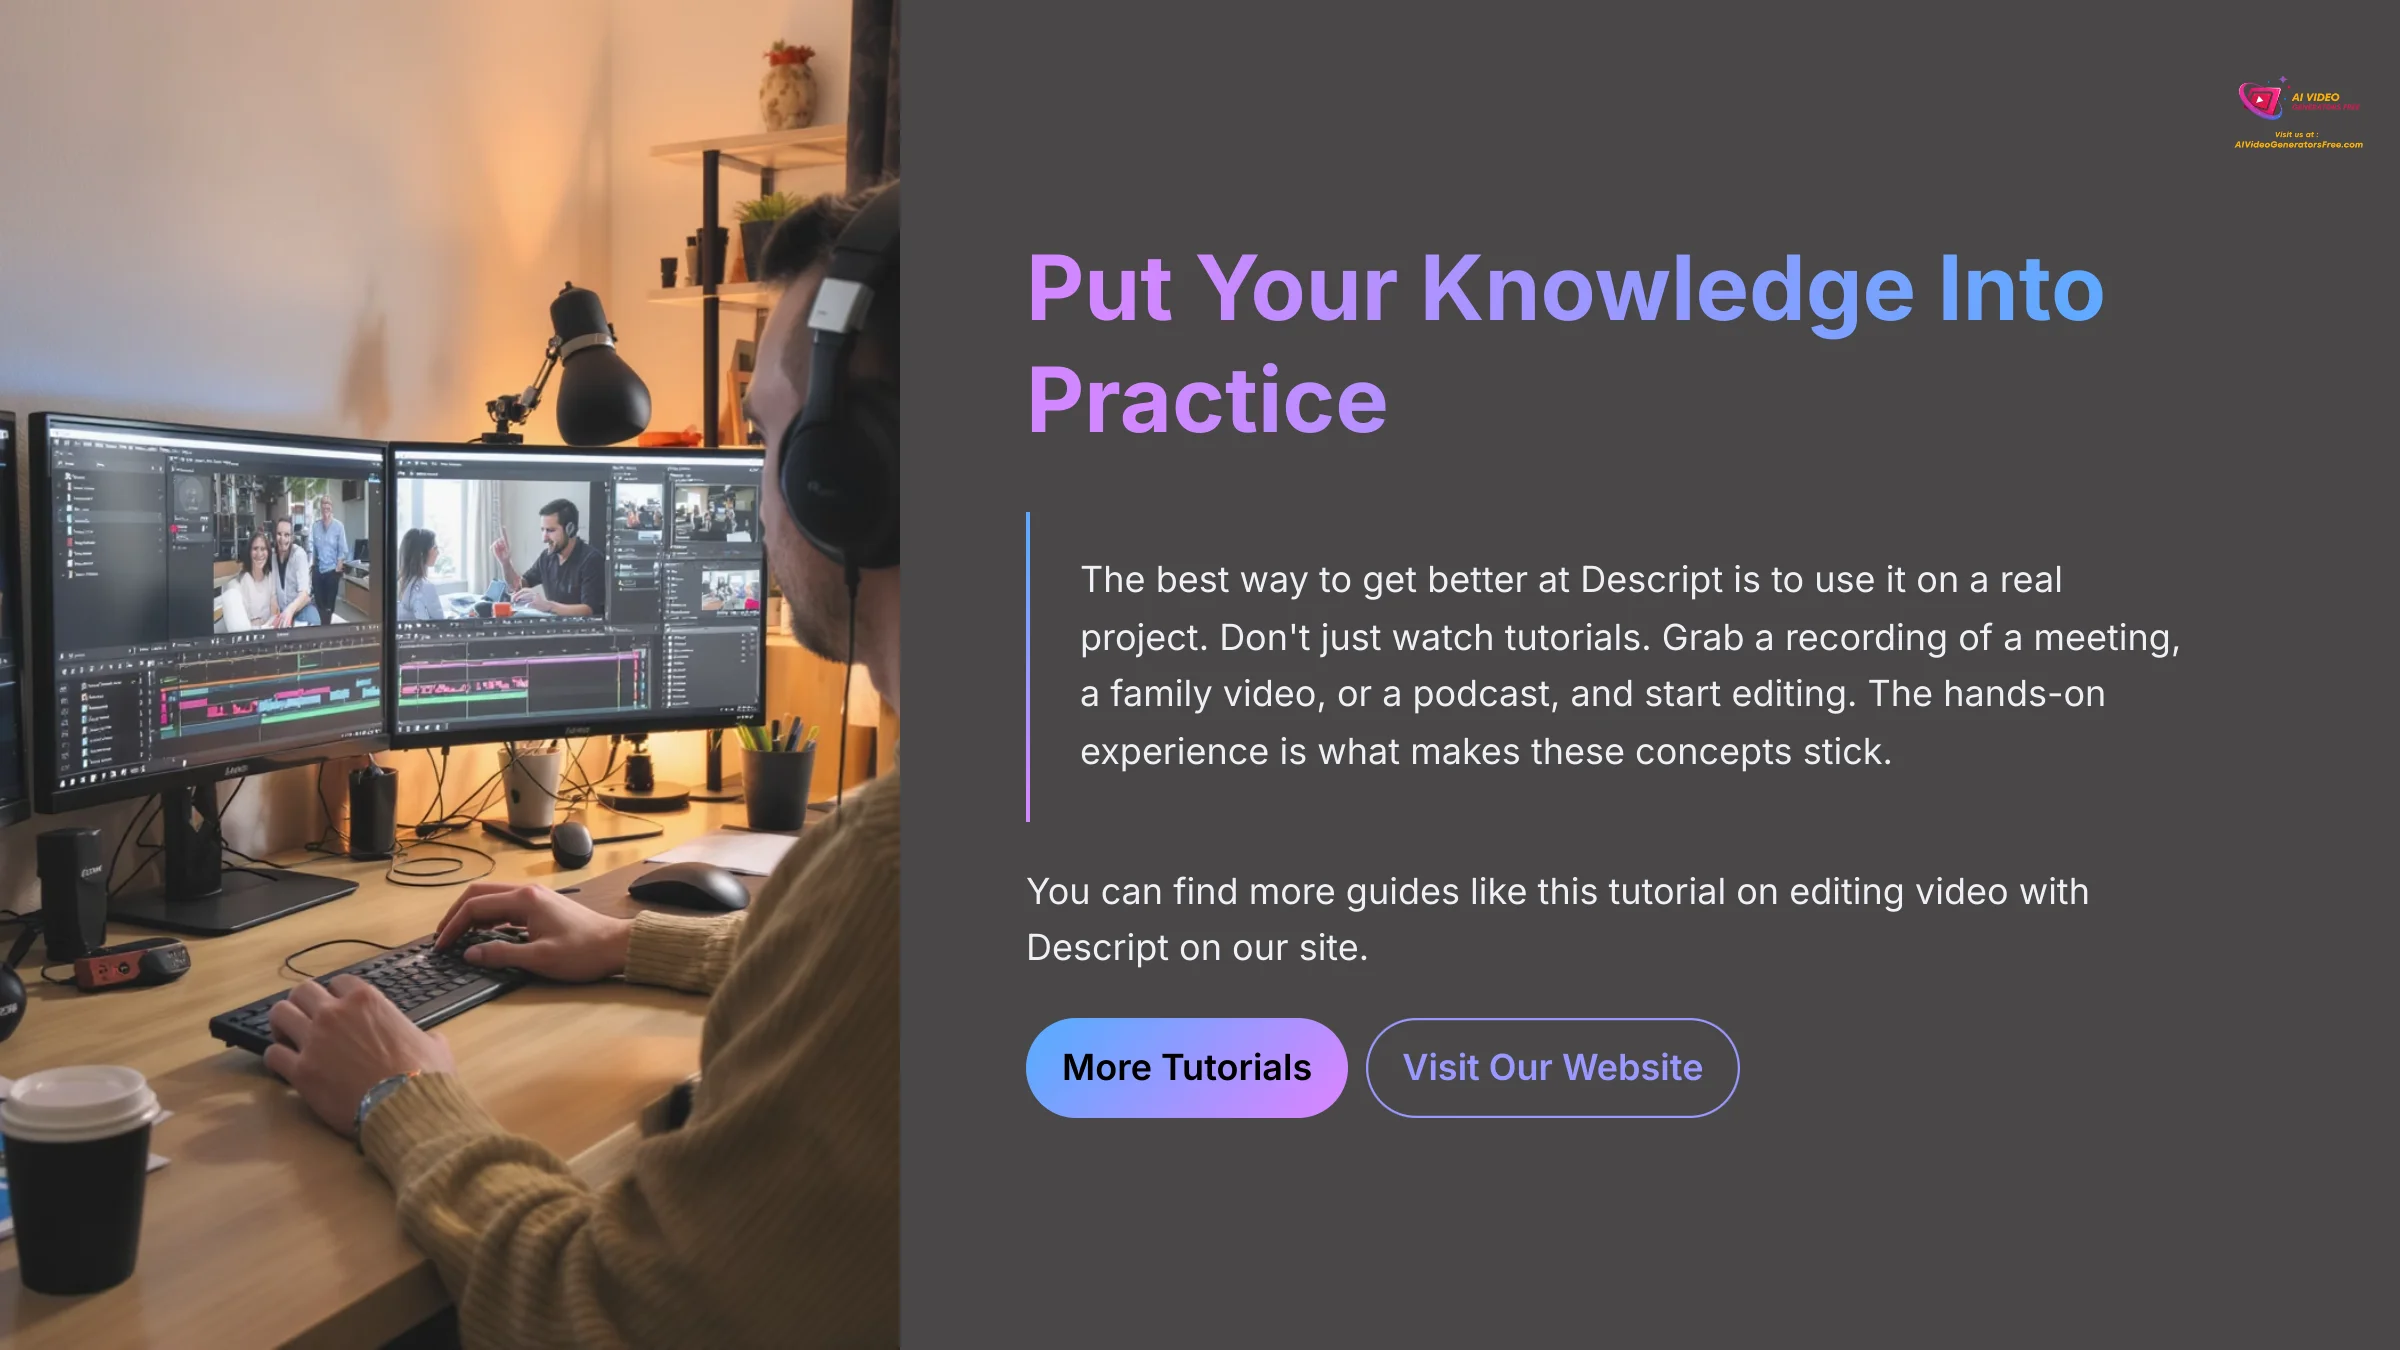
The best way to get better at Descript is to use it on a real project. Don't just watch tutorials. Grab a recording of a meeting, a family video, or a podcast, and start editing. The hands-on experience is what makes these concepts stick. You can find more guides like this tutorial on editing video with Descript on our site.


Leave a Reply